Kdenlive/Manual/Timeline/Editing: Difference between revisions
| Line 29: | Line 29: | ||
There is a toolbar under the timeline that controls various aspects of the editor. | There is a toolbar under the timeline that controls various aspects of the editor. | ||
The first 6 buttons on this toolbar belong to two groups of three buttons. These are the same settings that are controled by Tool Menu. | The first 6 buttons on this toolbar belong to two groups of three buttons. These are the same settings that are controled by the ''Tool Menu''. | ||
Active buttons are light blue with a box around them. | Active buttons are light blue with a box around them. | ||
Revision as of 10:56, 6 August 2012
Editing is done in the Timeline. Add a clip by dragging it from the project tree or the Clip Monitor. Once a clip is dropped on a track, it can be moved (drag and drop it) at another place on the track or on another track.
Seeking through your project
The timeline cursor shows your current position in the project. It can be moved by clicking / dragging in the Timeline ruler or in an empty area of the timeline. Other ways to move the timeline cursor are:
- The keyboard right / left arrows
- Rotating the mouse wheel while the pointer is over the timeline ruler or over the project monitor
- Editing the timecode in the project monitor timecode widget
- Clicking the up or down arrows on the project monitor timecode widget
- Draging the position carat in the project monitor
Cutting a clip
To cut a clip, the easiest way is to place the timeline cursor where you want to cut the clip, then select the clip (left click in it) and use the menu (default shortcut: Ctrl+R).
Resizing a clip
A clip can be resized from start or from end by dragging its left or right edge. If you want a more precise resize, you can place the timeline cursor wherever you want the resize to end, and use the menu (default shortcut: 1) or (default shortcut: 2)
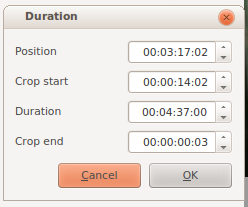
To even more precisely control the length of a clip double click it in the time line and adjust its duration using the Clip duration dialog. You can have frame level acuracy with this method.
You can also resize a clip by cutting it with the Razor tool and then deleting the bit you do not want.
Bottom Tool Bar
There is a toolbar under the timeline that controls various aspects of the editor. The first 6 buttons on this toolbar belong to two groups of three buttons. These are the same settings that are controled by the Tool Menu.
Active buttons are light blue with a box around them.

Edit Mode Group (one of these can be active)
1. Normal Mode
2. Overwrite Mode
3. Insert Mode
Tool Group (one of these 3 can be active)
4. Selection Tool
5. Razor Tool
6. Spacer Tool
Zoom Tools
7. Fit Zoom to Project
8. Zoom project including (L to R) zoom out, zoom level and zoom in
Ungrouped (These toggle on and off independantly)
9. Split Audio and Video Automatically
10. Show Video Thumbnails
11. Show Audio Thumbnails
12. Show marker comments
13. Snap
Normal Mode
Overwrite Mode
Insert Mode
Selection Tool
Use this to select clips in the timeline. The cursor becomes a hand when this tool is active.
Razor Tool
Use this to cut clips in the timeline. The cursor becomes a pair of sissors when this tool is active.
Spacer Tool
Use this tool to temporaily group seperate clips and then drag them around the time line to create or remove space between clips. Very useful. Experiment with this tool to see how it works.
Fit Zoom to Project
This will zoom the project out so that it all fits in the timeline window.
Zoom project
The magnifying glasses zoom in or out on the timeline. The slider adjusts the zoom by large increments.
Split Audio and Video Automatically
Show Video Thumbnails
When on, the video clips in the timeline will contain thumbnails as well a filename. Otherwize they just have the clip filename.
Show Audio Thumbnails
When on, the audio clip will have a wave representation of the audio data as well as a filename. Otherwize they just have the clip filename.


