Archive:Kdenlive/Manual/Monitors/da: Difference between revisions
Updating to match new version of source page |
Updating to match new version of source page |
||
| Line 10: | Line 10: | ||
'''Klipmonitoren''' viser det uredigerede klip, som aktuelt er valgt i projekttræet.. | '''Klipmonitoren''' viser det uredigerede klip, som aktuelt er valgt i projekttræet.. | ||
[[File:Clip monitor2.png]] | [[File:Clip monitor2.png]] | ||
==== Widgets on the Clip Monitor ==== | |||
<span class="mw-translate-fuzzy"> | <span class="mw-translate-fuzzy"> | ||
| Line 26: | Line 28: | ||
==== Creating Zones in Clip Monitor ==== | ==== Creating Zones in Clip Monitor ==== | ||
Zones are defined regions of clips that are indictated by green in the clip monitors time line - see item 3 above. The begining of a zone is set by clicking [ (item 1 in the pic above). The end of a zone is set by clicking ] (item 2 in the pic above) | Zones are defined regions of clips that are indictated by green in the clip monitors time line - see item 3 above. The begining of a zone is set by clicking [ (item 1 in the pic above). The end of a zone is set by clicking ] (item 2 in the pic above) | ||
==== Clip Monitor Right click menu ==== | ==== Clip Monitor Right click menu ==== | ||
The clip monitor has a right click (context menu) as described [[Kdenlive/Manual/Monitors/Clip_Monitor_RightClick|here]] | The clip monitor has a right click (context menu) as described [[Kdenlive/Manual/Monitors/Clip_Monitor_RightClick|here]] | ||
| Line 35: | Line 39: | ||
'''Projektmonitoren''' viser projektets tidslinje – dvs. den redigerede version af din video. | '''Projektmonitoren''' viser projektets tidslinje – dvs. den redigerede version af din video. | ||
[[File:Project monitor.png]] | [[File:Project monitor.png]] | ||
==== Project Monitor Widgets ==== | |||
<span class="mw-translate-fuzzy"> | <span class="mw-translate-fuzzy"> | ||
| Line 45: | Line 51: | ||
====Creating Zones in Project Monitor ==== | ====Creating Zones in Project Monitor ==== | ||
You can use the [ and ] buttons to create a zone in the project monitor in the same way as you do to make zones in the clip monitor. | You can use the [ and ] buttons to create a zone in the project monitor in the same way as you do to make zones in the clip monitor. | ||
The zone will be indicated by a green bar in both the time line and underneath the project monitor. | The zone will be indicated by a green bar in both the time line and underneath the project monitor. | ||
| Line 53: | Line 60: | ||
==== Project Monitor Right click menu ==== | ==== Project Monitor Right click menu ==== | ||
The project monitor has a right click (context menu) as described [[Kdenlive/Manual/Monitors/Project_Monitor_RightClick|here]] | The project monitor has a right click (context menu) as described [[Kdenlive/Manual/Monitors/Project_Monitor_RightClick|here]] | ||
Revision as of 21:32, 13 August 2012
Monitors
Kdenlive bruger 2 monitorer til at fremvise dine videoer: Klipmonitor og Projektmonitor. En tredje monitor, Optagemonitoren, forhåndsviser videooptagelser.
Klipmonitoren
Klipmonitoren viser det uredigerede klip, som aktuelt er valgt i projekttræet..

Widgets on the Clip Monitor
1) er Sæt zone start-knappen – klik på den for at sætte et zonestartpunkt.
2) er Sæt zone slut-knappen – klik på den for at sætte et zoneslutpunkt.
3) Grøn valgt zone – valgt ved at sætte zonestart- og -slutpunkter. Hvis klippet trækkes ned på tidslinjen mens der er en grøn valgt zone, så bliver den valgte zone kopieret til tidslinjen.
4) Positionsmarkøren – kan trækkes i klippet.
5) Tidskode-kontrollen – skriv en tidskode her og tastEnter for at gå til en præcis position i klippet.
6) Tidskode-pile – kan bruges til at ændre klippets aktuelle position i klipmonitoren.
Creating Zones in Clip Monitor
Zones are defined regions of clips that are indictated by green in the clip monitors time line - see item 3 above. The begining of a zone is set by clicking [ (item 1 in the pic above). The end of a zone is set by clicking ] (item 2 in the pic above)
The clip monitor has a right click (context menu) as described here
Projektmonitoren
Projektmonitoren viser projektets tidslinje – dvs. den redigerede version af din video.

Project Monitor Widgets
1) er positionsmarkøren, som viser den aktuelle position i projektet i forhold til hele projektet. Du kan klikke og trække denne for at flytte positionen i projektet.
2) er tidskodekontrollen. Du kan skrive en tidskode i denne og taste Enter for at bringe projektmonitoren til en præcis position.
3) er tidskodekontrollens kontrolpile. Du kan flytte projektmonitoren en frame ad gangen med disse.
Creating Zones in Project Monitor
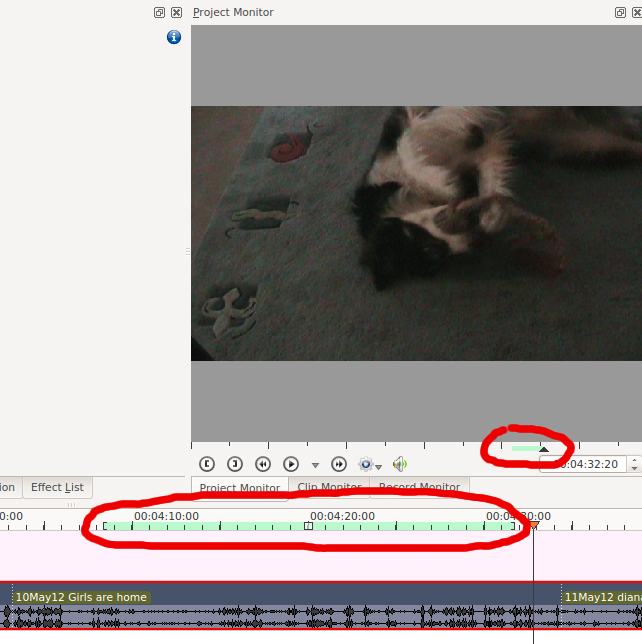
You can use the [ and ] buttons to create a zone in the project monitor in the same way as you do to make zones in the clip monitor. The zone will be indicated by a green bar in both the time line and underneath the project monitor.
You can get Kdenlive to only render the selected zone - see Rendering Using the Selected Zone Option
The project monitor has a right click (context menu) as described here
Optagemonitor
Der er også en Optagemonitor, som kan bruges til at forhåndsvise optagelse fra Firewire, Blackmagic kort" eller gennem FFmpeg / video4linux

