Krita/Tutorial 6: Difference between revisions
(minor tweeks) |
(minor tweeks) |
||
| Line 62: | Line 62: | ||
** Note: the Speed trick works well on Linux, but on my Windows XP system the Speed setting is actually unstable, which makes this trick unusable. I don't know if this affects all Windows systems or just me, but if you encounter this problem, please confirm it at this [https://bugs.kde.org/show_bug.cgi?id=309619 bug report]. | ** Note: the Speed trick works well on Linux, but on my Windows XP system the Speed setting is actually unstable, which makes this trick unusable. I don't know if this affects all Windows systems or just me, but if you encounter this problem, please confirm it at this [https://bugs.kde.org/show_bug.cgi?id=309619 bug report]. | ||
[[image:Krita-tutorial6-I.2-2.png|thumb|center| | [[image:Krita-tutorial6-I.2-2.png|thumb|center|500px]] | ||
* Set Curves opacity to 0: This is the simplest way to turn off the Curve lines. That said, leaving them on will get you more "expressive" lines. | * Set Curves opacity to 0: This is the simplest way to turn off the Curve lines. That said, leaving them on will get you more "expressive" lines. | ||
| Line 84: | Line 84: | ||
The curve lines will fill out the area they cover completely, resulting in a line with variable widths. Anyway, here are some comparisons: | The curve lines will fill out the area they cover completely, resulting in a line with variable widths. Anyway, here are some comparisons: | ||
[[image:Krita-tutorial6-I.2-3.png|thumb|center| | [[image:Krita-tutorial6-I.2-3.png|thumb|center|500px]] | ||
And here are examples of what you can do with this brush: | And here are examples of what you can do with this brush: | ||
[[image:Krita-tutorial6-I.2-4.png|thumb|center| | [[image:Krita-tutorial6-I.2-4.png|thumb|center|400px]] | ||
== Particle brush == | == Particle brush == | ||
| Line 101: | Line 101: | ||
* Opacity weight: the opacity of the lines. | * Opacity weight: the opacity of the lines. | ||
[[image:Krita-tutorial6-II-1.png|thumb|center| | [[image:Krita-tutorial6-II-1.png|thumb|center|500px]] | ||
* dx scale / dy scale: The displacement of the lines.</translate> | * dx scale / dy scale: The displacement of the lines.</translate> | ||
| Line 113: | Line 113: | ||
** Warning: renderings with negative values (whether small or large negative values) are very slow and can cause your system to freeze. Avoid negative values and you'll be fine. | ** Warning: renderings with negative values (whether small or large negative values) are very slow and can cause your system to freeze. Avoid negative values and you'll be fine. | ||
[[image:Krita-tutorial6-II-2.png|thumb|center| | [[image:Krita-tutorial6-II-2.png|thumb|center|500px]] | ||
* Iterations: This actually affects the "spread" between lines. The Lower the value, the bigger the distance between lines, whereas at high values, the line will end up compact. | * Iterations: This actually affects the "spread" between lines. The Lower the value, the bigger the distance between lines, whereas at high values, the line will end up compact. | ||
| Line 121: | Line 121: | ||
** Vary this value between 0.900 and 1.000. When the value is too low, it'd be like having a very high Drag value. | ** Vary this value between 0.900 and 1.000. When the value is too low, it'd be like having a very high Drag value. | ||
[[image:Krita-tutorial6-II-3.png|thumb|center| | [[image:Krita-tutorial6-II-3.png|thumb|center|500px]] | ||
* Airbrush mode: the various lines stop "catching up" to the mouse once you release the mouse. If you want them to continue, however, until they reach the mouse, you can turn on the Airbrush mode. In this mode, while the mouse is held down, the curves will continue to be drawn. | * Airbrush mode: the various lines stop "catching up" to the mouse once you release the mouse. If you want them to continue, however, until they reach the mouse, you can turn on the Airbrush mode. In this mode, while the mouse is held down, the curves will continue to be drawn. | ||
[[image:Krita-tutorial6-II-4.png|thumb|center| | [[image:Krita-tutorial6-II-4.png|thumb|center|500px]] | ||
== Dyna brush == | == Dyna brush == | ||
| Line 141: | Line 141: | ||
So which settings affect which modes? | So which settings affect which modes? | ||
[[image:Krita-tutorial6-III.1.png|thumb|center| | [[image:Krita-tutorial6-III.1.png|thumb|center|500px]] | ||
(these were tested with a mouse, so I don't know how tablet pressure affects them) | (these were tested with a mouse, so I don't know how tablet pressure affects them) | ||
| Line 169: | Line 169: | ||
** The circles vary in size and spacing: faster mouse movements give bigger circles with larger spacing. | ** The circles vary in size and spacing: faster mouse movements give bigger circles with larger spacing. | ||
[[image:Krita-tutorial6-III.2-1.png|thumb|center| | [[image:Krita-tutorial6-III.2-1.png|thumb|center|500px]] | ||
==== Lines ==== | ==== Lines ==== | ||
| Line 183: | Line 183: | ||
* Paint connection line: there won't actually be an extra line, but a line near the center may look thicker. | * Paint connection line: there won't actually be an extra line, but a line near the center may look thicker. | ||
[[image:Krita-tutorial6-III.2-2.png|thumb|center| | [[image:Krita-tutorial6-III.2-2.png|thumb|center|500px]] | ||
==== Polygon and Wire ==== | ==== Polygon and Wire ==== | ||
| Line 207: | Line 207: | ||
* Paint connection line: The connection line is only visible in the wire mode. | * Paint connection line: The connection line is only visible in the wire mode. | ||
[[image:Krita-tutorial6-III.2-3.png|thumb|center| | [[image:Krita-tutorial6-III.2-3.png|thumb|center|500px]] | ||
=== Airbrush mode === | === Airbrush mode === | ||
| Line 213: | Line 213: | ||
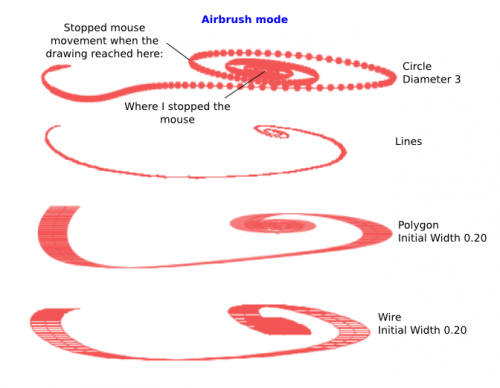
The last setting to describe is the Airbrush mode. Like the Particle brush, Airbrush mode will cause the brush to keep drawing even if you stop your mouse movement. Because of its "dynamic" drawing behavior however, the brush will basically keep drawing in a spiral pattern approaching the mouse. | The last setting to describe is the Airbrush mode. Like the Particle brush, Airbrush mode will cause the brush to keep drawing even if you stop your mouse movement. Because of its "dynamic" drawing behavior however, the brush will basically keep drawing in a spiral pattern approaching the mouse. | ||
[[image:Krita-tutorial6-III.3.png|thumb|center| | [[image:Krita-tutorial6-III.3.png|thumb|center|500px]] | ||
That's it for this tutorial! | That's it for this tutorial! | ||
Revision as of 15:19, 30 January 2013
Tutorial: Curve, Particle and Dyna brushes
All about lines! All three of these brushes produce lines of sorts, so this tutorial tells you the differences! In particular, the Curve brush is my recommended tool for drawing comic and anime lines, unless you're using the more expressive Sketch brush.
Curve brush
At first glance this may seem like a boring tool merely for decoration effects, but in fact, this is perhaps my favourite tool for drawing smooth, variable-width lines with a mouse (comic lines, basically).
Settings
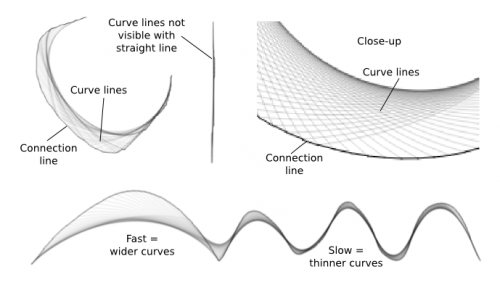
First off, the line produced by the Curve brush is made up of 2 sections:
- The connection line, which is the main line drawn by your mouse
- The... curve lines I think, which are the extra fancy lines that form at curves. The curve lines are formed by connecting one point of the curve to a point earlier on the curve. This also means that if you are drawing a straight line, these lines won't be visible, since they'll overlap with the connection line. Drawing faster gives you wider curves areas.
You have access to 3 settings from the Lines tab, as well as 2 corresponding dynamics:
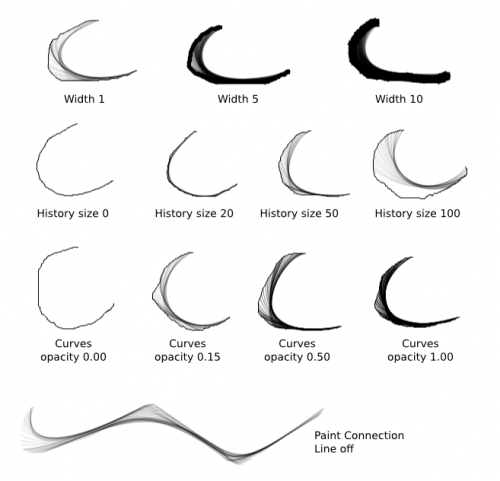
- Line width: this applies to both the connection line and the curve lines.
- Line width dynamics: use this to vary line width dynamically.
- History size: this determines the distance for the formation of curve lines.
- If you set this at low values, then the curve lines can only form over a small distances, so they won't be too visible.
- On the other hand, if you set this value too high, the curve lines will only start forming relatively "late".
- So in fact, you'll get maximum curve lines area with a mid-value of say... 40~60, which is about the default value. Unless you're drawing at really high resolutions.
- Curves opacity: you can't set different line widths for the connection line and the curve lines, but you can set a different opacity for the curve lines. With low opacity, this will produce the illusion of thinner curve lines.
- Curves opacity dynamics: use this to vary Curves opacity dynamically.
In addition, you have access to two checkboxes:
- Paint connection line, which toggles the visibility of the connection line
- Smoothing, which... I have no idea actually. I don't see any differences with or without it. Maybe it's for tablets?
Drawing variable-width lines
And here's the only section of this tutorial that anyone cares about: pretty lineart lines! For this:
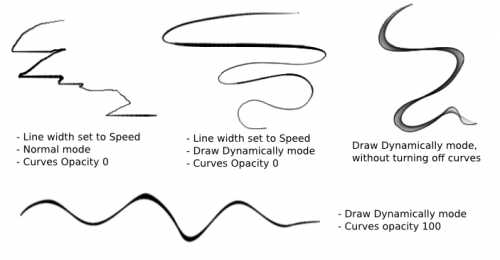
- Use the Draw Dynamically mode: I tend to increase drag to at least 50. Vary Mass and Drag until you get the feel that's most comfortable for you.

- Set line width to a higher value (ex.: 5), then turn line width dynamics on:
- If you're a tablet user, just set this to Pressure (this should be selected by default so just turn on the Line Width dynamics). I can't check myself, but a tablet user confirmed to me that it works well enough with Draw Dynamically.
- If you're a mouse user hoping to to get variable line width, set the Line Width dynamics to Speed.
- Note: the Speed trick works well on Linux, but on my Windows XP system the Speed setting is actually unstable, which makes this trick unusable. I don't know if this affects all Windows systems or just me, but if you encounter this problem, please confirm it at this bug report.

- Set Curves opacity to 0: This is the simplest way to turn off the Curve lines. That said, leaving them on will get you more "expressive" lines.
Additional tips:
- Zig-zag a lot if you want a lot of extra curves lines.
- Use smooth, sweeping motions when you're using Draw Dynamically with Line Width set to speed: abrupt speed transitions will cause abrupt size transitions. It takes a bit of practice, and the thicker the line, the more visible the deformities will be. Also, zoom in to increase control.
- If you need to vary between thin and thick lines, I suggest creating presets of different widths, since you can't vary the base line width from the canvas.
Alternative:
- Use the Draw Dynamically mode
- Set Curves opacity to 100
- Optionally decrease history size to about 30
The curve lines will fill out the area they cover completely, resulting in a line with variable widths. Anyway, here are some comparisons:
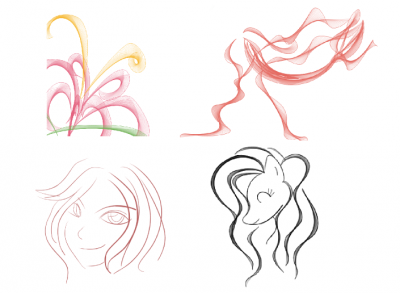
And here are examples of what you can do with this brush:
Particle brush
Like the Curve brush, the Particle brush produces fancy lines. Unfortunately, it lacks the dynamics options of the curve brush, making it less suited to drawing simple lines.
Unlike the Curve brush, the Particle brush produces more or less parallel lines. You can tweak the following settings:
- Particles: the number of lines, in a way. Most of them will be concentrated on one side, forming what looks like a very thick line then thinner ones.
- Opacity weight: the opacity of the lines.
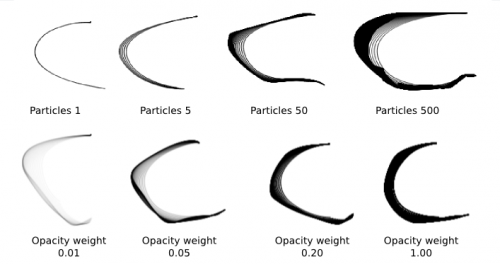
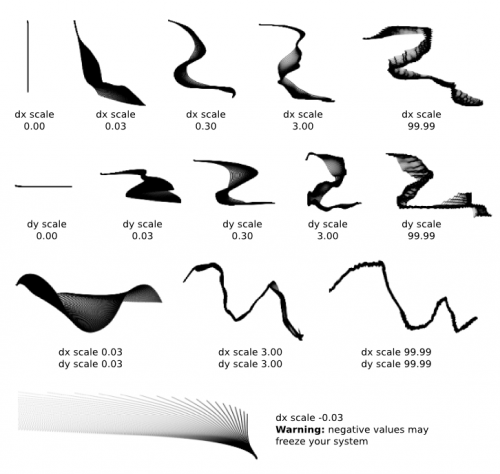
- dx scale / dy scale: The displacement of the lines.
- These values can range from -100.00 to 100.00
- Low values like the default 0.30 create smooth curves
- Higher values up to 100.00 create very "turbulent" lines. I actually rather like the corresponding effect.
- Warning: renderings with negative values (whether small or large negative values) are very slow and can cause your system to freeze. Avoid negative values and you'll be fine.
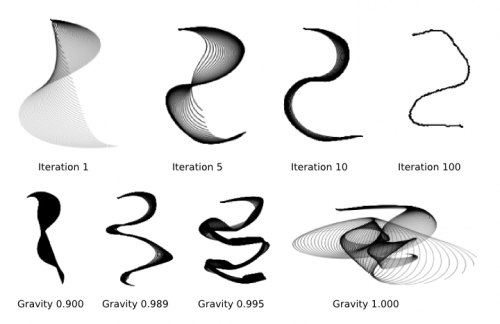
- Iterations: This actually affects the "spread" between lines. The Lower the value, the bigger the distance between lines, whereas at high values, the line will end up compact.
- Gravity: Controls the... well, see the examples. The Higher the value, the less "gravity", i.e. the more messy the lines will be.
- Vary this value between 0.900 and 1.000. When the value is too low, it'd be like having a very high Drag value.
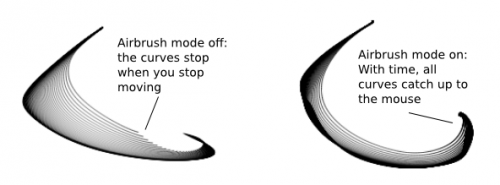
- Airbrush mode: the various lines stop "catching up" to the mouse once you release the mouse. If you want them to continue, however, until they reach the mouse, you can turn on the Airbrush mode. In this mode, while the mouse is held down, the curves will continue to be drawn.
Dyna brush
There are two things confusing with this brush:
- There are 4 modes, and they are not affected by the same values.
- Not all possible value are "safe" values. Mess with them too much and your brush will become so big that you risk freezing your program.
Luckily for you, I've crashed my system enough times to figure out what's what for you!
Settings overview
So which settings affect which modes?
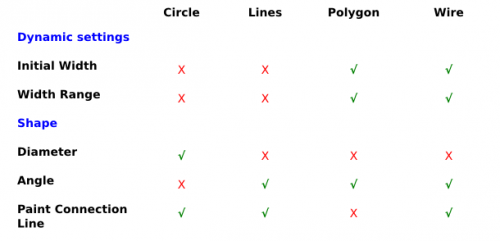
(these were tested with a mouse, so I don't know how tablet pressure affects them)
These aside:
- Mass and Drag: The Dyna brush draw as though you're using the "Draw Dynamically" mode. Mass and Drag are basically the same as with Draw Dynamically, and affect the speed and resistance of the brush. You'll probably want to increase drag to increase control.
- Two: Next to the Circle shape, you have a Two checkbox. I've never managed to figure out what it does, sorry. :\
Now, for a closer look at the drawing modes.
Drawing modes
Circle
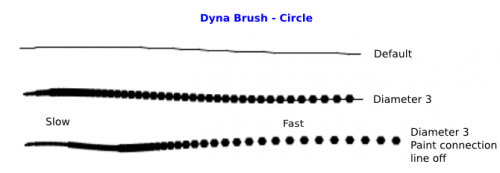
This brush is made of two parts:
- A connection line, which can be made invisible by unchecking Paint Connection Line
- Circles: their maximum diameter are controlled by the Diameter function.
- By default, this value is 0, so only the connection line is drawn.
- To get circles, you need a minimum diameter of 2. You Probably won't need values bigger than 10.
- The circles vary in size and spacing: faster mouse movements give bigger circles with larger spacing.
Lines
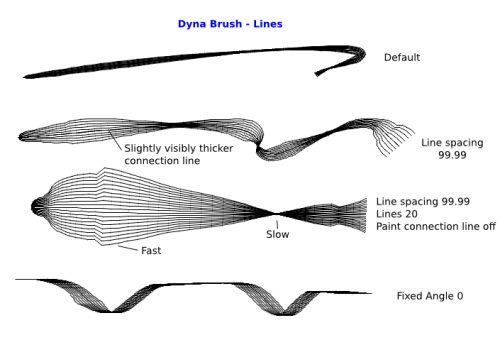
This brush creates a series of parallel-ish lines, and is mostly affected by two settings:
- Line spacing: increasing this increases the maximum distance between lines. This value can range between 0 and 99.99. Drawing slower decreases the line distance, and drawing faster increases it.
- Lines: the number of lines, with a maximum of 99. This mode is quite stable, so you can set both Line spacing and Lines to maximum (you probably don't need to though)
- Angle: by default the brush orients to the drawing direction of the mouse. You can force it to orient it to a fixed angle.
- Paint connection line: there won't actually be an extra line, but a line near the center may look thicker.
Polygon and Wire
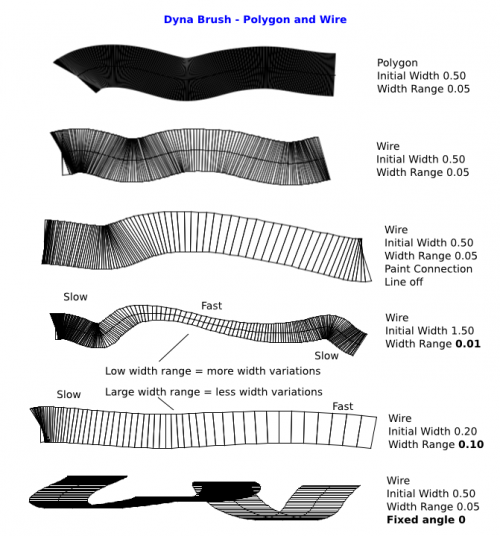
These two brushes are actually complementaries of each other (as far as I can tell anyway), so the size settings affecting them are the same. The faster you draw, the more spread out the grids.
- Initial width: determines the width of the brushes. An intial width of 1.50 corresponds roughly to a diameter of 150 px (with the default Width Range of 0.05), so unless you want a brush that big, you may want to lower this value.
- Width range:
- Warning: This setting actually has a multiplying effect on the initial width: Doubling it from say, the default 0.05 to 0.10 will double the brush size. Since the default initial width gives about 150 pixels, increasing this value will quickly cause your brush to become huge and freeze the drawing process (guess what happened when I tried testing the maximum value of 99.99?).
- In fact, the Lower this value, the more width variations. At 0.10 there's barely any size variations, so just keep this value below 0.10. If you're using the default 1.50 Initial width, you can use a width range value as low as 0.02 or 0.01.
- The faster you draw, the thinner the shape.
- If, for some reason, you want to increase this value, adjust the Initial Width downwards to avoid dealing with an enormous brush.
- If you set both initial width and width range to a negative value, the negatives will cancel out. If only one of them is negative however, it'd be like drawing with an Initial width of 0.
- Angle: by default the brush orients to the drawing direction of the mouse. You can force it to orient to a fixed angle.
- Paint connection line: The connection line is only visible in the wire mode.
Airbrush mode
The last setting to describe is the Airbrush mode. Like the Particle brush, Airbrush mode will cause the brush to keep drawing even if you stop your mouse movement. Because of its "dynamic" drawing behavior however, the brush will basically keep drawing in a spiral pattern approaching the mouse.
That's it for this tutorial!
