Digikam/Sharpening/uk: Difference between revisions
Created page with "<menuchoice>Радіус</menuchoice> визначає кількість пікселів на кожному з боці від краю, на які вплине ефект..." |
Created page with "<menuchoice>Потужність</menuchoice> визначає потужність ефекту збільшення різкості." |
||
| Line 9: | Line 9: | ||
<menuchoice>Радіус</menuchoice> визначає кількість пікселів на кожному з боці від краю, на які вплине ефект збільшення різкості. Для фотографій з високою роздільною здатністю слід вибирати більші значення цього параметра. | <menuchoice>Радіус</menuchoice> визначає кількість пікселів на кожному з боці від краю, на які вплине ефект збільшення різкості. Для фотографій з високою роздільною здатністю слід вибирати більші значення цього параметра. | ||
<menuchoice> | <menuchoice>Потужність</menuchoice> визначає потужність ефекту збільшення різкості. | ||
<menuchoice>Threshold</menuchoice> specifies the minimum difference in pixels that indicates an edge where sharpen must be applied. This lets you protect areas of smooth tonal transition from sharpening, and avoid creating blemishes in face, sky or water surfaces. [1] | <menuchoice>Threshold</menuchoice> specifies the minimum difference in pixels that indicates an edge where sharpen must be applied. This lets you protect areas of smooth tonal transition from sharpening, and avoid creating blemishes in face, sky or water surfaces. [1] | ||
Revision as of 18:03, 11 May 2013
Збільшення різкості у digiKam
Створено на основі допису у блозі Дмітрія Попова (Dmitri Popov), 8 травня 2013 року
У інструменті збільшення різкості digiKam передбачено три способи збільшення різкості: просте збільшення різкості, маска зменшення різкості та зміна фокусу. У кожного зі способів є свої переваги і недоліки. У методі простого збільшення різкості використовується стандартна алгоритм матриці згортання для покращення подробиць на зображенні. Якщо вас цікавлять подробиці, скористайтеся документації з GIMP, де наведено короткий опис алгоритму. Фактично, інструмент простого збільшення різкості у digiKam портовано з проекту GIMP. Основною перевагою способу простого збільшення різкості є його простота. Інструмент простого збільшення різкості у digiKam регулюється лише одним параметром з назвою . Цей параметр визначає потужність застосованого ефекту збільшення різкості. Недоліком цього способу є те, що його використання може призвести до проблем з шумністю зображення: його використання призводить до додаткового зашумлення фотографій, створених з низькими параметрами ISO.
— популярний спосіб збільшення різкості зображень, у якому застосовується збільшення різкості на краях елементів зображення без збільшення шумності зображення. Маска зменшення різкості створює дещо розмиту версію зображення, яка потім віднімається від початкового зображення з метою виявлення шумів. Після цього остаточна маска використовується для збільшення контрастності вздовж виявлених країв з метою отримання різкішого зображення. У інструменті маски зменшення різкості digiKam передбачено три параметри роботи:
визначає кількість пікселів на кожному з боці від краю, на які вплине ефект збільшення різкості. Для фотографій з високою роздільною здатністю слід вибирати більші значення цього параметра.
визначає потужність ефекту збільшення різкості.
specifies the minimum difference in pixels that indicates an edge where sharpen must be applied. This lets you protect areas of smooth tonal transition from sharpening, and avoid creating blemishes in face, sky or water surfaces. [1]
When using the unsharp mask tool, you should keep in mind that it can introduce subtle color shifts and halo artifacts visible as dark or light outlines near edges.

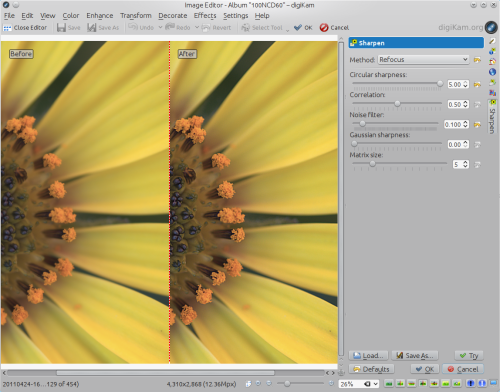
Finally, the method is based on the Refocus plugin for GIMP which uses a technique called FIR Wiener filtering to sharpen the image (see http://en.wikipedia.org/wiki/Wiener_filter). Similar to the original plugin, the Refocus tool in digiKam offers several adjustable parameters:
is a key parameter which determines the radius of the circular convolution. Basically, it specifies the strength of the refocusing action.
helps to reduce artifacts. Increasing the correlation value reduces the sharpening effect. Useful values are 0.5 and values close to 1 (e.g., 0.95 and 0.99).
may help to reduce artifacts. Similar to the Correlation parameter, increasing the noise filter value reduces the sharpening effect. A useful value is 0.01.
is used to specify the radius of the Gaussian convolution for correcting Gaussian blur. In most cases, it should be set to 0, as it introduces artifacts. When using non-zero values with Gaussian sharpness, you might need to increase the Correlation and Noise filter parameters, too.
determines the size of the transformation matrix. Increasing this parameter may give better results, especially when large values are chosen for the Circular sharpness or Gaussian sharpness parameters. In most cases, you should select a value in the range 3-10. [2]
is the most powerful and effective sharpening tool in digiKam’s arsenal, as it not only offers a superior sharpening method and granular controls, but can also handle noise.
[1] Source: http://docs.gimp.org/en/plug-in-unsharp-mask.html
[2] Source: http://refocus.sourceforge.net/
