Archive:Kdenlive/Manual/Capturing/da: Difference between revisions
Updating to match new version of source page |
Updating to match new version of source page |
||
| Line 6: | Line 6: | ||
Du konfigurerer videooptagelse i <menuchoice>Indstillinger -> Indstil Kdenlive -> Optagelse</menuchoice> (mere om det [[Special:myLanguage/Kdenlive/Manual/Settings_Menu/Configure_Kdenlive#Capture|her]]). | Du konfigurerer videooptagelse i <menuchoice>Indstillinger -> Indstil Kdenlive -> Optagelse</menuchoice> (mere om det [[Special:myLanguage/Kdenlive/Manual/Settings_Menu/Configure_Kdenlive#Capture|her]]). | ||
<span class="mw-translate-fuzzy"> | |||
Du definerer stedet, hvor dine optagelser skal gemmes i <menuchoice>Indstillinger -> Indstil Kdenlive -> Miljø -> Standardmapper</menuchoice> (mere om det [[Special:myLanguage/Kdenlive/Manual/Settings_Menu/Configure_Kdenlive#Default_Folders|her]]). | Du definerer stedet, hvor dine optagelser skal gemmes i <menuchoice>Indstillinger -> Indstil Kdenlive -> Miljø -> Standardmapper</menuchoice> (mere om det [[Special:myLanguage/Kdenlive/Manual/Settings_Menu/Configure_Kdenlive#Default_Folders|her]]). | ||
</span> | |||
For at udføre en optagelse går du til [[Special:myLanguage/Kdenlive/Manual/Monitors#Record_Monitor|Optagemonitoren]] og vælger optageenheden fra drop-ned-listen nederst til højre. | For at udføre en optagelse går du til [[Special:myLanguage/Kdenlive/Manual/Monitors#Record_Monitor|Optagemonitoren]] og vælger optageenheden fra drop-ned-listen nederst til højre. | ||
| Line 22: | Line 24: | ||
* Plug in your device to the firewire card and turn it on to play mode | * Plug in your device to the firewire card and turn it on to play mode | ||
* Click the ''Connect Button'' [[File:Kdenlive Connect firewire button.png]] | * Click the ''Connect Button'' [[File:Kdenlive Connect firewire button.png]] | ||
* Click the Record Button | * Click the Record Button — note it toggles to grey while you are recording | ||
* Click the Record button again to stop capture. Or click the stop button. | * Click the Record button again to stop capture. Or click the stop button. | ||
* Once capturing is finished click the disconnect button [[File:Kdenlive Disconnect capture.png]] | * Once capturing is finished, click the disconnect button [[File:Kdenlive Disconnect capture.png]] | ||
* In the ''Captured Files'' dialog | * In the ''Captured Files'' dialog, click the import button to have the captured files automatically imported into the project tree. | ||
[[File:Kdenlive Captured files dialog.png]] | [[File:Kdenlive Captured files dialog.png]] | ||
'''Note''': If your device does not start playing the source device when you click the record button | '''Note''': If your device does not start playing the source device when you click the record button, you may have to start playback on your device manually and then click record. | ||
=== FFmpeg === | === FFmpeg === | ||
Jeg tror, at dette optager video fra et installeret webcam ved hjælp af Video4Linux2. | Jeg tror, at dette optager video fra et installeret webcam ved hjælp af Video4Linux2. | ||
=== Skærmoptagelse === | === Skærmoptagelse === | ||
| Line 41: | Line 43: | ||
</span> | </span> | ||
In version 0.9.3 the | In version 0.9.3, the screen grab is done by the ''ffmpeg'' functionality instead. For screen capture to work in ver 0.9.3, the version of ''ffmpeg'' installed needs to have been compiled with the <code>--enable-x11grab</code> option. Ubuntu comes with an ''ffmpeg'' version compiled with this option. | ||
To check on your linux distro type | To check on your linux distro, type <code>ffmpeg -version</code> in a terminal and look for <code>--enable-x11grab</code> in the reported configuration info. <ref>There are now two branches of ''ffmpeg'': a ''Libav'' branch and an ffmpeg.org branch. The ''ffmpeg'' version from the latter branch reports the configuration when you run with <code>ffmpeg -version</code>. The ''Libav'' version does not. So this method to check for the <code>--enable-x11grab</code> does not work if you have the ''Libav'' version of ''ffmpe''g.</ref> | ||
If you are capturing screen and using the X246 with audio settings and you get a crash as shown in the screen shot ... | If you are capturing the screen and using the X246 with audio settings and you get a crash as shown in the screen shot ... | ||
[[File:Kdenlive Screen cap with audio crash.png]] | [[File:Kdenlive Screen cap with audio crash.png]] | ||
... then consider creating a profile for audio capture where | ... then consider creating a profile for audio capture where <code>-acodec pcm_s16le</code> is replaced by <code>-acodec libvorbis -b 320k</code>. See [[Special:myLanguage/Kdenlive/Manual/Settings_Menu/Configure_Kdenlive#Capture|Configure Kdnelive]]. | ||
=== Blackmagic === | === Blackmagic === | ||
| Line 58: | Line 60: | ||
<references/> | <references/> | ||
<span class="mw-translate-fuzzy"> | |||
{{Prevnext2 | {{Prevnext2 | ||
| prevpage=Special:MyLanguage/Kdenlive/Manual/Project_Menu/Render/Render_Profile_Parameters | nextpage=Special:MyLanguage/Kdenlive/Manual/Toolbars | | prevpage=Special:MyLanguage/Kdenlive/Manual/Project_Menu/Render/Render_Profile_Parameters | nextpage=Special:MyLanguage/Kdenlive/Manual/Toolbars | ||
| Line 63: | Line 66: | ||
| index=Special:MyLanguage/Kdenlive/Manual | indextext=Indholdsfortegnelse | | index=Special:MyLanguage/Kdenlive/Manual | indextext=Indholdsfortegnelse | ||
}} | }} | ||
</span> | |||
[[Category:Kdenlive/da]] | [[Category:Kdenlive/da]] | ||
Revision as of 06:55, 9 December 2014
Optagelse
Kdenlive giver mulighed for optagelse af video fra eksterne enheder - Firewire, FFmpeg, skærmoptagelse og Blackmagic.
Du konfigurerer videooptagelse i (mere om det her).
Du definerer stedet, hvor dine optagelser skal gemmes i (mere om det her).
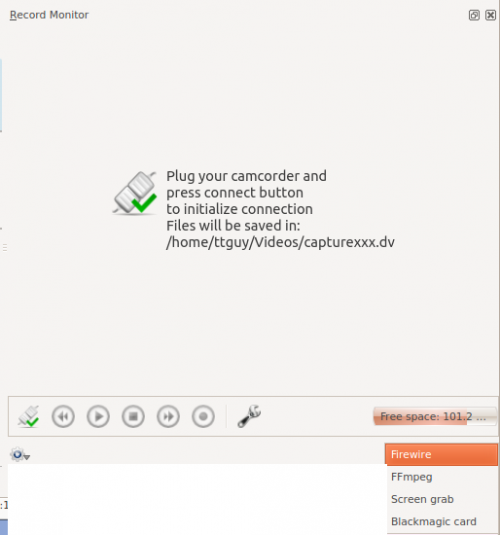
For at udføre en optagelse går du til Optagemonitoren og vælger optageenheden fra drop-ned-listen nederst til højre.
Firewire
Dette optager video fra enheder forbundet via et firewire (også kendt som IEEE 1394 High Speed Serial Bus) kort og kabel.
To perform a capture:
- Plug in your device to the firewire card and turn it on to play mode
- Click the Connect Button

- Click the Record Button — note it toggles to grey while you are recording
- Click the Record button again to stop capture. Or click the stop button.
- Once capturing is finished, click the disconnect button

- In the Captured Files dialog, click the import button to have the captured files automatically imported into the project tree.
Note: If your device does not start playing the source device when you click the record button, you may have to start playback on your device manually and then click record.
FFmpeg
Jeg tror, at dette optager video fra et installeret webcam ved hjælp af Video4Linux2.
Skærmoptagelse
Dette optager en video fra computerens skærm ved hjælp af recordMyDesktop. Der er et uløst problem med denne funktion - se fejlrapporten 2643
In version 0.9.3, the screen grab is done by the ffmpeg functionality instead. For screen capture to work in ver 0.9.3, the version of ffmpeg installed needs to have been compiled with the --enable-x11grab option. Ubuntu comes with an ffmpeg version compiled with this option.
To check on your linux distro, type ffmpeg -version in a terminal and look for --enable-x11grab in the reported configuration info. [1]
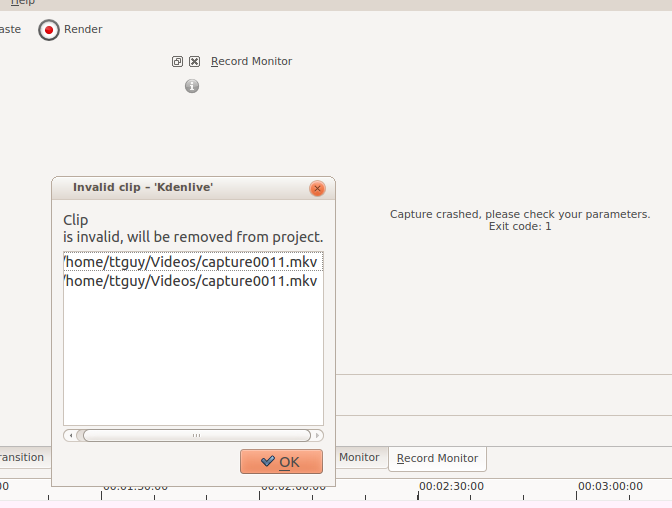
If you are capturing the screen and using the X246 with audio settings and you get a crash as shown in the screen shot ...
... then consider creating a profile for audio capture where -acodec pcm_s16le is replaced by -acodec libvorbis -b 320k. See Configure Kdnelive.
Blackmagic
Dette er til optagelse fra Blackmagics decklink videooptagelseskort (så vidt jeg ved). Jeg er ikke sikker på, hvor stabil denne funktion er i øjeblikket. Se fejlrapporten 2130.
Footnotes
- ↑ There are now two branches of ffmpeg: a Libav branch and an ffmpeg.org branch. The ffmpeg version from the latter branch reports the configuration when you run with
ffmpeg -version. The Libav version does not. So this method to check for the--enable-x11grabdoes not work if you have the Libav version of ffmpeg.


