KMail/Account Wizard/pt-br: Difference between revisions
< KMail
(Created page with "* ' ' 'Fornecer dados pessoais' ' ' é a primeira tela do assistente. Ele irá pedir-lhe por suas informações básicas sobre a conta: <menuchoice> Nome completo</menuchoice>...") |
(Created page with "{{Nota|Se você usa GMail 2-etapas de verificação serão necessárias para gerar uma senha específica do aplicativo dentro de configurações de segurança do GMail e digit...") |
||
| Line 14: | Line 14: | ||
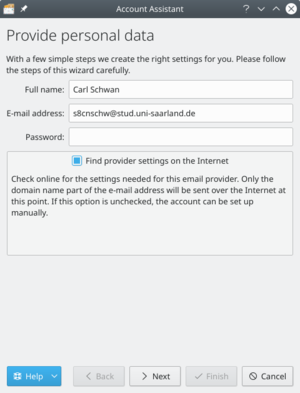
* ' ' 'Fornecer dados pessoais' ' ' é a primeira tela do assistente. Ele irá pedir-lhe por suas informações básicas sobre a conta: <menuchoice> Nome completo</menuchoice>, <menuchoice>E-mail </menuchoice>, e <menuchoice>Senha</ menuchoice>. Por padrão, o <menuchoice> Encontre as configurações do provedor na Internet </ menuchoice> opção fica marcada, assim o assistente tentará recuperar as informações necessárias a partir do servidor. Desmarque essa opção se você for um usuário experiente para definir a configuração avançada. Clique no botão <menuchoice> Próximo</ menuchoice>, quando terminado. | * ' ' 'Fornecer dados pessoais' ' ' é a primeira tela do assistente. Ele irá pedir-lhe por suas informações básicas sobre a conta: <menuchoice> Nome completo</menuchoice>, <menuchoice>E-mail </menuchoice>, e <menuchoice>Senha</ menuchoice>. Por padrão, o <menuchoice> Encontre as configurações do provedor na Internet </ menuchoice> opção fica marcada, assim o assistente tentará recuperar as informações necessárias a partir do servidor. Desmarque essa opção se você for um usuário experiente para definir a configuração avançada. Clique no botão <menuchoice> Próximo</ menuchoice>, quando terminado. | ||
{{ | {{Nota|Se você usa GMail 2-etapas de verificação serão necessárias para gerar uma senha específica do aplicativo dentro de configurações de segurança do GMail e digitar a senha na caixa de texto senha.}} | ||
*'''Select Account Type''' screen will be next if the wizard cannot determine your account type. Select your account type from the list (if you do not know, you will need to contact your email provider). If your account type is not listed, click the <menuchoice>Check for more on Internet</menuchoice> button. Once your account type has been selected, click the <menuchoice>Next</menuchoice> button, and you will be presented with the '''Personal Settings''' screen. | *'''Select Account Type''' screen will be next if the wizard cannot determine your account type. Select your account type from the list (if you do not know, you will need to contact your email provider). If your account type is not listed, click the <menuchoice>Check for more on Internet</menuchoice> button. Once your account type has been selected, click the <menuchoice>Next</menuchoice> button, and you will be presented with the '''Personal Settings''' screen. | ||
Revision as of 16:25, 11 January 2016
Assistente de Conta

A primeira vez que você iniciar KMail você será saudado com o Assistente de Contas.
Nota
se em algum momento precisar iniciar o assistente de contas novamente, você pode procura-lo em
O assistente irá levá-lo através do processo de criação de suas contas de e-mail. Suas telas irão variar dependendo de quanto o assistente pode configurar sozinho. Abaixo está um resumo das telas que podem ocorrer durante a utilização deste assistente.
- ' ' 'Fornecer dados pessoais' ' ' é a primeira tela do assistente. Ele irá pedir-lhe por suas informações básicas sobre a conta: , , e
{{Nota|Se você usa GMail 2-etapas de verificação serão necessárias para gerar uma senha específica do aplicativo dentro de configurações de segurança do GMail e digitar a senha na caixa de texto senha.}}
- '''Select Account Type''' screen will be next if the wizard cannot determine your account type. Select your account type from the list (if you do not know, you will need to contact your email provider). If your account type is not listed, click the <menuchoice>Check for more on Internet button. Once your account type has been selected, click the button, and you will be presented with the Personal Settings screen.
- Provide personal data screen will show again with the server details it found if the wizard was successful at determining the account type. Click the button, and it will set up the account. Click the to complete the wizard and close the window.
- Personal Settings screen will show if you had to enter your account type. Verify that your information is correct on this page. Select if you want your messages available when you do not have an Internet connection (IMAP only). Click the button once finished.
Your account will then be set up, and you can click the button to complete the wizard and close the window.
