Taking Screenshots/uk: Difference between revisions
Appearance
Updating to match new version of source page |
No edit summary |
||
| Line 18: | Line 18: | ||
== Прийоми роботи == | == Прийоми роботи == | ||
У нашому прикладі ми скористаємося [https://www.kde.org/applications/graphics/spectacle/ Spectacle]. Ви можете скористатися будь-якою іншою програмою для створення знімків вікон. | |||
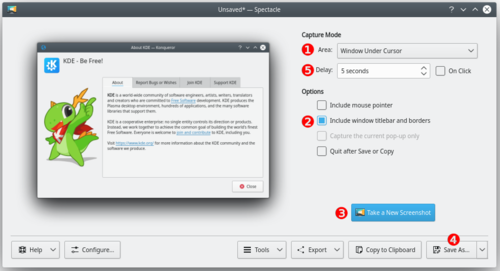
[[Image: | [[Image:Taking_Screenshots.png|thumb|500px|center|Capturing a shot of [https://www.kde.org/applications/graphics/spectacle/ Spectacle] using ''Window under cursor'']] | ||
# | # Start [https://www.kde.org/applications/graphics/spectacle/ Spectacle] | ||
# | # Choose a Capture mode (1) from the following: | ||
#; | #;Current Screen (only visible on a multi-screen environment) | ||
#: | #: Everything on the single screen is captured, usually used for ''desktop screenshots''. | ||
#; | #;Full Screen | ||
#: | #:This works differently, depending on whether you have a single screen or a multi-screen environment. For single screen users it captures everything currently on the screen. Multi-screen users will see it capture all screens into a single window. | ||
#; | #;Window Under Cursor | ||
#: | #: The content of an applications or dialog window is captured. usually used for ''application screenshots''. Preferably, check the '''Include window decorations''' option (2). | ||
#; | #;Region | ||
#: | #: Only a region to be defined later is captured. | ||
# | # Click on <menuchoice>New Snapshot</menuchoice> (3). | ||
#; | #;Full Screen | ||
#; | #;Current Screen | ||
#; | #;Window Under Cursor | ||
#: | #: Click anywhere on the screen to take the snapshot. | ||
#; | #;Region: | ||
#:# | #:# Use the mouse to draw a rectangle around the region to be captured (for example around a window). | ||
#:# | #:# Strike the <keycap>Enter</keycap> key or double click in the region to take the snapshot. | ||
# | # Click on <menuchoice>Save As...</menuchoice> (4). | ||
# | # Browse to the location you want to save the image, give it a name ('''''name.png''''') and click on <menuchoice>Save</menuchoice> | ||
== Підказки і настанови == | == Підказки і настанови == | ||
* | * The <menuchoice>Snapshot delay</menuchoice> option (5) makes [https://www.kde.org/applications/graphics/spectacle/ Spectacle] wait a given amount of time (given in seconds) before taking the snapshot. This can be useful in many situations, for example when taking screenshots of drop-down menus | ||
* | * It's often useful to create a separate user for taking screenshots to ensure a standard look with the default settings. | ||
* | * Use <menuchoice>Type: Color</menuchoice> in the wallpaper settings to get a white background. | ||
== Додаткові дані == | == Додаткові дані == | ||
Revision as of 11:18, 7 January 2017
Вступ
Метою створення знімків вікон програмного забезпечення є ознайомлення зацікавлених користувачів з виглядом і поведінкою програм та тим, чого очікувати від програми після її запуску. Тому знімки вікон мають документувати загальні прийоми використання середовища та програм, доступ до яких користувач може отримати за умови встановлення стандартної конфігурації обладнання.
Настанови
- Перемкніть інтерфейс програми на англійську мову, якщо ви не маєте наміру створити локалізований знімок вікна.
- Зберігайте зображення у форматі PNG.
- Бажано використовувати типові параметри (піктограми, схему кольорів, стиль, обрамлення вікон, параметри програм тощо).
- Скористайтеся композитним режимом показу (модуль «Ефекти стільниці» у вікні Системних параметрів). Втім, знімки можна робити і за використання відеокарток, які не можуть працювати у композитному режимі.
- Намагайтеся використовувати шрифт "Liberation Sans" з розміром символів 9 пт.
- Якщо на знімку буде показано частину стільниці, намагайтеся використовувати типове тло Плазми. Якщо можна, додайте поле (близько 20 пікселів), щоб тіні вікон не виглядали обрізаними.
- Якщо ви створюєте локалізований знімок вікна, зберігайте його з назвою, яка збігається з назвою англійської версії з додаванням коду мови (код української мови — «uk»).
- Якщо знімок вікна є оновленою версією, скористайтеся тією самою назвою, яку було визначено для початкової версії. (Див. оновлення зображення).
Прийоми роботи
У нашому прикладі ми скористаємося Spectacle. Ви можете скористатися будь-якою іншою програмою для створення знімків вікон.

- Start Spectacle
- Choose a Capture mode (1) from the following:
- Current Screen (only visible on a multi-screen environment)
- Everything on the single screen is captured, usually used for desktop screenshots.
- Full Screen
- This works differently, depending on whether you have a single screen or a multi-screen environment. For single screen users it captures everything currently on the screen. Multi-screen users will see it capture all screens into a single window.
- Window Under Cursor
- The content of an applications or dialog window is captured. usually used for application screenshots. Preferably, check the Include window decorations option (2).
- Region
- Only a region to be defined later is captured.
- Click on (3).
- Full Screen
- Current Screen
- Window Under Cursor
- Click anywhere on the screen to take the snapshot.
- Region
-
- Use the mouse to draw a rectangle around the region to be captured (for example around a window).
- Strike the Enter key or double click in the region to take the snapshot.
- Click on (4).
- Browse to the location you want to save the image, give it a name (name.png) and click on
Підказки і настанови
- The option (5) makes Spectacle wait a given amount of time (given in seconds) before taking the snapshot. This can be useful in many situations, for example when taking screenshots of drop-down menus
- It's often useful to create a separate user for taking screenshots to ensure a standard look with the default settings.
- Use in the wallpaper settings to get a white background.
