Digikam/Calendars/da: Difference between revisions
Updating to match new version of source page |
Updating to match new version of source page |
||
| Line 1: | Line 1: | ||
<languages /> | <languages /> | ||
== | ==Creating Calendars Using Digikam== | ||
{{Note|Transcribed from Mohamed Malik's web post, 18 February 2011. Last updated in 2019, with new screenshots and some small | {{Note|Transcribed from Mohamed Malik's web post, 18 February 2011. Last updated in 2019, with new screenshots and some small corrections.}} | ||
Did you know that you could create calendars using [[Special:myLanguage/Digikam|DigiKam]]? It is very simple and easy to do this. First you need to select some photos, most preferably 12 photos so that those 12 photos corresponds to 12 months in the calendar. | |||
[[Image: | [[Image:Digikam_calendar1.png|center|500px|thumb]] | ||
| Line 15: | Line 14: | ||
[[Image: | [[Image:Digikam_calendar2.png|center|500px|thumb]] | ||
| Line 21: | Line 20: | ||
[[Image: | [[Image:Digikam_calendar3.png|center|500px|thumb]] | ||
Here you can alter your settings. | |||
; | ;Paper size: | ||
: | :You have two choices standard <menuchoice>A4</menuchoice> and <menuchoice>US Letter</menuchoice> size. | ||
; | ;Resolution: | ||
: | :You have two choices <menuchoice>High</menuchoice> or <menuchoice>Low</menuchoice> | ||
; | ;Image position: | ||
: | :Set which position in which the images appear in the calendar. | ||
; | ;Draw lines on calendar: | ||
: | :Meaning that you can either disable or enable the lines which appear. | ||
; | ;Image to text ratio: | ||
: | :Increase the size of the image or decrease them according to the ratio, move the slider and the preview will change as you adjust it. | ||
;Set your font: | |||
:Choose a default font to be used. | |||
;Year: | |||
:Choose the year to be used. | |||
Når du er færdig, så klik på <menuchoice>Næste</menuchoice> i guiden; du mødes så af dette vindue: | Når du er færdig, så klik på <menuchoice>Næste</menuchoice> i guiden; du mødes så af dette vindue: | ||
[[Image: | [[Image:Digikam_calendar4.png|center|500px|thumb]] | ||
The website [http://www.icalshare.com iCalshare] has many great templates that can be used. They are free to use and download. All you need to do is register an account with them. It includes templates which contain much information on public holidays and events of many countries. I searched this website for Maldives, however I didn’t find anything about my country here, so I skipped this. | |||
If you are using [[Special:myLanguage/KOrganizer|KOrganizer]] to organize your daily work and if you have marked special days like birthdays of friends and relatives you could really use this feature. And it is a very simple process. Open up '''KOrganizer''', go to <menuchoice>File -> Export -> Calendar</menuchoice> and save the calendar file on to your computer. Then select the folder button on the window from the current screenshot and show it to the file manager and select <menuchoice>Open</menuchoice>. This will add that to your calendar. Then press <menuchoice>Next</menuchoice> in the wizard. And you will see this window. | |||
[[Image: | [[Image:Digikam_calendar5.png|center|500px|thumb]] | ||
Når du er klar, så klik <menuchoice>Print</menuchoice>; så genereres der en 12-siders PDF-fil med din kalender. | Når du er klar, så klik <menuchoice>Print</menuchoice>; så genereres der en 12-siders PDF-fil med din kalender. | ||
You can either send it directly to your printer or print to a PDF file. However according to my personal opinion it will be a wise decision to print to PDF first so that you can see what you have created. If you need to change the printer properties, press <menuchoice>Properties</menuchoice>. You will be able to change the page layout (portrait, landscape) and the units of measurements (cm, inches, px, etc.). By default, the output file will be made in your home folder. If you need to change the location press the button on the right and specify manually. | |||
[[Category:Grafik/da]] | [[Category:Grafik/da]] | ||
[[Category:Fotografi/da]] | [[Category:Fotografi/da]] | ||
[[Category:Vejledning/da]] | [[Category:Vejledning/da]] | ||
Revision as of 17:30, 24 January 2019
Creating Calendars Using Digikam
Did you know that you could create calendars using DigiKam? It is very simple and easy to do this. First you need to select some photos, most preferably 12 photos so that those 12 photos corresponds to 12 months in the calendar.
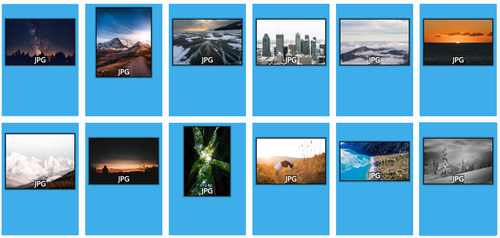
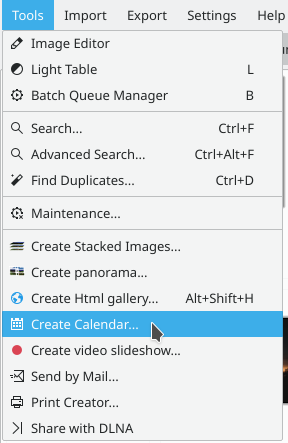
After, selecting the pictures go to .
When you do this, this window will appear.
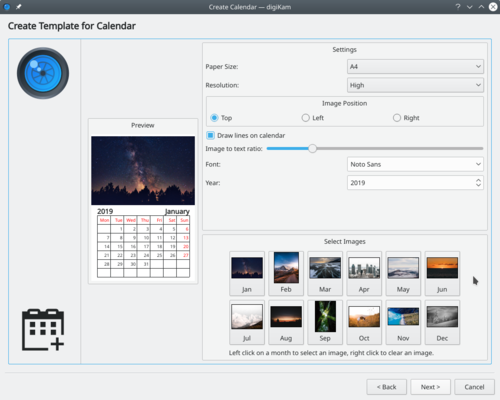
Here you can alter your settings.
- Paper size
- You have two choices standard and size.
- Resolution
- You have two choices or
- Image position
- Set which position in which the images appear in the calendar.
- Draw lines on calendar
- Meaning that you can either disable or enable the lines which appear.
- Image to text ratio
- Increase the size of the image or decrease them according to the ratio, move the slider and the preview will change as you adjust it.
- Set your font
- Choose a default font to be used.
- Year
- Choose the year to be used.
Når du er færdig, så klik på i guiden; du mødes så af dette vindue:
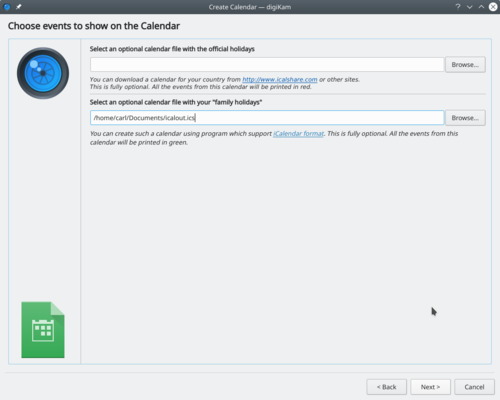
The website iCalshare has many great templates that can be used. They are free to use and download. All you need to do is register an account with them. It includes templates which contain much information on public holidays and events of many countries. I searched this website for Maldives, however I didn’t find anything about my country here, so I skipped this.
If you are using KOrganizer to organize your daily work and if you have marked special days like birthdays of friends and relatives you could really use this feature. And it is a very simple process. Open up KOrganizer, go to and save the calendar file on to your computer. Then select the folder button on the window from the current screenshot and show it to the file manager and select . This will add that to your calendar. Then press in the wizard. And you will see this window.
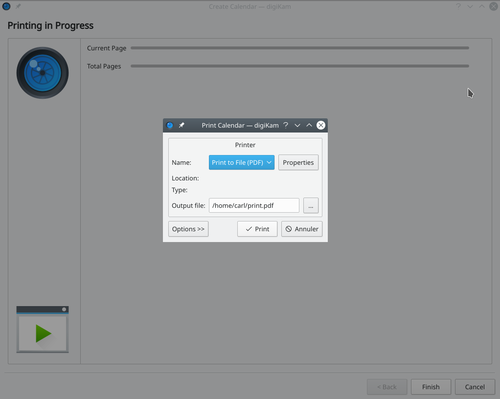
Når du er klar, så klik ; så genereres der en 12-siders PDF-fil med din kalender.
You can either send it directly to your printer or print to a PDF file. However according to my personal opinion it will be a wise decision to print to PDF first so that you can see what you have created. If you need to change the printer properties, press . You will be able to change the page layout (portrait, landscape) and the units of measurements (cm, inches, px, etc.). By default, the output file will be made in your home folder. If you need to change the location press the button on the right and specify manually.

