Kdenlive/Manual/QuickStart/tr: Difference between revisions
Updating to match new version of source page |
Updating to match new version of source page |
||
| Line 22: | Line 22: | ||
== Klip ekleme == | == Klip ekleme == | ||
[[File:Kdenlive Quickstart-Add-Clips.png|thumb|left| | [[File:Kdenlive Quickstart-Add-Clips.png|thumb|left|Project Bin: Adding video clips]] | ||
Now that the project is ready, let’s start adding some clips (i.e. the ones you downloaded). This works via the ''Project Bin widget''; a click on the <menuchoice>Add Clip</menuchoice> icon {{Icon|add-clip}} directly opens the file dialog, a click on the small arrow shows a list of additional clip types that can be added as well. Video clips, audio clips, images, and other '''Kdenlive''' projects can be added via the default <menuchoice>Add Clip</menuchoice> dialog. | |||
<br style="clear: both;"/> | <br style="clear: both;"/> | ||
[[File:Kdenlive Quickstart-Mainwindow.png|thumb|left|400px|Kdenlive | [[File:Kdenlive Quickstart-Mainwindow.png|thumb|left|400px|Kdenlive window with the tutorial files]] | ||
After loading the clips, '''Kdenlive''' will look similar to this. On the top left there is the already known project tree. Right of it are the monitors that show video; The clip monitor displays video from the original clips, the project monitor shows how the output video will look, with all effects, transitions, etc. applied. The third, also very important, item is the timeline (below the monitors): This is the place where the video clips will be edited. There are two different types of tracks, Video and Audio. Video tracks can contain any kind of clip, audio tracks as well – but when dropping a video file to the audio track, only the audio will be used. | After loading the clips, '''Kdenlive''' will look similar to this. On the top left there is the already known project tree. Right of it are the monitors that show video; The clip monitor displays video from the original clips, the project monitor shows how the output video will look, with all effects, transitions, etc. applied. The third, also very important, item is the timeline (below the monitors): This is the place where the video clips will be edited. There are two different types of tracks, Video and Audio. Video tracks can contain any kind of clip, audio tracks as well – but when dropping a video file to the audio track, only the audio will be used. | ||
| Line 65: | Line 65: | ||
<br style="clear: both;"/> | <br style="clear: both;"/> | ||
[[File:Kdenlive-Quickstart-Add-Transition.png|thumb|left|Transition marker]] | [[File:Kdenlive-Quickstart-Add-Transition.png|thumb|left|350px|Transition marker]] | ||
<span id="transition"></span>Now that the clips overlap, the transition can be added. This is done either by right-clicking on the upper clip and choosing <menuchoice>Add Transition</menuchoice> or, easier, by hovering the mouse over the lower right corner of the Spoon clip until the pointing-finger pointer is shown and the message "Click to add transition" appears. The latter, by default, adds a dissolve transition, which is in this case the best idea anyway since the Spoon is not required for playing. | <span id="transition"></span>Now that the clips overlap, the transition can be added. This is done either by right-clicking on the upper clip and choosing <menuchoice>Add Transition</menuchoice> or, easier, by hovering the mouse over the lower right corner of the Spoon clip until the pointing-finger pointer is shown and the message "Click to add transition" appears. The latter, by default, adds a dissolve transition, which is in this case the best idea anyway since the Spoon is not required for playing. | ||
| Line 87: | Line 87: | ||
[[File:Kdenlive Quickstart-Effect-Flag.png|thumb|left|352px]] | [[File:Kdenlive Quickstart-Effect-Flag.png|thumb|left|352px]] | ||
Once the effect has been added, its name will be added to the timeline clip. It will also be shown in the <menuchoice>Properties</menuchoice> widget. | |||
<br style="clear: both;"/> | <br style="clear: both;"/> | ||
| Line 94: | Line 94: | ||
Resimde hafif sarı-turuncu tonu alarak rahat bir akşama uydurmak için, mavi azaltılmalı ve kırmızı ile yeşil arttırılmalıdır. | Resimde hafif sarı-turuncu tonu alarak rahat bir akşama uydurmak için, mavi azaltılmalı ve kırmızı ile yeşil arttırılmalıdır. | ||
The values in the Properties widget can be changed by using the slider (middle mouse button resets it to the default value), or by entering a value directly by double-clicking the number to the right of the slider. | |||
The Properties widget always refers to the timeline clip that is currently selected. Each effect can be temporarily disabled by clicking the eye icon, or all effects for that clip can be disabled using the check box at the top of the Properties widget (the settings are saved though), this is e.g. useful for effects that require a lot of computing power, so they can be disabled when editing and enabled again for rendering. | |||
Burada kullanılan gibi bazı efektler için anahtarkare eklemek mümkündür. Çerçeveli izleme simgesi, bunu belirtir. Anahtarkareler, zamna içerisinde efekt parametrelerini değiştirmek için kullanılırlar. Klibimizde, bu piano'nun rengini, ılık akşam renginden, soğuk gece rengine değiştirmede yardımcı olacak. | Burada kullanılan gibi bazı efektler için anahtarkare eklemek mümkündür. Çerçeveli izleme simgesi, bunu belirtir. Anahtarkareler, zamna içerisinde efekt parametrelerini değiştirmek için kullanılırlar. Klibimizde, bu piano'nun rengini, ılık akşam renginden, soğuk gece rengine değiştirmede yardımcı olacak. | ||
| Line 117: | Line 117: | ||
==== Müzik ==== | ==== Müzik ==== | ||
[[File:Kdenlive Quickstart-Fadeout.png|thumb|left| | [[File:Kdenlive Quickstart-Fadeout.png|thumb|left|395px|Audio fadeout]] | ||
Since the clips do not provide any audio, let’s search for some nice piece of music, from your local collection or on web pages like [http://www.jamendo.com Jamendo]. The audio clip should, after adding it, be dragged to an audio track on the timeline. | Since the clips do not provide any audio, let’s search for some nice piece of music, from your local collection or on web pages like [http://www.jamendo.com Jamendo]. The audio clip should, after adding it, be dragged to an audio track on the timeline. | ||
Revision as of 17:30, 14 April 2019
Quick Start
Yeni bir proje oluşturmak
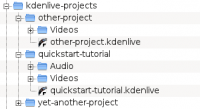
Yeni projemiz için yapılacak ilk adım yeni bir (boş) klasör oluşturmaktır. Klasörü bu öğreticide quickstart-tutorial/ olarak adlandıracağım. Ardından birkaç örnek video alın veya buradan indirin: kdenlive-tutorial-videos-2011-avi.tar.bz2 (7 MB)[1] ve proje klasörü içindeki alt klasöre çıkarın: Örn. quickstart-tutorial/Videos/.
Soldaki resim, önerilen dizin yapısını göstermekte: Her proje Videos dizinindeki video dosyalarını ve Audio dizini içerisindeki ses dosyaları gibi kendi dizinlerine sahip. (devamını oku)
(Bu öğretici, sağlanan örnek videoları kullandığınızı varsayacaktır, ancak herhangi bir videoyla da çalışmaktadır.)
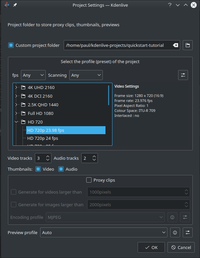
Kdenlive'ı açın ve yeni bir proje oluşturun ().
Önceden oluşturulmuş proje klasörünü seçin (quickstart-tutorial/) ve uygun bir proje dosyası belirtin. Yukarıda önerilen videolar 720p, 23.98 fps'dir.[2] Eğer kendi dosyalarınızı kullanıyor ve hangi değerleri kullanacağınızı bilmiyorsanız, Kdenlive ilk klip eklendiğinde [3] uygun bir seçenek önerecektir. Bu nedenle değeri olduğu gibi bırakabilirsiniz.
Klip ekleme
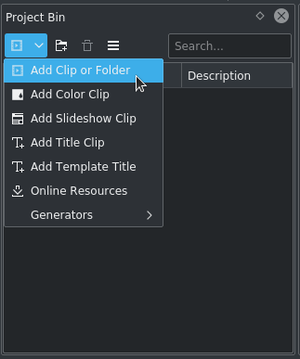
Now that the project is ready, let’s start adding some clips (i.e. the ones you downloaded). This works via the Project Bin widget; a click on the icon ![]() directly opens the file dialog, a click on the small arrow shows a list of additional clip types that can be added as well. Video clips, audio clips, images, and other Kdenlive projects can be added via the default dialog.
directly opens the file dialog, a click on the small arrow shows a list of additional clip types that can be added as well. Video clips, audio clips, images, and other Kdenlive projects can be added via the default dialog.
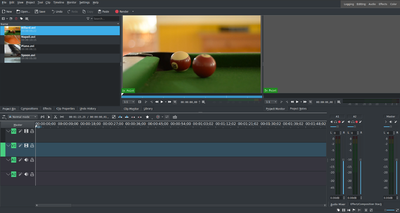
After loading the clips, Kdenlive will look similar to this. On the top left there is the already known project tree. Right of it are the monitors that show video; The clip monitor displays video from the original clips, the project monitor shows how the output video will look, with all effects, transitions, etc. applied. The third, also very important, item is the timeline (below the monitors): This is the place where the video clips will be edited. There are two different types of tracks, Video and Audio. Video tracks can contain any kind of clip, audio tracks as well – but when dropping a video file to the audio track, only the audio will be used.
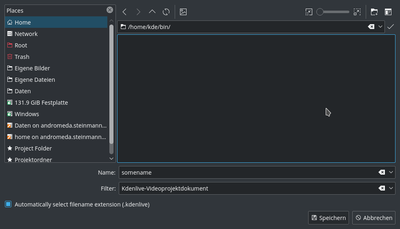
Şimdi yaptığımız işi ile kaydedelim. Bu işlem projemiz ile birlikte, zaman tüneline eklediğimiz kliplerin yerini, uygulanan efektler ve bir çok değişikliği kaydedecektir. Ancak oynatılamaz.[4] Sonuç videosu oluşturma işlemi Hazırlama işlemidir.
Zaman Tüneli
Ayrıca kılavuzun Zaman Tüneli bölümüne de bakınız.
Now comes the actual editing. Project clips are combined to the final result on the timeline. They get there by drag and drop: Drag some Napoli (assuming you are using the files provided above, as in the rest of this quick start tutorial; If not, please make sure your screen is waterproof, and perhaps tomatoproof) from the project tree, and drop it onto the first track in the timeline.
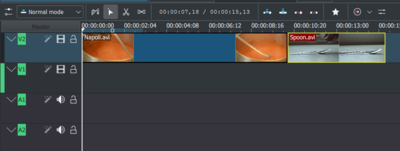
Since some cutlery is needed as well, grab the spoon clip and drop it on the first track as well. Then drag the Napoli to the beginning of the timeline (otherwise the rendered video would start with some seconds of plain black), and the Spoon right after the Napoli, such that it looks like in the image on the left. (Where I have zoomed in with Ctrl + Wheel.)

Sonuç hemen Boşluk tuşuna (veya proje ekranındaki düğmesine) basılarak görülebilir. Napoli'nin Kaşık videosunun ardından hemen takip edildiğini göreceksiniz. Eğer zaman tüneli imleci başlangıçta değilse, proje ekranı ortada bir yerden oynatmaya başlayacak. Zaman tüneli cetvelini veya proje ekranındaki kaydırıcıyı kullanarak hareket ettirebilirsiniz. Eğer klavye kısayollarını tercih ederseniz, Ctrl + Home tuşu, etkinleştirilen ekran ile aynı işlemi yapacaktır (Kısayolu kullanmadan önce seçili değilse nı seçin.)

Since after eating comes playing, there is a Billiards clip. Add it to the timeline as well. For the first 1.5 seconds nothing happens in the clip, so it should perhaps be cut to avoid the video becoming boring. An easy way[5] for this is to move the timeline cursor to the desired position (i.e. the position where you want to cut the video), then drag the left border of the clip when the resize marker appears. It will snap in at the timeline cursor when you move close enough.
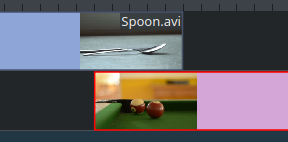
To add a transition between eating (the Spoon) and playing billiards, the two clips need to overlap. To be precise: the second clip should be above or below the first one and end some frames after the second one begins. Zooming in until the ticks for single frames appear helps here; it also makes it easy to always have the same transition duration, five frames in this case.
Yakınlaştırmayı Kdenlive penceresinin altındaki nı veya Ctrl + Fare tekerleği kullanarak yapabilirsiniz. Kdenlive, zaman tüneli imlecine yakınlaşacağı veya uzaklaşacağından, ilk olarak genişletilmesini istediğiniz konuma taşıyın ve yakınlaştırın.
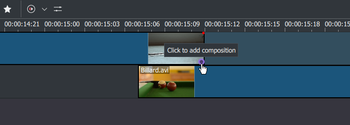
Now that the clips overlap, the transition can be added. This is done either by right-clicking on the upper clip and choosing or, easier, by hovering the mouse over the lower right corner of the Spoon clip until the pointing-finger pointer is shown and the message "Click to add transition" appears. The latter, by default, adds a dissolve transition, which is in this case the best idea anyway since the Spoon is not required for playing.
Çözünme geçişleri, ilk klipten ikinci klibe belirginlik sağlar. Ayrıca Kılavuzun geçiş bölümüne de bakın.

Şimdi son klip olan Piano'yu ekleyelim ve tekrar çözünme geçişini uygulayalım. Zaman tünelinin ilk izine eklediğinizde, yeni klibin sol alt kenarına tıklayıp önceki klibe geçiş eklemeniz gerekiyor.
Efektler
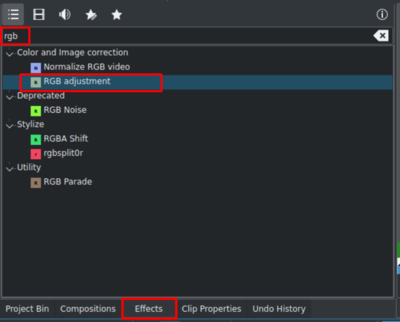
Piano, bir efekt eklenerek renklendirilebilir. Piano klibini seçin ve içerisindeki efektini seçin. Eğer görünür değilse komutu ile gösterebilirsiniz.
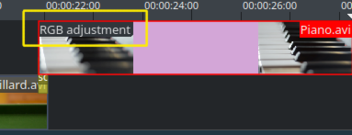
Once the effect has been added, its name will be added to the timeline clip. It will also be shown in the widget.
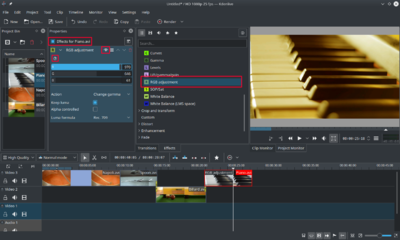
Resimde hafif sarı-turuncu tonu alarak rahat bir akşama uydurmak için, mavi azaltılmalı ve kırmızı ile yeşil arttırılmalıdır.
The values in the Properties widget can be changed by using the slider (middle mouse button resets it to the default value), or by entering a value directly by double-clicking the number to the right of the slider.
The Properties widget always refers to the timeline clip that is currently selected. Each effect can be temporarily disabled by clicking the eye icon, or all effects for that clip can be disabled using the check box at the top of the Properties widget (the settings are saved though), this is e.g. useful for effects that require a lot of computing power, so they can be disabled when editing and enabled again for rendering.
Burada kullanılan gibi bazı efektler için anahtarkare eklemek mümkündür. Çerçeveli izleme simgesi, bunu belirtir. Anahtarkareler, zamna içerisinde efekt parametrelerini değiştirmek için kullanılırlar. Klibimizde, bu piano'nun rengini, ılık akşam renginden, soğuk gece rengine değiştirmede yardımcı olacak.
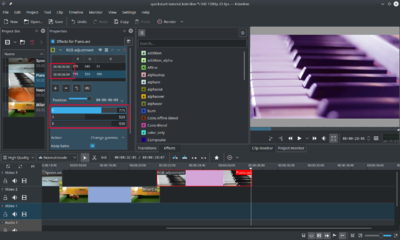
simgesine bastıktan sonra (önceki resimde saat olarak gösterilmiş), Efekt Yığın gereci, değiştirilecek. Öntanımlı olarak iki anahtarkare olacak: Zaman tüneli klibinin başında ve sonunda. Zaman tüneli imlecini zaman tüneli klibinin sonuna taşıyın ve proje ekranının sondaki anahtarkare parametrelerini değiştirdiğinizdeki yeni renkleri göstermesini sağlayın.
Efekt Yığın listesinde sonra anahtarkarenin seçili olduğundan emin olun. Ardından piyanoya derin bir mavi ile boyamaya hazırsınız.
Zaman tüneli imlecini projenin başına taşıyıp oynattığınızda (Boşluk tuşu veya içerisindeki düğmesi ile) piyano rengi istediğiniz gibi değişiyor olmalı.
Anahtarkareleştirme, bu öğreticinin en zor bölümüydi. Eğer yapabildiyseniz, Kdenlive ile uzmanlaşmanız çok kolay olacak!
Ayrıca Kılavuzun efektler bölümüne de bakın.
Müzik

Since the clips do not provide any audio, let’s search for some nice piece of music, from your local collection or on web pages like Jamendo. The audio clip should, after adding it, be dragged to an audio track on the timeline.
Ses klibi video kliplerinde yaptığımız aynı şekilde zaman tünelinde boyutlandırılabilir. İmleç, projenin sonuna otomatik olarak tutturulacaktır. Ses klibinin sonuna kaybolma efekti eklemek için (tamamıyla aynı uzunlukta bir dosya bulmanız hariç) zaman tüneli klibinin sağ (veya sol) üst kenarına fare ile geldiğinizde gösterilecek yeşil daireyi kaybolmanın başlamasını istediğiniz yere sürükleyin.[6]
Hazırlama
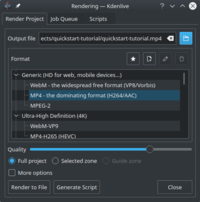
Birkaç dakika kaldı ve proje bitecek! Hazırla düğmesine (veya komutuna veya Ctrl + Enter tuşlarına) basarak soldaki iletişim kutusunun gösterilmesini sağlayın. Tüm efekt ve geçişleri içeren yeni videomuz için istenen çıktı dosyasını seçin, MPEG4 (neredeyse her yerde çalışır) ve 2000k bit oranı (daha yüksek bit oranı, daha büyük çıktı dosyası ve daha iyi kalite demektir - ancak girdi klipleri için bit oranı 2000k olduğundan, daha büyük bit oranı kaliteyi arttırmayacağı gibi, gereksiz de olacak) seçin ve düğmesine basın.
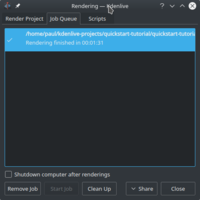
Birkaç saniye sonra hazırlama bitecek ve ilk Kdenlive projeniz tamamlanmış olacak. Tebrikler!
Complete manual
Further documentation for the current version of Kdenlive can be found in the full manual.
Referans ve notlar
- ↑ Eğer Theora'yı tercih ederseniz (genellikle Ogg Video problem yarattığı için muhtemelen istemeyeceğiniz tür), alternatif olarak kdenlive-tutorial-videos-2011-ogv.tar.bz2.
- ↑ 720 videonun yüksekliği iken p, interlaced video (taramalı video)'ya tam zıt olarak progressive scan (aşamalı tarama) ifade etmektedir. Yine fps değeri, saniyedeki kare sayısını belirtmektedir.
- ↑ Sağlanan Kdenlive Ayarları altındaki Çeşt. kısmında İlk eklenen klibin proje profili ile eşleştiğini kontrol et seçili ise
- ↑ Düzeltmek için açıklayalım: Eğer
melt projeniz.kdenlivekullanılarak oynatılabilir ancak (çoğu zaman) çok yavaş olacağı için çıkışta görmek istediğiniz sonuç videosu değildir. Ayrıca, sadece melt yüklü ise çalışır. - ↑ Writing it this way suggests that there are several ways of cutting a clip. This is in fact true.
- ↑ Bu yeşil daire efektini eklemek için bir kısayoldur. İki yol da aynı sonuca ulaşır.
