Kdenlive/Manual/QuickStart/ru: Difference between revisions
Updating to match new version of source page |
Updating to match new version of source page |
||
| Line 14: | Line 14: | ||
[[File:Kdenlive Quickstart-New-Project.png|thumb|left|250px|New Project dialog]] | [[File:Kdenlive Quickstart-New-Project.png|thumb|left|250px|New Project dialog]] | ||
Open '''Kdenlive''' and create a new project (<menuchoice>File | Open '''Kdenlive''' and create a new project (<menuchoice>File -> New</menuchoice>). | ||
Выберем созданную ранее папку проекта(<tt>quickstart-tutorial/</tt>) и соответствующий профиль проекта. Загруженные файлы имеют параметры 720p, 23,98 кадров/с.<ref>[https://ru.wikipedia.org/wiki/720p 720] - высота видеокадра, буквой p обозначается [https://ru.wikipedia.org/wiki/Прогрессивная_развёртка прогрессивная (построчная) развёртка], для отличия от [https://ru.wikipedia.org/wiki/Чересстрочная_развёртка чересстрочной развёртки], а кадров/с показывает количество полных кадров в секунду.</ref> Если вы используете собственные файлы и не можете определиться с профилем, Kdenlive предложит наиболее подходящий профиль при добавлении первого клипа,<ref>При условии, что в настройках Kdenlive включена опция <menuchoice>Проверять, соответствие первого добавленного клипа профилю проекта</menuchoice>, подробнее [[Special:myLanguage/Kdenlive/Manual/Settings_Menu/Configure_Kdenlive#Misc|Настройки Kdenlive]]</ref> так, что можно не заполнять поле профиля, оставив в нём значение по умолчанию. | Выберем созданную ранее папку проекта(<tt>quickstart-tutorial/</tt>) и соответствующий профиль проекта. Загруженные файлы имеют параметры 720p, 23,98 кадров/с.<ref>[https://ru.wikipedia.org/wiki/720p 720] - высота видеокадра, буквой p обозначается [https://ru.wikipedia.org/wiki/Прогрессивная_развёртка прогрессивная (построчная) развёртка], для отличия от [https://ru.wikipedia.org/wiki/Чересстрочная_развёртка чересстрочной развёртки], а кадров/с показывает количество полных кадров в секунду.</ref> Если вы используете собственные файлы и не можете определиться с профилем, Kdenlive предложит наиболее подходящий профиль при добавлении первого клипа,<ref>При условии, что в настройках Kdenlive включена опция <menuchoice>Проверять, соответствие первого добавленного клипа профилю проекта</menuchoice>, подробнее [[Special:myLanguage/Kdenlive/Manual/Settings_Menu/Configure_Kdenlive#Misc|Настройки Kdenlive]]</ref> так, что можно не заполнять поле профиля, оставив в нём значение по умолчанию. | ||
| Line 33: | Line 33: | ||
<br style="clear: both;"/> | <br style="clear: both;"/> | ||
[[File:Kdenlive Quickstart-Save-Project.png|thumb|left|400px| | [[File:Kdenlive Quickstart-Save-Project.png|thumb|left|400px|Saving a Kdenlive project]] | ||
Let’s save the work via <menuchoice>File -> Save</menuchoice>. This saves our project, i.e. where we placed the clips on the timeline, which effects we applied, and so on. It can ''not'' be played.<ref>To be correct, it ''can'' be played using <code>melt yourproject.kdenlive</code>, but this is not the way you would want to present your final video since it is (most likely) too slow. Additionally, it only works if melt is installed.</ref> The process of creating the final video is called ''Rendering''. | |||
<br style="clear: both;"/> | <br style="clear: both;"/> | ||
| Line 72: | Line 72: | ||
<br style="clear: both;"/> | <br style="clear: both;"/> | ||
[[File:Kdenlive-Quickstart-Add-Last-Clip.png|thumb|left| | [[File:Kdenlive-Quickstart-Add-Last-Clip.png|thumb|left|395px]] | ||
Let’s now add the last clip, the Piano, and again apply a dissolve transition. When adding it on the first track of the timeline, you need to click on the new clip’s lower left edge to add the transition to the previous clip. | |||
| Line 82: | Line 82: | ||
[[File:Kdenlive Quickstart-Add-Effect.png|thumb|left|Effect List]] | [[File:Kdenlive Quickstart-Add-Effect.png|thumb|left|Effect List]] | ||
The Piano can be colourized by adding an ''effect'' to it. Select the piano clip, then double-click the <menuchoice>RGB Adjustment</menuchoice> effect in the <menuchoice>Effect List</menuchoice>. If it is not visible, you can get it via <menuchoice>View | The Piano can be colourized by adding an ''effect'' to it. Select the piano clip, then double-click the <menuchoice>RGB Adjustment</menuchoice> effect in the <menuchoice>Effect List</menuchoice>. If it is not visible, you can get it via <menuchoice>View -> Effect List</menuchoice>. | ||
<br style="clear: both;"/> | <br style="clear: both;"/> | ||
| Line 120: | Line 120: | ||
Since the clips do not provide any audio, let’s search for some nice piece of music, from your local collection or on web pages like [http://www.jamendo.com Jamendo]. The audio clip should, after adding it, be dragged to an audio track on the timeline. | Since the clips do not provide any audio, let’s search for some nice piece of music, from your local collection or on web pages like [http://www.jamendo.com Jamendo]. The audio clip should, after adding it, be dragged to an audio track on the timeline. | ||
The audio clip can be resized on the timeline the same way as video clips are. The cursor will snap in at the end of the project automatically. To add a fade out effect at the end of the audio clip (except if you found a file with exactly the right length) you can hover the top right (or left) edge of the timeline clip and drag the red shaded triangle to the position where fading out should start.<ref>This shaded triangle is a shorthand for adding the effect <menuchoice>Fade | The audio clip can be resized on the timeline the same way as video clips are. The cursor will snap in at the end of the project automatically. To add a fade out effect at the end of the audio clip (except if you found a file with exactly the right length) you can hover the top right (or left) edge of the timeline clip and drag the red shaded triangle to the position where fading out should start.<ref>This shaded triangle is a shorthand for adding the effect <menuchoice>Fade -> Fade out</menuchoice>. Both ways lead to the same result.</ref> | ||
<br style="clear: both;"/> | <br style="clear: both;"/> | ||
| Line 126: | Line 126: | ||
=== Сборка проекта === | === Сборка проекта === | ||
[[File:Kdenlive Quickstart- | [[File:Kdenlive Quickstart-Renderer.png|thumb|left|210px|Rendering dialog]] | ||
A few minutes left, and the project is finished! Click the Render button (or go to <menuchoice>Project -> Render</menuchoice>, or press <keycap>Ctrl + Enter</keycap>) to get the dialog shown on the left. Select the desired output file for our new video with all effects and transitions, choose MP4 (works nearly everywhere), select the output file location and press the <menuchoice>Render to File</menuchoice> button. | |||
<br style="clear: both;"/> | <br style="clear: both;"/> | ||
[[File:Kdenlive Quickstart- | [[File:Kdenlive Quickstart-Rendering.png|thumb|left|210px|Rendering progress]] | ||
After some seconds rendering will be finished, and your first '''Kdenlive''' project completed. Congratulations! | |||
<br style="clear: both;"/> | <br style="clear: both;"/> | ||
Revision as of 15:40, 8 May 2019
Краткое руководство
Создание нового проекта
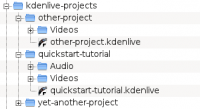
Сначала создадим папку (пустую) для нашего нового проекта. Назовём её quickstart-tutorial/. Далее, нам понадобятся несколько образцов видеоклипов. В качестве примера, загрузим эти: kdenlive-tutorial-videos-2011-avi.tar.bz2 (7 МБ)[1], которые следует извлечь, например, в каталог quickstart-tutorial/Videos/ в папке проекта.
Слева изображена предложенная структура папок: Каждый проект имеет собственную папку, с видеофайлами в папке Videos со звуковыми файлами в папке Audio и т.д.. (подробнее)
(В данном руководстве предполагается, что вы будете использовать предоставленные образцы видео, но использовать можно любые).
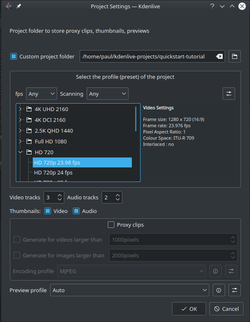
Open Kdenlive and create a new project ().
Выберем созданную ранее папку проекта(quickstart-tutorial/) и соответствующий профиль проекта. Загруженные файлы имеют параметры 720p, 23,98 кадров/с.[2] Если вы используете собственные файлы и не можете определиться с профилем, Kdenlive предложит наиболее подходящий профиль при добавлении первого клипа,[3] так, что можно не заполнять поле профиля, оставив в нём значение по умолчанию.
Добавление клипов
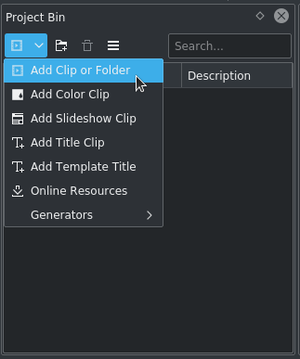
Now that the project is ready, let’s start adding some clips (i.e. the ones you downloaded). This works via the Project Bin widget; a click on the icon ![]() directly opens the file dialog, a click on the small arrow shows a list of additional clip types that can be added as well. Video clips, audio clips, images, and other Kdenlive projects can be added via the default dialog.
directly opens the file dialog, a click on the small arrow shows a list of additional clip types that can be added as well. Video clips, audio clips, images, and other Kdenlive projects can be added via the default dialog.
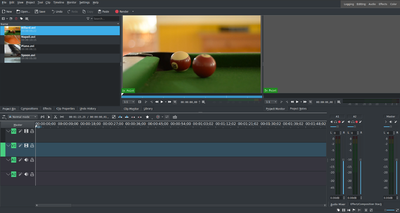
After loading the clips, Kdenlive will look similar to this. On the top left there is the already known project tree. Right of it are the monitors that show video; The clip monitor displays video from the original clips, the project monitor shows how the output video will look, with all effects, transitions, etc. applied. The third, also very important, item is the timeline (below the monitors): This is the place where the video clips will be edited. There are two different types of tracks, Video and Audio. Video tracks can contain any kind of clip, audio tracks as well – but when dropping a video file to the audio track, only the audio will be used.
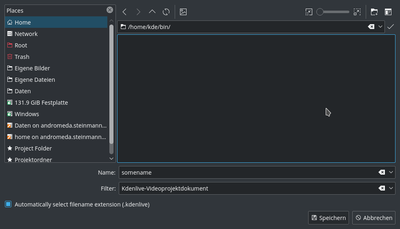
Let’s save the work via . This saves our project, i.e. where we placed the clips on the timeline, which effects we applied, and so on. It can not be played.[4] The process of creating the final video is called Rendering.
Монтажный стол
См. так же раздел руководства Монтажный стол
Перейдём непосредственно к самому редактированию. Клипы проекта объединяются в окончательный результат на монтажном столе. Добавить клип на монтажный стол можно с помощью простого перетаскивания: перетащите клип с неаполитанским соусом (Napoli) из дерева проекта на первую видеодорожку монтажного стола (при условии, что вы используете файлы, предоставленные вначале этого краткого руководства).
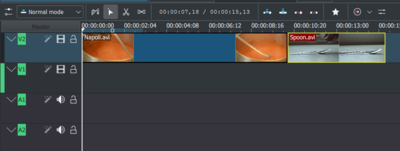
К соусу нам понадобятся столовые приборы, возьмите клип с ложкой (spoon) и поместите его на первую дорожку. Перетащите клип с неаполитанским соусом (Napoli) на начало дорожки монтажного стола (иначе в начале собранного видеоролика несколько секунд будете наблюдать чёрный экран), а клип с ложкой расположите сразу после клипа с соусом, как это показано на изображении слева (Здесь мы увеличили масштаб с помощью комбинации Ctrl + колесико мыши).

Полученный результат можно просмотреть нажатием клавиши Пробел (или кнопки на панели монитора проекта). Вы увидите, что после клипа Napoli сразу начнётся воспроизведение клипа Spoon. Если курсор монтажного стола расположен, допустим, в середине проекта, воспроизведение на мониторе проекта начнётся с середины клипа. Изменить положение курсора монтажного стола можно, либо перемещением на монтажном столе, либо перемещением на мониторе проекта. Если вы предпочитаете клавиши, использование комбинации, Ctrl + Home переведёт курсор в начальную точку на активном мониторе (выберете , если он еще не был выбран, прежде чем использовать комбинации клавиш).

После приёма пищи можно поиграть, а у нас есть клип с бильярдом (Billard). Добавьте его на монтажный стол. Первые полторы секунды в клипе ничего не происходит, поэтому стоит вырезать эту часть, чтобы убрать скучный участок клипа. Самый простой способ[5] выполнения этой задачи заключается в перемещении курсора до нужной позиции (то есть позиции, до которой хотите обрезать видео), затем следует переместить левую границу клипа до курсора монтажного стола. При приближении она прилипнет к курсору.
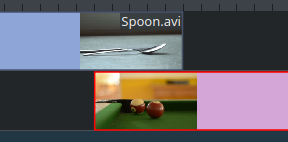
Для добавления "перехода" между клипами с ложкой (Spoon) и игрой в бильярд (Billard), один клип должен перекрывать другой. Точнее: клипы должны располагаться на соседних дорожках, где первый клип должен заканчиваться на несколько кадров позже начала второго. Масштабирование до появления отдельных кадров, позволит легко делать одинаковую продолжительность перехода, в данном случае это пять кадров.
Масштабирование может осуществляться с помощью расположенного в правой нижней части окна Kdenlive , или используяCtrl + Колесо мыши. Kdenlive меняет масштаб по курсору монтажного стола, поэтому сначала расположите курсор в нужном месте, а затем увеличьте масштаб.
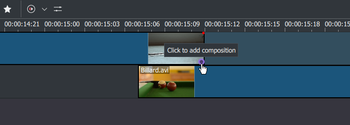
Now that the clips overlap, the transition can be added. This is done either by right-clicking on the upper clip and choosing or, easier, by hovering the mouse over the lower right corner of the Spoon clip until the pointing-finger pointer is shown and the message "Click to add transition" appears. The latter, by default, adds a dissolve transition, which is in this case the best idea anyway since the Spoon is not required for playing.
Переход Наплыв — затухание первого клипа во время появления второго. См. так же раздел руководства Переходы.

Let’s now add the last clip, the Piano, and again apply a dissolve transition. When adding it on the first track of the timeline, you need to click on the new clip’s lower left edge to add the transition to the previous clip.
Эффекты
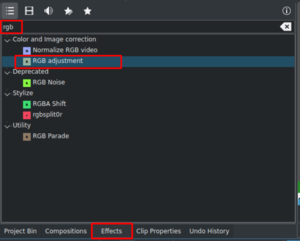
The Piano can be colourized by adding an effect to it. Select the piano clip, then double-click the effect in the . If it is not visible, you can get it via .
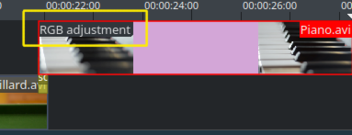
Once the effect has been added, its name will be added to the timeline clip. It will also be shown in the widget.
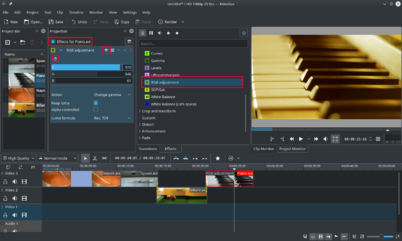
To get a warm yellow-orange tone on the image, fitting the comfortable evening, blue needs to be reduced and red and green improved.
The values in the Properties widget can be changed by using the slider (middle mouse button resets it to the default value), or by entering a value directly by double-clicking the number to the right of the slider.
The Properties widget always refers to the timeline clip that is currently selected. Each effect can be temporarily disabled by clicking the eye icon, or all effects for that clip can be disabled using the check box at the top of the Properties widget (the settings are saved though), this is e.g. useful for effects that require a lot of computing power, so they can be disabled when editing and enabled again for rendering.
При использовании некоторых эффектов, можно добавлять ключевые кадры. На это может указывать значок с часами в свойствах эффекта. Ключевые кадры используются для изменения параметров эффектов с течением времени. В нашем случае использование ключевых кадров предоставляет возможность постепенно изменить цвет клипа с пианино из теплого вечернего на холодный ночной.
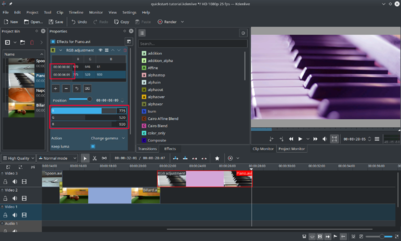
After clicking the icon (the clock icon framed in the previous image), the Properties widget will re-arrange. By default there will be two keyframes, one at the beginning of the timeline clip and one at the end. Move the timeline cursor to the end of the timeline clip, such that the project monitor actually shows the new colours when changing the parameters of the keyframe at the end.
Make sure the last keyframe is selected in the Properties list. Then you are ready to flood the piano with a deep blue.
Переместите курсор монтажного стола в начало клипа с пианино и воспроизведите видео (с помощью клавиши Пробел, или кнопки в ), пианино теперь меняет тон указанным вами образом.
Ключевые кадры самая сложная часть этого урока. Если вы поняли принцип их работы, то с лёгкостью освоите Kdenilve!
См. так же раздел руководства Эффекты.
Музыка

Since the clips do not provide any audio, let’s search for some nice piece of music, from your local collection or on web pages like Jamendo. The audio clip should, after adding it, be dragged to an audio track on the timeline.
The audio clip can be resized on the timeline the same way as video clips are. The cursor will snap in at the end of the project automatically. To add a fade out effect at the end of the audio clip (except if you found a file with exactly the right length) you can hover the top right (or left) edge of the timeline clip and drag the red shaded triangle to the position where fading out should start.[6]
Сборка проекта
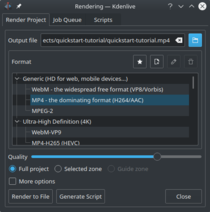
A few minutes left, and the project is finished! Click the Render button (or go to , or press Ctrl + Enter) to get the dialog shown on the left. Select the desired output file for our new video with all effects and transitions, choose MP4 (works nearly everywhere), select the output file location and press the button.
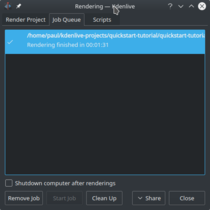
After some seconds rendering will be finished, and your first Kdenlive project completed. Congratulations!
Полное руководство
Дополнительную документацию по текущей версии Kdenlive можно найти в полном руководстве.
Ссылки и примечания
- ↑ Если вы предпочитаете формат Theora (вам не стоит этого делать, поскольку использование видео Ogg обычно приводит к проблемам), вы можете воспользоваться другим архивом kdenlive-tutorial-videos-2011-ogv.tar.bz2.
- ↑ 720 - высота видеокадра, буквой p обозначается прогрессивная (построчная) развёртка, для отличия от чересстрочной развёртки, а кадров/с показывает количество полных кадров в секунду.
- ↑ При условии, что в настройках Kdenlive включена опция , подробнее Настройки Kdenlive
- ↑ To be correct, it can be played using
melt yourproject.kdenlive, but this is not the way you would want to present your final video since it is (most likely) too slow. Additionally, it only works if melt is installed. - ↑ Есть ещё несколько способов вырезать участок из клипа.
- ↑ This shaded triangle is a shorthand for adding the effect . Both ways lead to the same result.
