Archive:Kdenlive/Manual/Projects and Files/Clips/uk: Difference between revisions
Updating to match new version of source page |
Replaced content with "====Кліпи====" |
||
| Line 1: | Line 1: | ||
<languages /> | <languages /> | ||
==== | ====Кліпи==== | ||
See also [[Special:MyLanguage/Kdenlive/Manual/Clip_Menu|Clip Menu]]. | See also [[Special:MyLanguage/Kdenlive/Manual/Clip_Menu|Clip Menu]]. | ||
| Line 25: | Line 25: | ||
У відповідь на натискання цього пункту меню програма відкриє діалогове вікно, за допомогою якого ви зможете вибрати колір і тривалість кліпу. | У відповідь на натискання цього пункту меню програма відкриє діалогове вікно, за допомогою якого ви зможете вибрати колір і тривалість кліпу. | ||
[[File: | [[File:Add color clip.png|center|200px]] | ||
Після натискання кнопки <menuchoice>Гаразд</menuchoice> кліп буде додано до дерева проекту. Після цього його можна буде перенести на монтажний стіл. Тривалість кольорового кліпу можна скоригувати безпосередньо на монтажному столі. | Після натискання кнопки <menuchoice>Гаразд</menuchoice> кліп буде додано до дерева проекту. Після цього його можна буде перенести на монтажний стіл. Тривалість кольорового кліпу можна скоригувати безпосередньо на монтажному столі. | ||
| Line 39: | Line 39: | ||
Щоб створити кліп показу слайдів, виберіть пункт <menuchoice>Додати кліп показу слайдів</menuchoice> зі спадного списку меню <menuchoice>Додати кліп</menuchoice>. | Щоб створити кліп показу слайдів, виберіть пункт <menuchoice>Додати кліп показу слайдів</menuchoice> зі спадного списку меню <menuchoice>Додати кліп</menuchoice>. | ||
[[File: | [[File:Create slide show clip.png|center|300px]] | ||
У діалоговому вікні '''Кліп показу слайдів''' виберіть у розділі '''Спосіб вибору зображень''' варіант <menuchoice>Шаблон назви файлів</menuchoice>. | У діалоговому вікні '''Кліп показу слайдів''' виберіть у розділі '''Спосіб вибору зображень''' варіант <menuchoice>Шаблон назви файлів</menuchoice>. | ||
| Line 59: | Line 59: | ||
===== Створення теки ===== | ===== Створення теки ===== | ||
See [[Special:myLanguage/Kdenlive/Manual/Project Menu/Create Folder|Project Menu — Create Folder]] | |||
===== Мережеві ресурси ===== | ===== Мережеві ресурси ===== | ||
See [[Special:myLanguage/Kdenlive/Manual/Project Menu/Online Resources|Project Menu — Online Resources]] | |||
===== Мультиплікація ===== | ===== Мультиплікація ===== | ||
| Line 74: | Line 74: | ||
[[File:Kdenlive | [[File:Kdenlive ProxyClipsSettings.png|thumb|center|500px|Activating proxy clips]] | ||
''Proxy clips'' are one of the most useful inventions for editing if you are not working on an ultra high-end machine. Even quite well speced PCs can struggle with High Definition footage if proxy clips are not turned on. The trick that the proxy clip feature does is that the original clips are replaced by clips with lower resolution and a less complex codec. Video decoding, e.g. of H.264 clips, requires a lot of computing power and computing power is required for rendering effects in real time. If insufficient power is available, playback will ''stutter''. Proxy clips require hardly any computing power at all, which allows fluent playback. | ''Proxy clips'' are one of the most useful inventions for editing if you are not working on an ultra high-end machine. Even quite well speced PCs can struggle with High Definition footage if proxy clips are not turned on. The trick that the proxy clip feature does is that the original clips are replaced by clips with lower resolution and a less complex codec. Video decoding, e.g. of H.264 clips, requires a lot of computing power and computing power is required for rendering effects in real time. If insufficient power is available, playback will ''stutter''. Proxy clips require hardly any computing power at all, which allows fluent playback. | ||
Proxy clips can be enabled/disabled for the current project in the Project Settings (<menuchoice>Project</menuchoice> → <menuchoice>Project Settings</menuchoice> → <menuchoice>Proxy</menuchoice> → <menuchoice>Enable Proxy Clips</menuchoice>). | |||
To enable proxy clips by default for new projects, go to <menuchoice>Settings</menuchoice> → <menuchoice>Configure Kdenlive</menuchoice> → <menuchoice>Proxy Clips</menuchoice> → <menuchoice>Enable Proxy Clips</menuchoice>. | |||
See also the [[Special:myLanguage/Kdenlive/Manual/Projects_and_Files/Project_Settings#Proxy Clips|Project Settings]] page | |||
<br style="clear: both;"/> | <br style="clear: both;"/> | ||
[[File:Proxy clip | [[File:Proxy clip creation.png|thumb|left|210px]] | ||
Після вмикання проміжних кліпів їх можна створити для певних кліпів у проекті за допомогою віджета дерева проекту: скористайтеся пунктом контекстного меню <menuchoice>Проміжний кліп</menuchoice>. За поступом можна спостерігати за допомогою невеличкої панелі поступу, яку буде показано під пунктом кліпу на панелі дерева проекту. Повторне натискання пункту <menuchoice>Проміжний кліп</menuchoice> вимкне створення проміжного кліпу. | Після вмикання проміжних кліпів їх можна створити для певних кліпів у проекті за допомогою віджета дерева проекту: скористайтеся пунктом контекстного меню <menuchoice>Проміжний кліп</menuchoice>. За поступом можна спостерігати за допомогою невеличкої панелі поступу, яку буде показано під пунктом кліпу на панелі дерева проекту. Повторне натискання пункту <menuchoice>Проміжний кліп</menuchoice> вимкне створення проміжного кліпу. | ||
| Line 89: | Line 90: | ||
<br style="clear: both;"/> | <br style="clear: both;"/> | ||
[[File:Proxy clip creation | [[File:Proxy clip creation completed.png|thumb|left|210px]] | ||
Після створення проміжного кліпу його пункт у дереві проекту буде позначено піктограмою з літерою «P». | Після створення проміжного кліпу його пункт у дереві проекту буде позначено піктограмою з літерою «P». | ||
<br style="clear: both;"/> | <br style="clear: both;"/> | ||
| Line 100: | Line 101: | ||
You can display and edit clip properties by selecting a clip in the [[Special:myLanguage/Kdenlive/Manual/Projects_and_Files/Project_Tree|Project Bin]] and choosing <menuchoice>Clip Properties</menuchoice> from the <menuchoice>Project</menuchoice> menu or from the right-click menu. Or by turning on the display of clip properties the <menuchoice>View</menuchoice> → <menuchoice>Clip Properties</menuchoice> check box. | You can display and edit clip properties by selecting a clip in the [[Special:myLanguage/Kdenlive/Manual/Projects_and_Files/Project_Tree|Project Bin]] and choosing <menuchoice>Clip Properties</menuchoice> from the <menuchoice>Project</menuchoice> menu or from the right-click menu. Or by turning on the display of clip properties the <menuchoice>View</menuchoice> → <menuchoice>Clip Properties</menuchoice> check box. | ||
====== | ====== File Info ====== | ||
The <menuchoice>File Info</menuchoice> tab displays information about the file. | The <menuchoice>File Info</menuchoice> tab displays information about the file. | ||
| Line 110: | Line 111: | ||
The <menuchoice>Properties</menuchoice> tab displays advanced properties of the clip where you can select a check box and then force the clip to take the property you specify. For example, you can use <menuchoice>Aspect ratio</menuchoice> to tell a clip that seems to have forgotten it was 16:9 ratio that it really is 16:9 ratio. | The <menuchoice>Properties</menuchoice> tab displays advanced properties of the clip where you can select a check box and then force the clip to take the property you specify. For example, you can use <menuchoice>Aspect ratio</menuchoice> to tell a clip that seems to have forgotten it was 16:9 ratio that it really is 16:9 ratio. | ||
[[File:Clip properties | [[File:Clip properties advanced.png|center|340px]] | ||
Серед додаткових властивостей кліпу: | Серед додаткових властивостей кліпу: | ||
Revision as of 11:22, 10 June 2019
Кліпи
See also Clip Menu.
Clips (Video, Audio and Images)
The ![]() button (Add Clip) brings up the Add Clip Dialog where you can choose video, audio or still image clips to add to the Project Bin.
button (Add Clip) brings up the Add Clip Dialog where you can choose video, audio or still image clips to add to the Project Bin.
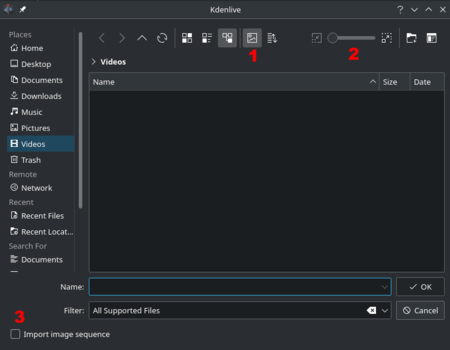
The button ![]() labeled 1 toggles File Preview on and off (applies to image files only). The slider labeled 2 adjusts the size of the preview icons. The checkbox labeled 3 enables the import of a series of images that can be used to make a stop motion animation. The checkbox labeled 4 makes the process respect an alpha channel in the source images ref.
labeled 1 toggles File Preview on and off (applies to image files only). The slider labeled 2 adjusts the size of the preview icons. The checkbox labeled 3 enables the import of a series of images that can be used to make a stop motion animation. The checkbox labeled 4 makes the process respect an alpha channel in the source images ref.
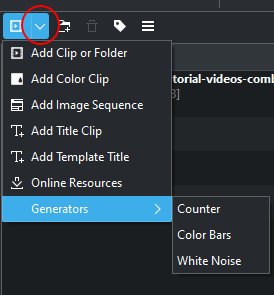
You can add other types of clips by choosing a clip type from the menu brought up from the drop down button next to the ![]() button.
button.
Кольорові кліпи
Кольорові кліпи — це зображення одного кольору, які може бути додано до дерева проекту. Такі кліпи можуть бути корисними для створення тла, на якому можна розташувати субтитри.
Add color clips by choosing from the drop down button next to the ![]() button.
button.
У відповідь на натискання цього пункту меню програма відкриє діалогове вікно, за допомогою якого ви зможете вибрати колір і тривалість кліпу.

Після натискання кнопки кліп буде додано до дерева проекту. Після цього його можна буде перенести на монтажний стіл. Тривалість кольорового кліпу можна скоригувати безпосередньо на монтажному столі.
Кліпи титрів
Див. титри.
Кліпи показів слайдів
Кліпи показів слайдів є кліпами, які створюються на основі послідовностей простих статичних зображень. Цю можливість призначено для створення анімацій на основі збірок статичних зображень або створення показів слайдів зі статичних зображень. Для створення перших слід використовувати коротку тривалість показу кадру, а других — довшу тривалість показу кадру.
Щоб створити кліп показу слайдів, виберіть пункт зі спадного списку меню .
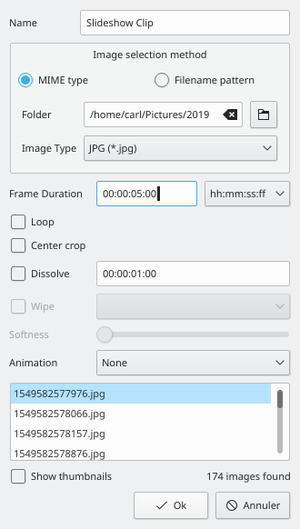
У діалоговому вікні Кліп показу слайдів виберіть у розділі Спосіб вибору зображень варіант .
Відкрийте теку, у якій зберігаються зображення, з яких слід слід створити показ слайдів, і виберіть перше зображення показу слайдів. Інші зображення буде вибрано на основі застосування певного алгоритму визначення назви файлів, який визначає назву файла наступного зображення.
Наприклад, якщо першим зображенням є 100_1697.jpg, наступним буде 100_1698.jpg тощо.
Виберіть відповідну тривалість показу кадру, вона визначатиме проміжок часу, протягом його буде показано зображення.
Натисніть кнопку . До дерева проекту буде додано кліп, який складатиметься з усіх зображень у теці, звідки було вибрано файл зображення першого кадру.
Потім ви можете перетягти це відео на монтажний стіл.
Обрізання за центром: автоматично заповнювати кадр результату зображенням, зберігаючи формат (співвідношення розмірів) кадру обрізанням зображення з обох боків. Якщо все це сказати іншими словами, це просто вилучення чорних смуг, які утворюються на кадрі, якщо орієнтація фотографії чи співвідношення розмірів зображення не збігаються з відповідними параметрами відео.
Анімація: додає шаблон плавного панорамування з ефектами масштабування. Цей ефект відомий як ефект Кена Бернза. Ви можете вимкнути анімацію, залишити лише панорамування, лише масштабування або вибрати комбінацію панорамування і масштабування. Для кожного з варіантів також передбачено фільтр низьких частот для зменшення шуму на зображеннях, що виникає внаслідок обробки. Фільтрування за низькими частотами дуже сповільнює обробку, отже, варто виконати попередній перегляд результатів без нього, а лише потім увімкнути його для остаточної обробки.
Створення теки
See Project Menu — Create Folder
Мережеві ресурси
See Project Menu — Online Resources
Мультиплікація
Див. захоплення мультиплікаційних кадрів.
Проміжні кліпи
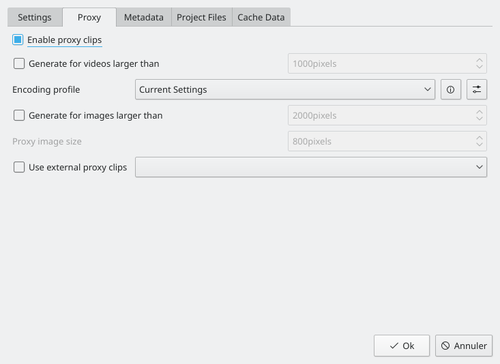
Proxy clips are one of the most useful inventions for editing if you are not working on an ultra high-end machine. Even quite well speced PCs can struggle with High Definition footage if proxy clips are not turned on. The trick that the proxy clip feature does is that the original clips are replaced by clips with lower resolution and a less complex codec. Video decoding, e.g. of H.264 clips, requires a lot of computing power and computing power is required for rendering effects in real time. If insufficient power is available, playback will stutter. Proxy clips require hardly any computing power at all, which allows fluent playback.
Proxy clips can be enabled/disabled for the current project in the Project Settings ( → → → ).
To enable proxy clips by default for new projects, go to → → → . See also the Project Settings page
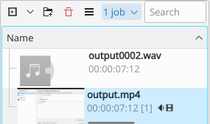
Після вмикання проміжних кліпів їх можна створити для певних кліпів у проекті за допомогою віджета дерева проекту: скористайтеся пунктом контекстного меню . За поступом можна спостерігати за допомогою невеличкої панелі поступу, яку буде показано під пунктом кліпу на панелі дерева проекту. Повторне натискання пункту вимкне створення проміжного кліпу.
Ви можете позначити декілька кліпів на панелі ієрархії проекту і скористатися пунктом , щоб розпочати пакетне завдання зі створення проміжних кліпів, тобто чергу завдань, у результаті виконання яких буде створено проміжний кліп для кожного з позначених кліпів.

Після створення проміжного кліпу його пункт у дереві проекту буде позначено піктограмою з літерою «P».
Під час остаточної обробки ви також можете скористатися проміжними кліпами. Типово використання проміжних кліпів вимкнено, але для прискорення обробки проекту для попереднього перегляду проміжні кліпи можуть бути дуже корисними.
Властивості кліпу
You can display and edit clip properties by selecting a clip in the Project Bin and choosing from the menu or from the right-click menu. Or by turning on the display of clip properties the → check box.
File Info
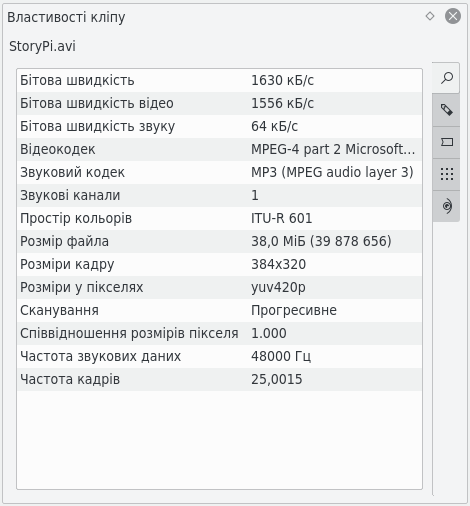
The tab displays information about the file.
Properties
The tab displays advanced properties of the clip where you can select a check box and then force the clip to take the property you specify. For example, you can use to tell a clip that seems to have forgotten it was 16:9 ratio that it really is 16:9 ratio.
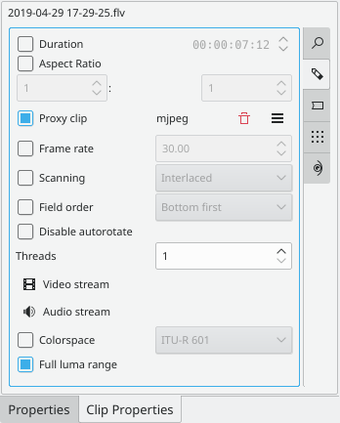
Серед додаткових властивостей кліпу:
- Duration: Change the clip duration. If the duration is shorter than the clip duration, then the clip is cropped. If the duration is bigger than the clip duration, then the last image is repeated until the new duration is over.
- Aspect ratio: Change the clip aspect.
- Proxy clips: Enable a proxy clip for this clip. See Proxy clips.
- Frame rate: Change the clip frame rate. See Wikipedia Frame rate.
- Scanning
- Field order
- Disable autorotate
- Threads
- Video stream
- Audio stream
- Colorspace
- Full Luma range
Позначки
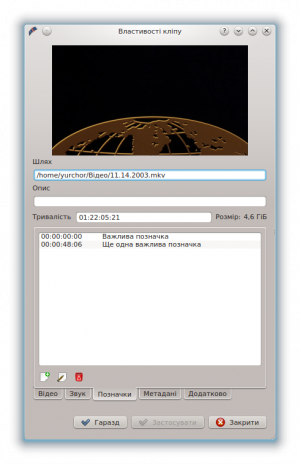
За допомогою вкладки ви можете додавати позначки до певних важливих позицій у початковому файлі. Втім, ймовірно, простіше додавати позначки до ваших кліпів за допомогою монітора кліпів, оскільки за його допомогою ви можете попередньо переглядати кадр, до якого ви додаєте позначку.
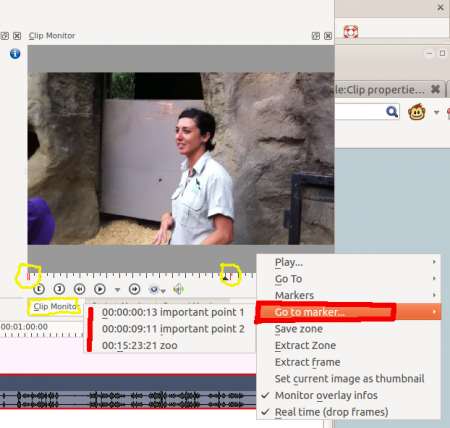
Once markers are put in your clip, you can access them in the Clip Monitor by right-clicking and selecting (see picture.) Also note how the markers appear as red vertical lines in the Clip Monitor (see yellow highlighted regions in the picture.) You can turn on the display of the marker comments in the timeline too (see Show Marker Comments).
Markers can also be added to clips on the timeline. Right-click the clip and choose . Markers added this way also appear in the clip in the Project Bin.
Metadata
You expect this to show any meta data that is contained in the clip. Does not appear to work.
Analysis
You can view and delete motion vector data that is associated with the clip from here. This is data created by Auto Mask - Motion Tracking
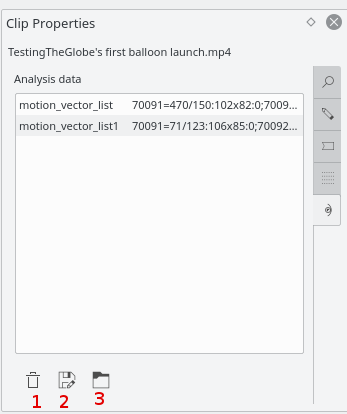
Button 1 Will delete the selected analysis data, Button 2 will allow you to export the data (semi colon delimited text file), Button 3 will allow you to import analysis data.
Породжувачі
Counter
This generates a counter timer clip in various formats which you can put onto the timeline.
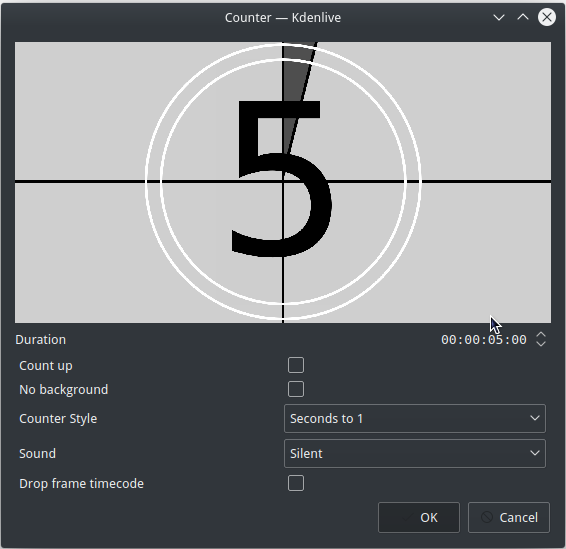 Previous versions of Kdenlive you could have the background to the counter be transparent.
There may be a defect here because it appears the No Background check box does not remove the background from the counter.
Вам варто скористатися ефектом панорамування з масштабуванням, щоб зменшити шрифт у кліпі відліку часу.
White Noise
This generates a video noise clip — like the "snow" on an out-of-tune analogue TV. In ver 17.04 it generates audio white noise as well as video snow.
Color Bars
This generator came in to Kdenlive around ver 17.04.
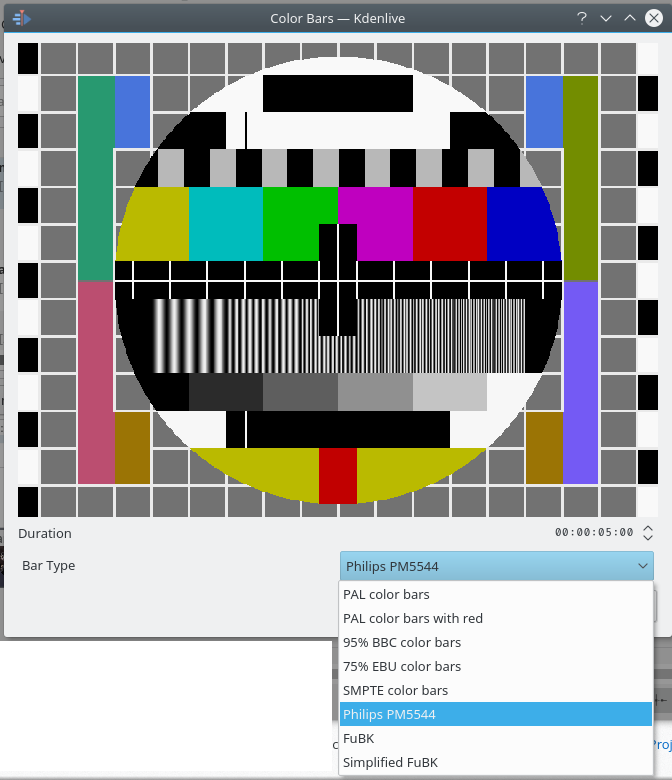
Generates a color test pattern of various types.
Including PAL color bars, BBC color bars, EBU color bars, SMPTE color bars, Philips PM5544, FuBK
