Dolphin/File Management: Difference between revisions
ChristianW (talk | contribs) T34: "or of ..." saying twice the same thing; cleaning |
m Updated to Dolphin 19.12.3 |
||
| Line 110: | Line 110: | ||
<!--T:135--> | <!--T:135--> | ||
The sorting method can be changed by selecting | The sorting method can be changed by selecting <menuchoice>Sort by</menuchoice> from the toolbar and then select <menuchoice>A-Z</menuchoice> or <menuchoice>Z-A</menuchoice>. Additionally you may chose whether folders should be listed first by selecting <menuchoice>Folders First</menuchoice>. | ||
Revision as of 19:13, 12 May 2020
Dolphin or Konqueror?
Dolphin is the file management application of Plasma Workspace. It is designed to be simple to use, yet powerful.
Konqueror was the default file manager in KDE 2 and 3, and is still available for those who prefer its interface. It is a web browser, a file manager, media viewer and more. For file management it uses the Dolphin KPart, and so has all of the functionality of Dolphin.
Discover Dolphin
The first section takes you on a guided tour of Dolphin. The second section deals with the concepts of different types of bookmarks. The third section discusses archive management. Finally we look at 'More Cool Things'. The images are clickable - you can see the enlarged view.
Introduction to Dolphin
Dolphin is the file manager of the KDE Software Compilation.
I'll show how to use Dolphin for common file managing tasks, and how to customize it to your needs.
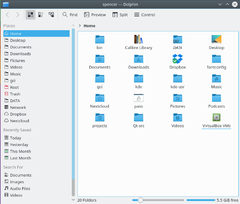
When we open the Dolphin from the Kickoff menu it shows your starting directory - by default it is your Home directory.
To open a file, or go to a folder just click on it. (This can be changed to double-click in → → or in → → for older versions of System Settings)
To select and deselect files and folders hover mouse cursor above icon and click the emerging plus sign to select and minus sign to deselect. Like this:
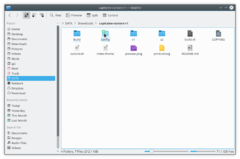
When you click the plus-sign, this file or folder will be added to your selection. You can select multiple files in the same way. Selection can be done also by dragging a rectangle (sometimes called the "rubber band" method), and selection and deselection with Ctrl + click for one at a time and Shift + click for a consecutive range.
Many selected files looks like this:

Creating a new folder: You can create a new folder in the active directory using → or the F10 shortcut.
Tabs: Dolphin supports tabbed browsing. A new tab can be opened for example from → (if you have enabled menu bar), by Ctrl + T or by middle mouse click on folder icon and navigation buttons.
Dolphin opens by default when we click on any folder. It can also be started from Kickoff menu.
The Interface
Location Bar
Dolphin integrates a new concept to use the location bar in a faster and more precise way: therefore a breadcrumb location bar is used. Instead of displaying the complete path only the navigation points starting from one of the places are displayed as buttons. By clicking one of these buttons you navigate directly to this folder. In this way you can reach a parent folder from a sub folder in a very quick way.
Between the buttons which represent a folder there is a small arrow which is a button as well. By clicking this arrow you can see a list of all the subdirectories on the same level as your current one, giving you a quick directory change.
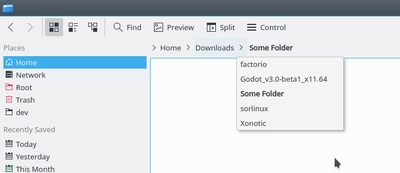
There is also a classical location bar which displays the complete path. To use this style you can right click on the Location Bar and select . If you want the Location bar to become editable, trigger the keyboard shortcut Ctrl + L or select → → . By clicking on the free space next to the last displayed folder in the breadcrumb style you can switch to an editable Location Bar as well. If the editable style is selected a checkmark is displayed at the end of the location bar. This checkmark is a button which can be used to change back to the breadcrumb style. Of course menu and keyboard shortcut can be used, too.
Split View
Dolphin offers the possibility to split the current folder view so that two folder views are displayed next to each other as known from Midnight Commander, or Krusader. This is a very comfortable view to copy or move files from one folder to another.
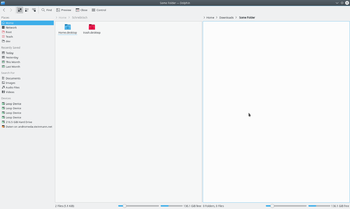
You can split the view by clicking on in the tool bar or, if you have enabled menu bar, (keyboard shortcut F3). To change back to only one folder view you can click on or just press F3 again. The symbol will show you which view will be closed. Depending on the currently active view the minus sign will be shown in the left or right part of the symbol. The active view will be closed. This is important to know if you want to use the keyboard shortcut. There is also a button for splitting and closing the view situated in the toolbar. This button displays the minus symbol as well, so it is easy to know which view would be closed.
Of course each view has its own location bar and each view can use a different view mode.
Sorting Files
By default, the files in the currently displayed folder are sorted in ascending alphabetical order. However, this can be changed by selecting → .
Files may be sorted by the following attributes
- Name
- Size
- Date
- Permissions
- Owner
- Group
- Type
- Link Destination
- Path
The sorting method can be changed by selecting from the toolbar and then select or . Additionally you may chose whether folders should be listed first by selecting .
View Mode
Dolphin features three different folder view modes:
 Icons shows each file or folder as an icon with its name
 Compact is the same as icons, but in a more compact form, allowing more folders and files to be displayed at once
 Details presents a list of files and folders, giving information on each, including but not limited to size and date
The mode can be changed from within Dolphin
- Select from the menu. This option is only available if the main Menubar is enabled
- Select from the menu. This option is only available when the main Menubar is disabled
- By selecting the appropriate icon from the main toolbar, if it is enabled
- Using the default keyboard shortcuts:
- Ctrl+1 switches to the Icon display mode,
- Ctrl+2 switches to Compact and,
- Ctrl+3 switches to Detailed view.
View as Icons
Each file and each folder is represented by an icon in this mode. Instead of displaying an icon a preview of the file can be shown. This feature can be turned on/off via the menu → (if menu bar is enabled) or via the main toolbar button .
There is the possibility to display additional information below the icons. These can be turned on/off via → or → (if menu bar is enabled). In principal the same criteria which are available as search criteria can be selected.
You can group the icons to achieve a better overview. This is turned on via → or → (if menu bar is enabled). Now the icons are grouped and the groups are divided by a horizontal line containing the name of the group as caption. The grouping is related to the selected search criteria.
Details
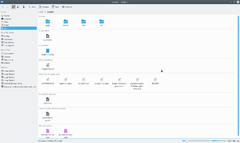
In view mode "Details" additional information is displayed by default in contrast to view mode "Icons". All files are listed in a tabular. The context menu of the table header offers the possibility to add additional columns. The following columns are available:
- Size
- Date
- Permissions
- Owner
- Group
- Type
- Link Destination
- Path
Column "Name" is always displayed. By clicking on the header of one of the columns the table will be sorted by this column. By clicking on the same column header the sorting sequence is reversed.
Since KDE 4.1 it is possible to display the folders as a tree. In this mode a plus sign is shown next to the folder. Plus sign has been replaced by > symbol in newer KDE versions. By clicking on this sign the folder is expanded and all containing sub folders and files are also shown in the table but they are attenuated. By clicking the sign, which displays a minus now (or an arrow pointing downwards in latest versions), again the expansion is closed again. Of course the tree structure can be used for as many folders as wished. In latest KDE releases, the tree view is enabled by default, but can be deactivated via → → → with option .
Columns
View mode "Columns" was inspired by the file manager Finder of Mac OS X. Entering a sub folder did not replace the current folder view but the content of the sub folder was listed in an additional column next to the column of the parent folder. This could be used for several hierarchies, so that you could navigate in an easy and fast way in the file system. Since KDE 4.8, view mode "Columns" has been dropped and will not be available in future Dolphin releases.
Setting defaults for all folders
Under → (or under the menu item → if you have enabled menu bar) you can set any of these attributes to be the default for all folder views.
Panels
Dolphin contains several panels, which can be activated via menu → . Each panel can be placed in the left or right docking area. To move a panel you have to unlock panels (right clik on a panel and select ), click on the header and Drag&Drop the panel. The area where the panel will be placed on mouse released is highlighted. It is possible to stack panels on top of each other. In this case the panels are placed into tabs.
In the header of each panel there are two buttons. The button near to the caption undocks the panel. This makes the panel an independent window which "floats" above Dolphin. The window is still combined with Dolphin and cannot be displayed without Dolphin and cannot for example be minimized like normal windows. By clicking the button again the panel is docked again. The second button will close the panel.
Non Modal Dialogs
When Moving, Copying or Deleting files/directories the dialog disappears even when the operation has not yet completed. A progress bar then appears in the bottom right of the screen, this then disappears also, if you want see the progress you need to click a small (i) information icon in the system tray.
Places
Dolphin contains a new kind of bookmarks Places. These are displayed in a panel which can be activated via → → (keyboard shortcut F9). The default Places are identical to the ones shown in the category Computer of the K-Menu Kickoff.
By clicking one of these places it will be opened in the current folder view. The context menu offers the possibility to edit the places or to remove them again. It is also possible to hide entries temporarily.
The context menu of a folder can be used to add this folder an another entry to the Places panel. Therefore there is a menu item . You can also Drag&Drop a folder to the Places panel.
The places panel also contains entries to connected removable devices like USB-keys or CDs. A small plug icon indicates if the device is mounted. The context menu offers the possibility to unmount the device.
The places are used as the basis in the breadcrumb navigation bar. Each address is shown in relation to the nearest parent folder which is one of the places.
Information
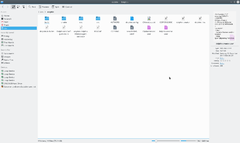
The information panel can be activated via → → (keyboard shortcut F11). This panel displays a preview or an icon of the currently selected file/folder or of the file/folder below the mouse cursor. Some additional information like change date or size to the file/folder is displayed as well.
The information panel offers the possibility to rate files, add a comment or tag a file. This is one of the interfaces to the semantic Desktop Nepomuk which provides the advantages of the semantic web for the desktop. Starting from KDE 4.2 it is possible to search for the semantic links given by the tags.
Folders
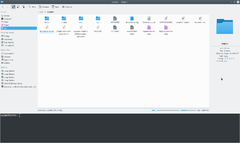
A panel providing a tree structure for the file system can be displayed via → → (keyboard shortcut F7). The tree structure offers the possibility by clicking the > and ˇ signs to expand/collapse sub folders. By clicking on one of the folders the content will be displayed in the current view.
Terminal
The terminal emulator Konsole can be displayed directly in Dolphin via → → (keyboard shortcut F4). This makes it possible to use shell commands directly in Dolphin. The terminal is opened in the folder which is displayed in the current view. Shift + F4 opens Konsole in new window.
Bookmarks and Places
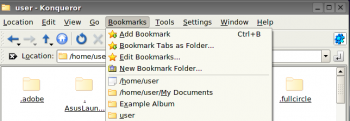
In KDE3 you could create bookmarks in Konqueror, but they were not available to any other application. KDE SC 4.x opens up a great deal more flexibility - but that inevitably means more complication. In fact KDE SC 4 has three classes of Bookmarks, which need to be differentiated. They reside in different files, and have different functions.
Three kinds of bookmark
First, there is the set of bookmarks available only to Konqueror - web bookmarks. These are stored in ~/.local/share/konqueror/bookmarks.xml. Then there is a set which Dolphin calls Places. This set is available to all applications as well as the Dolphin file manager. Every time you use → you will see this set. The third set of bookmarks are Application Bookmarks. These share one file, regardless of the application that set them, and are available to all applications, unless you restrain them to a specific application. More of that later.
Enable bookmarks
Bookmarks are not enabled in dialogs by default. To enable them
- Open the menu and select or
- Click the Options
 icon
icon - Select
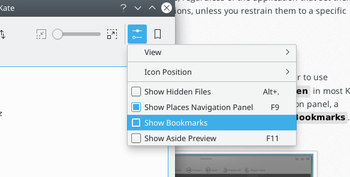
There is a default set of Places -
- Home
- Network
- Root
- Trash
but you can add other places. In Dolphin, right-click on a folder and select , or just drag a folder onto Places.
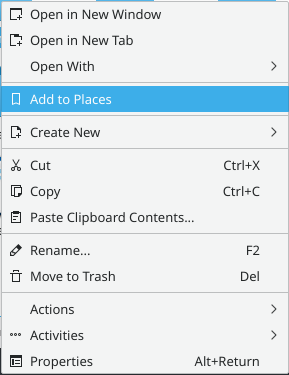
By default this "Place" will be visible in all applications. If you want to keep it constrained to Dolphin, you need to right-click on the new name in the Places list, where you will find the option to Edit it. There is a check-box for .
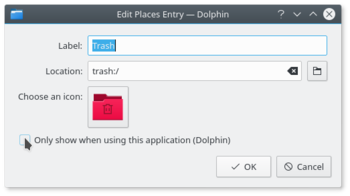
You can see the result of that command if you read ~/.local/share/apps/kfileplaces/bookmarks.xml.
In some applications too there is an option in the File menu to add a folder to Places. At this stage, however, applications vary in which features are available. The important thing to remember is that the default is for Places items to be available to all applications in the → dialogue.
Bookmarks in applications
This is the second class of bookmarks. Remember opening → and using the spanner/wrench? Next to it is a yellow star. This is the bookmark management menu.
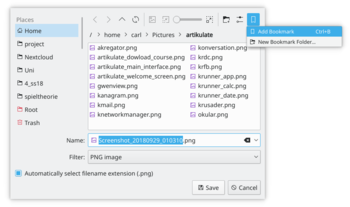
Here you can define bookmarks that will be visible in the same menu on any application. They are stored in one file, ~/.local/share/kfile/bookmarks.xml, which is used by all applications having that menu.
Constraining to one application
Some applications allow you to edit items in the Places menu. For instance, if in Gwenview you right click on a folder in Places you can set an option to .
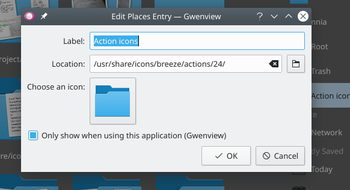
If you need to constrain to an application that does not yet allow you to do that, the only way left is to edit the file ~/.local/share/kfile/bookmarks.xml. Immediately before the </metadata> tag you will need to add the line
<OnlyInApp>appname</OnlyInApp>
Archive Management in Dolphin
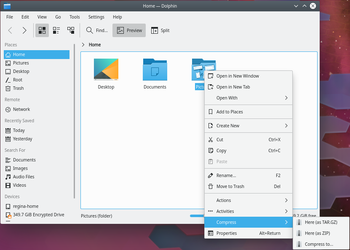
Managing archives now becomes simple. In any directory in Dolphin, highlight the files that you want to compress, and right-click. Here, using the Compress option, you can elect to create a RAR archive, a Gzipped tar archive, or define another compression mode that you have already set up.
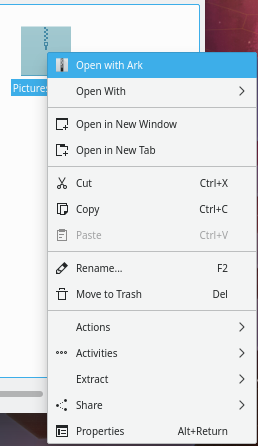
Similarly, if you right-click on an existing archived file you get a range of actions added to the right-click menu. You can extract the archive to the current folder, to an autodetected subfolder or to another place of your choosing.
Should you wish to add files to an existing archive, you can choose .
More Cool Actions
Change a File Association on-the-fly
Have you ever wanted to open a file, only to find that it is associated with an application that is not of your choice?
You can, for one, alter this in → → → → . This is the same as running kcmshell5 filetypes in a Konsole.
Alternatively, if you want to change multiple associations right quick, you would edit the *.desktop file directly, e.g. the file /usr/share/applications/org.gnome.Builder.desktop. For example, Gnome Builder associates with a great number of file-types which may not be desirable. So the line
MimeType=application/javascript; # we do not want all of these ....
may be shortened or commented out with # . Maybe a line
   InitialPreference=2
   X-KDE-InitialPreference=3
in the builder.desktop file helps to keep your previous default associated app, with builder being only secondary or tertiary option.
Thirdly, Dolphin and Konqueror offer a quick method for changing a single association:
Right-click on the file and select . The first line there is descriptive, something like:
Type: XML document
At the same level, on the right, there is a spanner (wrench). Click on that and you can add or change an association.
Similarly, by working on a folder, you can change the default file manager to/from Konqueror, if you choose, or add another image browser to the possible associations.
The sub-menu opens up a whole lot more cool things to do from Dolphin. Some possibilities only appear when applicable to the file you have selected. An apps .desktop file below /usr/share/applications defines what actions are applicable for a particular type of file. Some of the options are
- Convert an image file to a different format
- Preview the file
- Download a remote file with KGet
- Sign and/or encrypt the file, according to the encryption software installed
Encode and copy audio CD tracks
- Insert an audio CD
- Navigate to this CD in Dolphin: it must appear as "Volume" in your Dolphin 'Places' or you can reach it by typing audiocd:/ in the address bar.
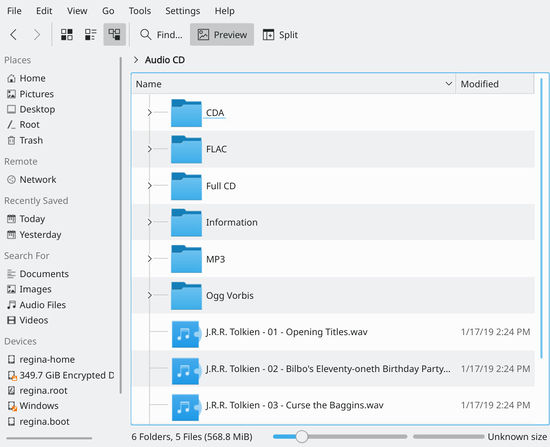
You now notice that Dolphin is proposing a WAV file for each track, plus:
- a CDA folder containing indexing information in the usual CDA format.
- a Whole CD folder, containing one file for each format (.cda, .flac, .mp3, .ogg, .wav) holding all the tracks
- a FLAC folder, containing the tracks encoded into FLAC format (lossless information format)
- an Information folder containing the CDDB informations
- an MP3 folder, containing all the tracks in MP3 format
- a Ogg Vorbis folder, containing the tracks encoded in OGG format
You then just have to copy the folder of your choice, in your preferred format to obtain the relative encoded version of your CD!
timeline:/ and have your recent files as startup folder
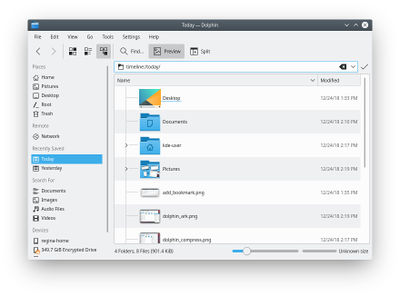
In a current (2017, Version 16.08.3 of) dolphin (with baloo up and running), you can start up dolphin with a view of recently modified files: Just navigate to the address/location of timeline:/today/ (copy paste it to the address bar) or use it as dolphin start-up-folder in dolphin-settings. With older versions of dolphin, this required the below manual steps:
Dolphin has access to a large number of file transfer protocols (KIO Slaves). One of those is provided by the KDE semantic search system (Nepomuk). Nepomuk offers a transfer protocol named history. You can navigate to it by entering timeline:/ in the location bar.
One particularly neat thing there is the ability to have the Today folder from the timeline:/ protocol in the Places sidebar (you can just drag it there!). You can then change the name and icon (do a right click on the new Today entry and choose ).
It could be very useful to have this view of recently used files immediately when you start Dolphin. Unfortunately, as of Dolphin 2.1 (part of KDE SC 4.9) this is not possible without editing the Dolphin configuration file. See this blog for more details on that.
To edit the configuration file, first close all Dolphin windows. Dolphin will save its configuration upon closing, overwriting any changes you might make!
Then use KRunner (Alt + F2) to edit ~/.config/dolphinrc with KWrite as follows: kwrite ~/.config/dolphinrc. You can of course use any other editor as well, like Kate. In the configuration file, locate the [General] section to edit the HomeUrl into: HomeUrl=timeline:/today and save the file. You should now have the today view as default and have the files you're most often looking for at your fingertips!


