Translations:Kdenlive/Manual/QuickStart/13/en: Difference between revisions
Appearance
Importing a new version from external source |
Importing a new version from external source |
||
| Line 1: | Line 1: | ||
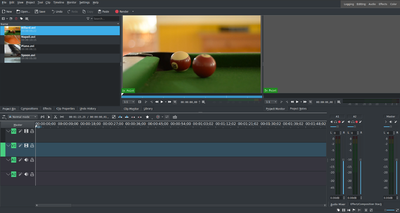
[[File: | [[File:Kdenlive_Quickstart-Mainwindow.png|thumb|left|400px|Kdenlive window with the tutorial files]] | ||
After loading the clips, '''Kdenlive''' will look similar to this. On the top left there is the already known project tree. Right of it are the monitors that show video; The clip monitor displays video from the original clips, the project monitor shows how the output video will look, with all effects, transitions, etc. applied. The third, also very important, item is the timeline (below the monitors): This is the place where the video clips will be edited. There are two different types of tracks, Video and Audio. Video tracks can contain any kind of clip, audio tracks as well – but when dropping a video file to the audio track, only the audio will be used. | After loading the clips, '''Kdenlive''' will look similar to this. On the top left there is the already known project tree. Right of it are the monitors that show video; The clip monitor displays video from the original clips, the project monitor shows how the output video will look, with all effects, transitions, etc. applied. The third, also very important, item is the timeline (below the monitors): This is the place where the video clips will be edited. There are two different types of tracks, Video and Audio. Video tracks can contain any kind of clip, audio tracks as well – but when dropping a video file to the audio track, only the audio will be used. | ||
Latest revision as of 10:13, 6 September 2020

After loading the clips, Kdenlive will look similar to this. On the top left there is the already known project tree. Right of it are the monitors that show video; The clip monitor displays video from the original clips, the project monitor shows how the output video will look, with all effects, transitions, etc. applied. The third, also very important, item is the timeline (below the monitors): This is the place where the video clips will be edited. There are two different types of tracks, Video and Audio. Video tracks can contain any kind of clip, audio tracks as well – but when dropping a video file to the audio track, only the audio will be used.
