Translations:Konversation/Configuring SASL authentication/8/en: Difference between revisions
Appearance
Importing a new version from external source |
Importing a new version from external source |
||
| Line 1: | Line 1: | ||
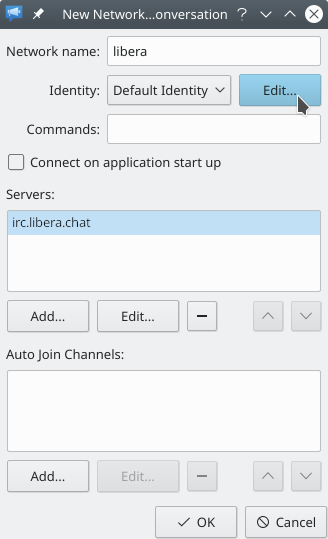
Back in the '''New Network''' dialog window (or '''Edit Network''', if you skipped here from [[Special:myLanguage/Konversation/Configuring SASL authentication#step2|step 2]]), notice the newly-added server in the <menuchoice>Servers</menuchoice> list for the network. Now click the <menuchoice>Edit...</menuchoice> button next to the drop-down selection labeled <menuchoice>Identity</menuchoice> to open the '''Identities''' dialog window:<br /> | Back in the '''New Network''' dialog window (or '''Edit Network''', if you skipped here from [[Special:myLanguage/Konversation/Configuring SASL authentication#step2|step 2]]), notice the newly-added server in the <menuchoice>Servers</menuchoice> list for the network. Now click the <menuchoice>Edit...</menuchoice> button next to the drop-down selection labeled <menuchoice>Identity</menuchoice> to open the '''Identities''' dialog window:<br /> | ||
[[Image:Authconfig05.png]] | [[Image:LB-Authconfig05.png]] | ||
Latest revision as of 09:15, 22 January 2023
Back in the New Network dialog window (or Edit Network, if you skipped here from step 2), notice the newly-added server in the list for the network. Now click the button next to the drop-down selection labeled to open the Identities dialog window:

