User:Algotruneman: Difference between revisions
Algotruneman (talk | contribs) m (Typo correction) |
Algotruneman (talk | contribs) No edit summary |
||
| Line 17: | Line 17: | ||
---- | ---- | ||
Tools for use in upcoming pages: | |||
{{info|'''Images are clickable, wich displays the full-size image. You have to use the back-button of you browser to return.'''}} | |||
{{Template:I18n/Language Navigation Bar|Printer_Config}} | {{Template:I18n/Language Navigation Bar|Printer_Config}} | ||
Revision as of 22:03, 13 January 2010
Introduction:
Retired teacher (junior high science, computer skills) and technology director
AB in Biology and MEd in Educational Leadership (both from Boston University)
Member of Massachusetts Computer Using Educators (20 years as board secretary) [1]
Facilitator for the FLOSS special interest group of MassCUE:
Involved:
Tools for use in upcoming pages:

Template:I18n/Language Navigation Bar
Printer Configuration
 |
Use this tool to connect your computer to a printer and set up appropriate options |
Feature List
- Add a printer to your computer
- Give each printer a name that helps identify it
- Perform printer tests and maintenance
- Remove a printer

When a printer is not attached directly to your computer with a USB cable, you will need to use the Printer Configuration utility to add the printer, such as when another computer has shared a printer, or you want to connect directly to a printer that is networked with a print server.
Example
Follow these example steps to add a network connected printer to your computer.
Getting to the program is a sequence of straightforward steps.
- KDE Kickoff -> Computer -> System Settings -> Printer Configuration
- Once you get to the Printer Configuration tool, click the button to add a printer (Find and click the "Forward" button between steps.)
- Your computer will search your local area network for printers that have been shared on other computers or are directly attached to the network.
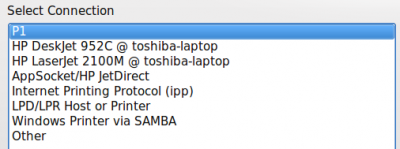
- In this example, I have an HP Laserjet 2100M which is connected directly to my network using a small print server on the printer.
- The next illustration also shows that I have another computer sharing two printers on a Toshiba laptop. If I wanted to use either of them, that other computer would need to be on for the printer to work. Remote printers work best if directly connected to the network or are connected to a dedicated print server computer.

- I choose AppSocket/JetDirect

- I enter the IP address number in the Host blank (Currently, the Printer Configuration tool does not identify what that number is, so you will need to ask your network administrator what the IP address is.
- Choose the manufacturer (Mine is HP)
- Choose the model (HP has many)
- Choose the recommended Driver unless you have a reason to do otherwise.
- Give the printer a useful name since "printer" may not be good enough.
- Give a description including the physical location if not in your own room.
- The "Location" defaults to your computer's name in case you decide to share it later. Sharing is one of the options of the printer configuration tool.
- On the configuration screen, you will now see a new "Local Printer" because the printer is "attached" to your computer. If you have more than one printer, you should be sure to thoughtfully select one as the default. You might not want to set the big high speed departmental printer/copier in the department manager's office as your default if you have a small printer hooked directly to your computer.
It is always wise to print a test page from the printer configuration tool.
