Amarok/QuickStartGuide/Hudební sbírka
Hudební sbírka
Pole s hudebními zdroji
Pole s hudebními zdroji je místem, kde můžete procházet a zobrazit celou hudební sbírku. Zahrnuje to jak skladby na vašem místním pevném disku, tak i skladby na jakémkoli z vnějších zařízení nebo na nosičích připojených k vašemu počítači, jako jsou zvuková CD, zařízení USB, přehrávače, síťové disky nebo internetové zdroje.
Nastavení sbírky
Máte hudební skladby ve formátu MP3, OGG nebo FLAC ve vašem počítači? Začněte tím, že řeknete Amaroku, kde ty soubory najde, aby mohl začít s vytvářením vaší sbírky. V hlavní nabídce: .
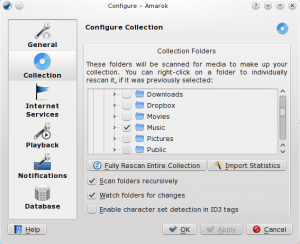
Stromový pohled na váš domovský adresář je ukázán výše. Klepněte na políčko, kde je uložena vaše hudba; obvykle ve složce ~ /Hudba. Potom zvolte . To bude nějaký čas trvat, takže se neznepokojujte, pokud se zdá být Amarok chvíli pomalejší. Jakmile je prohledávání dokončeno, je nejlepší Amarok ukončit přes hlavní nabídku , nebo Ctrl+Q , a znovu jej opět spustit. Vaše nově přidaná hudba by se měla ukázat v části s Místní sbírkou.
Přidání zařízení s hudbou do sbírky
Pod vyhledávacím polem v horní části pole s hudebními zdroji vidíte různá zařízení a/nebo obsahové skupiny v rámci prohlížeče obsahu. Pokud vložíte CD s hudbou do jednotky CD-ROM, objeví se v poli s hudebními zdroji, společně s přehrávači hudebních souborů, flash disky a jinými zařízeními USB. Poté, co bylo připojeno vnější zařízení, mělo by se automaticky ukázat v poli s hudebními zdroji. Nemusíte projít všemi dalšími činnostmi, abyste vnější zařízení uviděl ve svém poli s hudebními zdroji, pokud byla rozpoznána vaším počítačem.
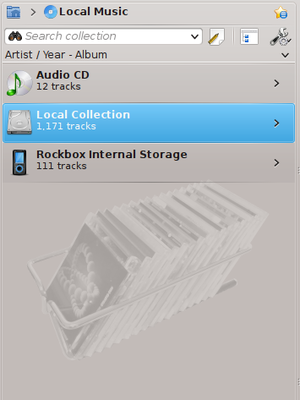
Níže je snímek, který ukazuje tři připojené zdroje s hudbou: zvukové CD, přehrávač souborů MP3, a místní sbírku.
Získání obsahu CD pro sbírku
Pokud ve svém počítači nemáte žádné hudební soubory, je snadné je získat (jde o zkopírování skladeb z vašeho CD do vaší sbírky). Jen vložte CD do mechaniky, a klepněte pravým tlačítkem myši na pruh se zařízením CD v prohlížeči obsahu, aby se CD začalo přehrávat, nebo aby se začalo kopírovat do vaší sbírky, přičemž vaše skladby budou získávány a značkovány (prohlédněte si obrázek níže). Pokud hudbu kopírujete ze zvukového CD do vaší místní sbírky, pruh se zprávami ve spodní části okna s Amarokem bude vyjadřovat, že je zaměstnán kopírováním. Získávání může trvat několik minut. Po jeho dokončení zpráva v pruhu se zprávami zmizí a hudba se objeví v prohlížeči obsahu vaší místní sbírky. Pokud se získaná hudba neobjeví ve vašem poli s hudebními zdroji je nejlepší Amarok ukončit přes hlavní nabídku , nebo klávesovou zkratkou Ctrl+Qa znovu jej spustit. Nyní byste měli svou sbírku vidět v levém poli. Snímek níže ukazuje, jak přesunujete skladby z vašeho zvukového CD, ze zařízení iPod nebo z jiného zařízení do vaší sbírky, pomocí vyvolání nabídky klepnutím pravým tlačítkem myši.
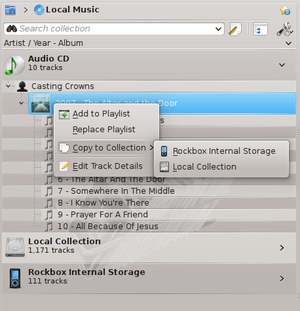
V související nabídce výše můžete také vidět volbu . Použijte tuto možnost, pokud máte skladbu, která potřebuje úpravu značky. To se stává důležitým, když hudbu získáváte ve formátu WAV, kdy dochází ke ztrátě některých značek. Pokud byť malý kousek vaší sbírky potřebuje upravit značky, zvažte použití zvláštního programu k tomu určenému, jako jsou tyto
* Picard
* EasyTAG
* Kid3
Správné značení je důležité proto, že Amaroku pomáhá při zobrazení vašich skladeb v náležitých albech a řádně seřazených. Naučte se více o získávání obsahu CD a o značení.
Accessing other media sources
You might have wondered why the Media Sources pane is not called the 'Collections pane'. Amarok gives you access to much more music than just your collection -- Internet shops, audio books, podcasts, music files stored outside your collection, and previously stored playlists. The Amarok breadcrumb navigation is the key to all of this. The starting icon for the breadcrumb navigation is the home folder icon at the extreme top left of the Media Sources pane. This icon expands and contracts as you browse through the Media Sources pane, allowing you to easily navigate your collection by clicking your desired folder in the breadcrumb bar.

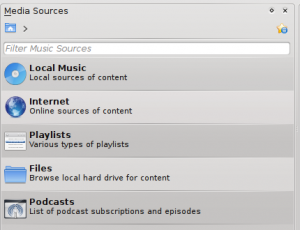
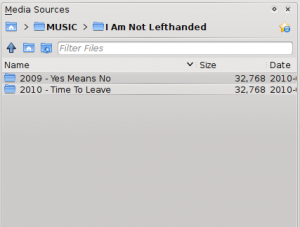
If you click the Amarok home folder you see the Media Sources pane on the left below, containing icons to available resources. If you click the Files icon (left image below, second item from the bottom), you will see something similar to the image on the right, below. Notice how the breadcrumb bar expands and how the content of the selected folder is shown in the Media Sources pane (right image below). Clicking the > symbols among the breadcrumbs allows you to view the folders available at that level of the folder structure. The Amarok file browser gives you access to your entire file system, even outside your Local Collection.
| Media Sources pane | Files icon clicked |
|---|---|
 |
 |
The functions of the icons in the Amarok Home folder (left above) are:
| Icon | Name | Action |
|---|---|---|
| Local Music | Your Amarok collection | |
| Internet | Internet shops such as Magnatune, Jamendo and Last.fm. First configure your internet resources in: | |
| Playlists | Saved playlists -- see also Playlists. Also playlists on media devices | |
| Files | Your file system | |
| Podcasts | Access to Podcasts via RSS feed |
Clicking the Local Music icon above or on the Local Music folder in the breadcrumb bar returns you to your collection, showing you a list of all the available resources, artists, albums and tracks that you have previously defined as part of your collection. The breadcrumb bar indicates that you are viewing your Local Music.
Streams and Podcasts
There are two ways to listen to streams. If you have a favorite station, get the stream URL and add it: . You'll be able to find it again in Playlists, as a Saved Playlist. Otherwise, browse through the scripts available in our Script Manager (). There are some excellent collections available, which will show up in the Internet section of your Media pane.
Podcasts have their own section in the Media Pane, above. If you have an RSS or Atom feed URL, click the green and add it there. If you have an OPML file to import, that choice is available also. Use the context (right-click) menus to , , , , or mark an episode as New. If you are interested in browsing through a large collection of podcasts, check out the Podcast Directory available through the Script Manager, referred to above.
Using the Content Browser
The hard disk of your computer, audio CDs, external devices and the Internet are the basic resources for your collection. After your collection has been set up, it is likely that your collection will hold a large number of albums and tracks, much more than can be shown on a single window.
How to change the display of your collection, below:
Hiding or expanding information
The area of the Media Sources pane below the search bar is called the Content Browser. Three media sources are indicated in the image of a Content Browser below: CD, Local Collection and a Media Player:
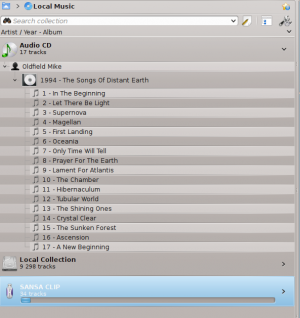
Clicking the banner for a device (the blue bar for the Sansa above) shows or hides the content of that device. The direction of the arrow on the right indicates whether the contents for that device is hidden or shown. The content on a particular device can, in turn, be hidden or shown using the same principle, clicking on the appropriate artist or album. An arrow pointing down on the left of an artist or an album indicates that the contents has been expanded. An arrow pointing right indicates that more content for that category is available but currently hidden. In the image above, the information for Mike Oldfield - The Songs of Distant Earth CD has been expanded, showing the individual tracks. On the other hand, the albums and tracks in the Local Collection are hidden. By clicking these arrows you also can expand or hide information.
Changing the order of tracks and albums
The order in which tracks are sorted in the Content Browser can be customised by using the Sort Options button at the top of the Media Sources pane:

The sort order is indicated on the top left of the Media Sources pane, just below the Search text box. The default order is Artist / Year - Album. The display order of the Content Browser can be temporarily switched between the user-defined sort order (described above) and a Merged view in which which artists are listed alphabetically, no matter on which media the music is stored. To toggle the Merged view, click the Merge icon at the top right-hand of the Media Sources pane:

To search your collection, type your search term into the search bar at the top of the Local Music section. Not only can you search by artist, album or track name, but any part. You might create a nice playlist by searching for winter, for instance, or merely find a track when you only remember one word of the title. You can also search by rating, playcount, even filetype. See Amarok Insider Issue 14 for more details.
Deleting items from the collection
You can delete any item from your collection by right-clicking on it and choosing the bottom item . A confirmation dialog will appear, preventing the accidental deletion of any tracks. More than one item can be selected with Ctrl+click.

