Kdenlive / Manuel / Démarrage rapide
Créer un nouveau projet
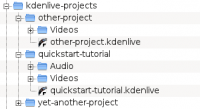
La première étape est de créer un nouveau dossier (vide) pour notre nouveau projet. Appelons-le tutoriel-mise-en-route/ dans ce tutoriel. Récupérez quelques échantillons de clips vidéo, vous pouvez télécharger ceux-ci (7 Mo). [1]. Décompressez-les par exemple dans un sous-dossier du projettutoriel-mise-en-route/videos/.
L'image de gauche montre la structure de dossier proposée : chaque projet a son propre dossier, avec des fichiers vidéo dans le sous-dossier videos, des fichiers audio dans le sous-dossier audio, etc. (en savoir plus)
(à partir de maintenant le tutoriel suppose que vous utilisez les échantillons de vidéo fournis, mais il fonctionne avec n'importe quelle autre source.)
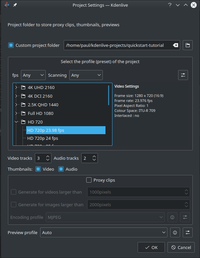
Ouvrez Kdenlive et créez un nouveau projet ().
Choisissez le dossier projet précédemment créé (tutoriel-mise-en-route/) et sélectionnez un profil de projet approprié. Les fichiers vidéo ci-dessus sont en 720p et 23,98 fps. [2] Si vous utilisez vos propres fichiers et ne savez pas quel profil utiliser,Kdenlive proposera le plus approprié lorsque le premier clip sera ajouté, vous pouvez donc laisser ce champ tel quel.
Ajouter des clips
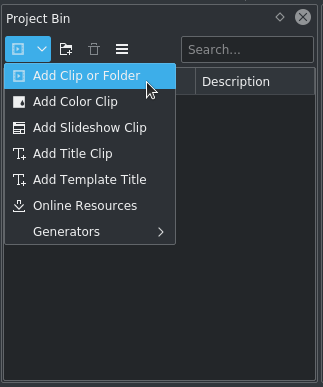
Maintenant que le projet est prêt, nous allons commencer à ajouter des clips (par exemple ceux que vous avez téléchargé). Cela se fait dans la zone Arborescence du projet ; un clic sur l'icône ouvre directement la boîte de dialogue d'ouverture de fichier, et un clic sur la petite flèche montre une liste des types de clips qui peuvent être ajoutés. Des clips vidéo, des sources audio, des images et d'autres projets Kdenlive' peuvent être ajoutés via cette fenêtre .
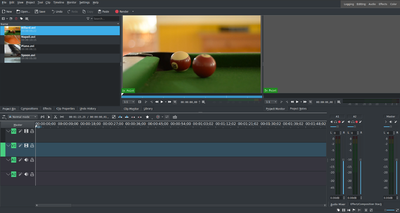
Après le chargement des clips,Kdenlive va ressembler à ceci. En haut à gauche on retrouve l'arborescence du projet déjà vue. A droite les moniteurs qui affichent les vidéos : le moniteur de clip qui affiche la vidéo des clips originaux, et le moniteur projet avec la vidéo telle qu'elle apparaîtra en sortie, avec tous les effets, transitions etc appliqués. Le troisième élément, également très important, est la timeline (sous les moniteurs) : c'est là que les clips vidéo seront montés. Il y a deux types de pistes différents, vidéo et audio. Les pistes vidéo peuvent contenir n'importe quel type de clip, et les pistes audio aussi... mais lorsqu'on dépose un fichier vidéo sur une piste audio, seul le son sera utilisé.
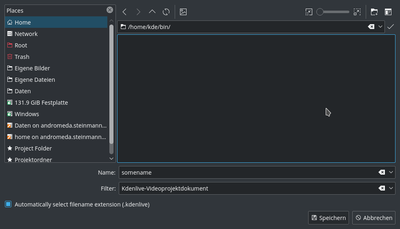
Enregistrons le travail via . Notre projet est ainsi sauvegardé, c'est à dire la position des clips sur la timeline, les effets appliqués, et ainsi de suite. Il peut ne pas être ouvert par un autre lecteur multimédia. [3] Le processus de création de la vidéo finale est appelée Rendu.
Timeline
Maintenant nous arrivons au montage à proprement parler. Les clips du projet sont combinés sur la timeline pour construire le film final. On les amène par glisser-déposer : attrapez par exemple un Napoli, et déposez-le sur la première piste de la timeline (en supposant que vous utilisez les fichiers fournis ci-dessus, comme dans le reste de ce tutoriel de démarrage rapide, si non, assurez-vous que votre écran résiste à l'eau, et même à la tomate ?).
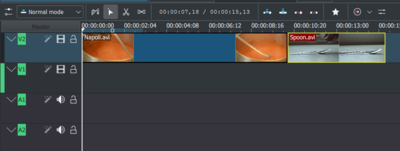
Comme il faut aussi quelques ustensiles de cuisine, déposez la cuillère sur la première également. Faites ensuite glisser le Napoli au début de la timeline (sinon la vidéo rendue commencerait par quelques secondes de noir), puis la cuillère à droite après le Napoli, de sorte à obtenir quelque chose ressemblant à l'image sur la gauche (zoomée avec Ctrl+Molette).

Le résultat peut-être déjà prévisualisé en appuyant sur Espace (ou le bouton dans le moniteur du projet). Vous verrez le Napoli directement suivi par la cuillère. Si le curseur de la timeline n'est pas au début, le moniteur projet va commencer à jouer la vidéo quelque part au milieu ; vous pouvez le déplacer en le faisant glisser sur la graduation de la timeline ou dans le moniteur projet. Si vous préférez les raccourcis clavier, Ctrl+Début donne la même chose pour le moniteur activé (sélectionnez le s'il n'est pas sélectionné avant d'utiliser le raccourci).

Après avoir mangé on peut jouer : il y a donc un clip de billard. Ajoutez-le aussi à la timeline. Pendant les 1,5 premières secondes rien ne se passe dans le clip, on pourrait donc plutôt le couper pour éviter que la vidéo ne devienne ennuyeuse. Une manière simple[4] est de déplacer le curseur de timeline à la position désirée (où vous voulez couper la vidéo), puis faire glisser le bord gauche du clip lorsque le marqueur de redimensionnement apparaît. Il sera attiré magnétiquement sur le curseur de timeline arrivé à proximité suffisante.
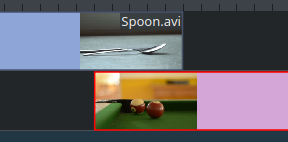
To add a transition between eating (the Spoon) and playing billard, the two clips need to overlap. To be precise: the second clip should be above or below the first one and end some frames after the second one begins. Zooming in until the ticks for simple frames appear helps there; it also makes it easy to always have the same transition duration, like five frames in this case.
You can zoom in by either using the at the bottom of the Kdenlive window, or with Ctrl + Mousewheel. Kdenlive will zoom to the timeline cursor, so first set it to the position which you want to see enlarged, then zoom in.
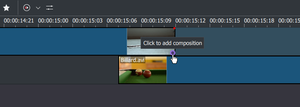
Now that the clips overlap, the transition can be added. This is done either by right-clicking on the upper clip and chosing or, easier, by clicking the lower right corner of the Spoon clip. The latter by default adds a dissolve transition, which is in this case the best idea anyway since the Spoon is not required for playing anyway.
The dissolve transitions fades the first clip into the second one.

Let’s add the last clip, the Piano, now, and again apply a dissolve transition. When adding it on the first track of the timeline, you need to click on the new clip’s lower left edge to add the transition to the previous clip.
Effects
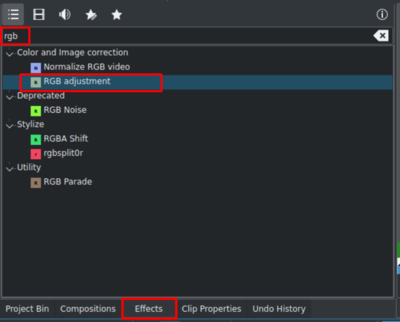
The Piano can be colourized by adding an effect to it. Select the piano clip, then double-click the effect in the . If it is not visible, you can get it via .
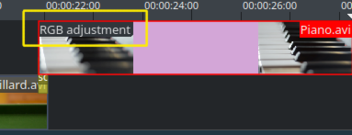
Once the effect has been added, its name will be added to the timeline clip. It will also be shown in the widget.
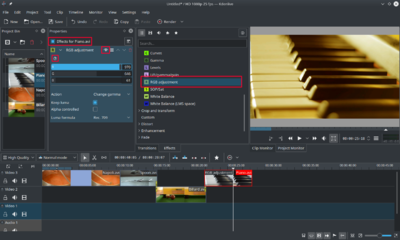
To get a warm yellow-orange tone on the image, fitting the comfortable evening, blue needs to be reduced and red and green improved.
The values in the effect stack widget can be changed by using the slider (middle mouse button resets it to the default value), or by entering a value directly by double-clicking the number right to the slider.
Effects can also be added with the icon (framed in the image on the left) in the ; It always refers to the timeline clip that is currently selected. By unchecking the checkbox they are temporarily disabled (the settings remain though), this is e.g. useful for effects that require a lot of computing power, so they can be disabled when editing and enabled again for rendering.
For some effects, like the one used there, it is possible to add keyframes. The framed watch icon indicates this. Keyframes are used for changing effect parameters over time. In our clip this allows us to fade the piano’s colour from a warm evening colour to a cold night colour.
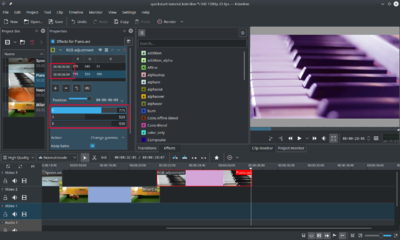
After clicking the icon (the clock icon framed in the previous image), the Effect Stack widget will re-arrange. By default there will be two keyframes, one at the beginning of the timeline clip and one at the end. Move the timeline cursor to the end of the timeline clip, such that the project monitor actually shows the new colours when changing the parameters of the keyframe at the end.
Make sure the last keyframe is selected in the Effect Stack’s list. Then you are ready to flood the piano with a deep blue.
Moving the timeline cursor to the beginning of the project and playing it (with Space, or the button in the ), the piano should now change the colour as desired.
Keyframing was the hardest part of this tutorial. If you managed to do it, you will master Kdenilve easily!
Music

Since the clips do not provide any audio, let’s search for some nice piece of music, on your local collection or on web pages like Jamendo. The audio clip should, after adding it, go to an audio track on the timeline.
The audio clip can be resized on the timeline the same way as video clips are. The cursor will snap in at the end of the project automatically. To add a fade out effect at the end of the audio clip (except if you found a file with exactly the right length) you can hover the top right (or left) edge of the timeline clip and drag the green disc to the position where fading out should start.[5]
Rendering
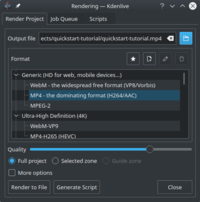
A few minutes left, and the project is finished! Click the Render button (or go to , or press Ctrl + Enter) to get the dialog shown on the left. Select the desired output file for our new video with all effects and transitions, choose MPEG4 (works nearly everywhere) and a bitrate of 2000k (the higher the bitrate, the larger the output file and the better the quality – but since the bitrate for the input clips was 2000k already, using a higher one would not improve quality and is therefore unnecessary), and press the Render to File button.
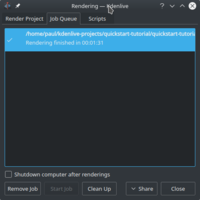
After some seconds rendering will be finished, and your first Kdenlive project completed. Congratulations!
References and notes
- ↑ Si vous préférez Theora (peu probable vu que les vidéos Ogg provoquent souvent des problèmes), vous pouvez également télécharger ceux-ci.
- ↑ 720 est la hauteur de la vidéo, p signifie balayage progressif contrairement à entrelacé, et le nombre fps désigne le nombre d'images complètes par seconde.
- ↑ Pour être exact, il peut être joué avec
melt votre_projet.kdenlive, mais ce n'est pas la façon dont vous voulez présenter votre vidéo finale car elle est (probablement) trop lente. En outre, elle ne fonctionne que si melt est installé. - ↑ Cela suggère qu'il y a plusieurs façons de couper un clip : c'est vrai
- ↑ This green disc is a shorthand for adding the effect . Both ways lead to the same result.
