Catturare schermate
Introduzione
The purpose of publishing software screenshots is to introduce prospective users to the look and feel and to give them an idea of what to expect from the product once they have got it running. Therefore, screen shots should document common usage of the environment and applications, available to users with a standard hardware configuration.
Guidelines
- Set the language to English, unless it's a localized screenshot.
- Save as a PNG image.
- Preferably, use the default settings (icons, color scheme, style, window decoration, application settings etc.).
- Preferably, use (Desktop Effects module in System Settings), but don't worry if your graphics card does not support compositing.
- Preferably, use font "Liberation Sans" at 9pt.
- If the screenshot shows parts of the desktop, preferably use the default background of plasma. Include a margin (around 20 pixels) if possible, to ensure that window shadows don't look cropped.
- If you are preparing a localized screenshot, use the same name as the original English one, with the language-code (the same as you will see on the page address) appended.
- If the screenshot is to update an existing one, use exactly the same name so that the update happens automatically.
Workflow
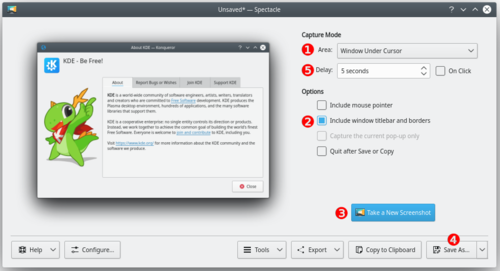
In this example KSnapshot is used, but other screen capture applications work as well.

- Start KSnapshot
- Choose a Capture mode (1) from the following:
- Current Screen (only visible on a multi-screen environment)
- Everything on the single screen is captured, usually used for desktop screenshots.
- Full Screen
- This works differently, depending on whether you have a single screen or a multi-screen environment. For single screen users it captures everything currently on the screen. Multi-screen users will see it capture all screens into a single window.
- Window Under Cursor
- The content of an applications or dialog window is captured. usually used for application screenshots. Preferably, check the Include window decorations option (2).
- Region
- Only a region to be defined later is captured.
- Click on (3).
- Full Screen
- Current Screen
- Window Under Cursor
- Click anywhere on the screen to take the snapshot.
- Region
-
- Use the mouse to draw a rectangle around the region to be captured (for example around a window).
- Strike the Enter key or double click in the region to take the snapshot.
- Click on (4).
- Browse to the location you want to save the image, give it a name (name.png) and click on
Hints and Tips
- The option (5) makes KSnapshot wait a given amount of time (given in seconds) before taking the snapshot. This can be useful in many situations, for example when taking screenshots of drop-down menus
- It's often useful to create a separate user for taking screenshots to ensure a standard look with the default settings.
- Use in the wallpaper settings to get a white background.
