Kdenlive/Manual/Tidslinje/Redigering
Redigering
Redigeringudføres i tidslinjen. Tilføj et klip ved at trække det fra projekttræet eller klipmonitoren. Når et klip er blevet sluppet på et spor kan det flyttes (træk og slip det) til et andet sted på sporet eller til et andet spor.
= Søgning igennem dit projekt
Tidslinjemarkøren viser din aktuelle position i projektet. Den kan flyttes ved at klikke eller trække i tidslinjelinealen eller på et tomt område af tidslinjen. Andre måder at flytte tidslinjemarkøren er:
- Tastaturets taster Pil til venstre og Pil til højre
- Brug af musehjulet mens musemarkøren er over tidslinjen eller over projektmonitoren
- Redigering af tidskoden i projektmonitorens tidskodekontrol.
- Klik på op- eller nedpilene i projektmonitorens tidskodekontrol
- Træk markørens position i projektmonitoren
Beskæring af et klip
Den nemmeste måde at beskære et klip er at placere tidslinjemarkøren der, hvor du ønsker at beskære klippet og så vælge klippet (klik på det) og bruge menuen (standard tastaturgenvej Ctrl + R).
Alternativt kan du bruge skæreværktøjet.
Ændring af et klips størrelse
Et klips størrelse kan ændres fra starten eller slutningen af klippet ved at trække dets venstre eller højre kant. Hvis du ønsker en mere præcis justering af størrelsen, så kan du placere tidslinjemarkøren der, hvor du ønsker at justere størrelsen til og så bruge (standard tastaturgenvej: 1) eller (standard tastaturgenvej: 2) i menuen menuen Tidslinje.
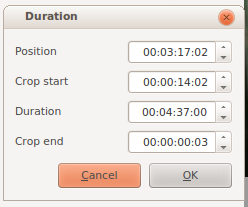
For at få endnu mere præcis kontrol over længden af et klip kan du dobbeltklikke på det i tidslinjen og justere dets varighed ved hjælp af dialogen Varighed. Du kan opnå præcision på frame-niveau på denne måde.
Du kan også ændre et klips størrelse ved at beskære det med skæreværktøjet og så slette den del, som du ikke vil bruge.
Fjernelse af tomrum imellem klip
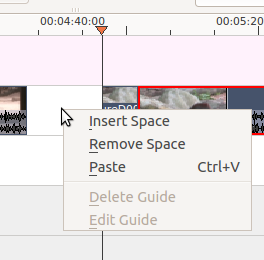
Højreklik i mellemrummet mellem klippene og vælg . Vær dog opmærksom på, at hvis du har klip i flere spor og de ikke er grupperede, så kan fjernelse af tomrum forstyrre justeringen af klippene imellem sporene; tomrummet fjernes kun fra den tidslinje du klkkede på. I denne situation kan det være mere sikkert at bruge tomrumsværktøjet.
Den nederste værktøjslinje
Der er en værktøjslinje under tidslinjen, som kontrollerer de forskellige aspekter af editoren.
The first 6 buttons on this toolbar belong to two groups of three buttons. These are the same settings that are controlled by the tool menu.
Active buttons are light blue with a box around them.
Edit Mode Group (one of these can be active)
1. Normal Mode
2. Overwrite Mode
3. Insert Mode
Tool Group (one of these 3 can be active)
4. Selection Tool
5. Razor Tool
6. Spacer Tool
Zoom Tools
7. Fit Zoom to Project
8. Zoom project including (L to R) zoom out, zoom level and zoom in
Ungrouped (These toggle on and off independently)
9. Split Audio and Video Automatically
10. Show Video Thumbnails
11. Show Audio Thumbnails
12. Show marker comments
13. Snap
Normal Mode
In this edit mode you can not drag clips on top of other clips in the same track in the timeline. You can drag them to another track in the time line but not into the same track at the same time point as an existing clip. Contrast this to overwrite mode.
Overwrite Mode
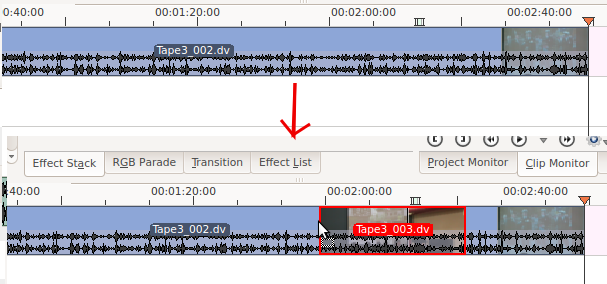
In this edit mode you can drag a clip into a track where there is an existing clip and the incoming clip will overwrite the existing clip over the length of the incoming clip.
The bottom of the picture shows how the track shown at the top changes after a clip has been dragged into it while the project is running in overwrite edit mode.
Insert Mode
This is not implemented yet.
Selection Tool
Use this to select clips in the timeline. The cursor becomes a hand when this tool is active.
Razor Tool
Use this to cut clips in the timeline. The cursor becomes a pair of scissors when this tool is active.
Spacer Tool
Use this tool (![]() ) to temporarily group separate clips and then drag them around the time line to create or remove space between clips. Very useful. Experiment with this tool to see how it works.
) to temporarily group separate clips and then drag them around the time line to create or remove space between clips. Very useful. Experiment with this tool to see how it works.
In the above example these clips are not grouped. However, the spacer tool groups them temporarily for you so you can move them all as a group.
Fit Zoom to Project
This will zoom the project out so that it all fits in the timeline window. This is the same function that is triggered by Timeline Menu item, .
Zoom project
The magnifying glasses zoom in or out on the timeline. The slider adjusts the zoom by large increments. These same settings that are controlled by the menu items, and .
Split Audio and Video Automatically
When this is on and you drag a clip to the time line, the audio in the clip will end up on an audio track and the video on a video track. This produces the same effect as selecting the clip, right click . With this off and you drag a clip onto the timeline both the audio and video tracks are combined into one video track.
Show Video Thumbnails
When on, the video clips in the timeline will contain thumbnails as well a filename. Otherwise they just have the clip filename.
Show Audio Thumbnails
When on, the audio clip will have a wave representation of the audio data as well as a filename. Otherwise they just have the clip filename.
Show marker comments
This toggles on and off the display of the comments saved inside markers (gold and inside the clip in the picture below) and inside guides (purple above the timeline in the picture below).
Snap
When this feature is on, dragging the beginning of one clip near to the end of another will result in the end of the first clip snapping into place to be perfectly aligned with the beginning of the first. As you move the two ends near each other, as soon as they get within a certain small distance, they snap together so there is no space and no overlap. Importantly this occurs even if the clips are in different tracks in the timeline.
Clips will also snap to the cursor position, markers and guides.


