Digikam/Sharpening
Sharpening in digiKam
Transcribed from Dmitri Popov's blog, 08 May, 2013
The Sharpen tool in digiKam offers three sharpening methods: simple sharp, unsharp mask, and refocus. Each method has its advantages and drawbacks. The simple sharp technique uses a standard convolution matrix algorithm to improve image details. If you are curious about the nitty-gritty of the convolution matrix, the GIMP documentation provides a brief description of the algorithm. In fact, the simple sharp tool in digiKam is ported from the GIMP project. The main advantage of the simple sharp method is its simplicity. The Simple Sharp tool in digiKam has only one adjustable parameter called which determines the strength of the applied sharpening filter. On the downside, the simple sharp method doesn’t handle image noise very well: it tends to introduce more noise in photos taken at lower ISO settings.
is a popular sharpening method which sharpens the edges of the elements without increasing noise. The unsharp mask technique creates a slightly blurred version of an image, which is then subtracted from the original in order to detect edges. The resulting mask is then used to increase contrast along the detected edges to produce a sharper final image. The Unsharp Mask tool in digiKam has three adjustable parameters:
specifies how many pixels on either side of an edge will be affected by sharpening. High-resolution photos allow higher radius.
determines the strength of sharpening.
specifies the minimum difference in pixels that indicates an edge where sharpen must be applied. This lets you protect areas of smooth tonal transition from sharpening, and avoid creating blemishes in face, sky or water surfaces. [1]
When using the unsharp mask tool, you should keep in mind that it can introduce subtle color shifts and halo artifacts visible as dark or light outlines near edges.

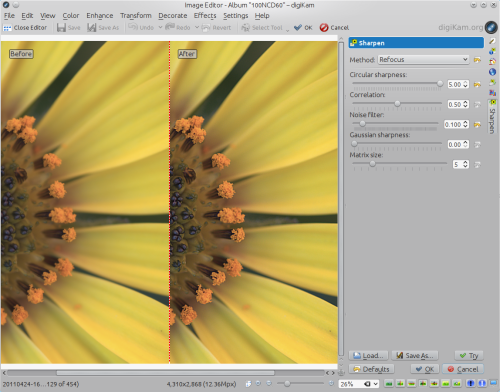
Finally, the method is based on the Refocus plugin for GIMP which uses a technique called FIR Wiener filtering to sharpen the image (see http://en.wikipedia.org/wiki/Wiener_filter). Similar to the original plugin, the Refocus tool in digiKam offers several adjustable parameters:
is a key parameter which determines the radius of the circular convolution. Basically, it specifies the strength of the refocusing action.
helps to reduce artifacts. Increasing the correlation value reduces the sharpening effect. Useful values are 0.5 and values close to 1 (e.g., 0.95 and 0.99).
may help to reduce artifacts. Similar to the Correlation parameter, increasing the noise filter value reduces the sharpening effect. A useful value is 0.01.
is used to specify the radius of the Gaussian convolution for correcting Gaussian blur. In most cases, it should be set to 0, as it introduces artifacts. When using non-zero values with Gaussian sharpness, you might need to increase the Correlation and Noise filter parameters, too.
determines the size of the transformation matrix. Increasing this parameter may give better results, especially when large values are chosen for the Circular sharpness or Gaussian sharpness parameters. In most cases, you should select a value in the range 3-10. [2]
is the most powerful and effective sharpening tool in digiKam’s arsenal, as it not only offers a superior sharpening method and granular controls, but can also handle noise.
[1] Source: http://docs.gimp.org/en/plug-in-unsharp-mask.html
[2] Source: http://refocus.sourceforge.net/
