Plazma
Első ránézésre
A Plazma a KDE asztali környezete. Igazából egy olyan technológia is, ami képes különféle eszközökhöz alkalmazkodni. Jelenleg a Plazma háromféle változatban érhető el: az asztali Plazma, amivel lapjaink nagy része foglalkozik, a Plazma Netbook, és a Plazma Aktív, az új és klassz asztali környezetünk táblagépekre és okostelefonokra.
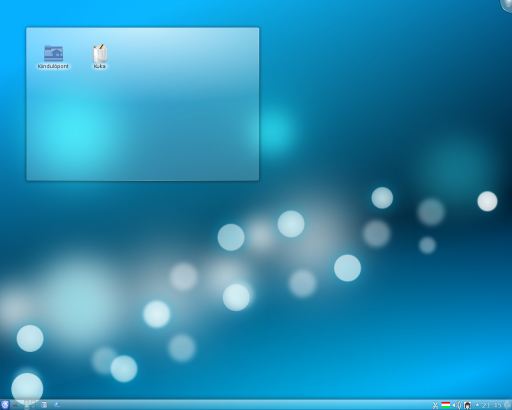
Egy tipikus, személyi számítógépen használatos Plazma asztala így néz ki:

Egy alapértelmezett Plazmás asztal négy fő része:
- A panel, més néven tálca. Itt található a programindító menü gombja, a megnyitott ablakok (programok) listája, az óra és a paneltálca;
- Az asztal, ahová az ikonok és widgetek kerülnek;
- A mappanézet nevű elem, amely megjeleníti egy mappa tartalmát, lehetővé téve alapvető fájlkezelési műveleteket az asztalon;
- A Plazma eszköztár. Ebből egy-egy van a képernyő jobb felső sarkában és a panel végén. Ezzel gyorsan és megbízhatóan érhetőek el konfigurációs és más opciók.
Mindezen alapértelmezett elemek kedv szerint konfigurálhatóak és számos eszközt és tartalmat tárolhatnak.
Plazma gyorstalpaló
A GYIK az asztali Plazma jelenlegi változatához itt található, tömör válaszokkal gyakori kérdésekre és a régebbi változatok GYIK-jeinek címeivel.
Eligazodás a Plazmán
A Plazmát ugyanúgy kell használni, mint bármely más asztali környezetet, pl. az alkalmazásindító megnyitásával, a jelenleg aktív programok megnézésével a feladatkezelőn, a paneltálca ikonjainak megnézésével, stb.
A "widgetek" fontos részét képzik a Plazmának. A widgetekre az asztal különálló elemeiként kell gondolni, beleértve a menüt, ikonokat, paneltálcát, órát, stb. Az asztalon is el lehet helyezni őket, de bele is lehet őket integrálni többek között a panelba, a képernyőkímélóbe vagy az irányítópultba. A widgetek nem csak általános asztali feladatokra képesek, hanem minden másra is, mondjuk, van widget microblogging szolgáltatásokhoz (Twitter, identi.ca), mértékegység-átváltásra, időjárás megnézésére, fájlmegosztára és még egy csomó másra. A panel és az asztal is egyfajta widget, ami más widgeteket tárol.
És hogy mi köze van ennek az asztal használatához? A Plazma új funkciókat kínál a hagyományos asztali megjelenés megtartása mellett. Már volt szó a Plazma eszköztárról: ezzel neki is vághatsz a Plazma asztal testreszabásához. Kattintásra egy menü fog felbukkanni számos menüponttal: új elemeket adhatsz a panelhez vagy az asztalhoz, paneleket méretezhetsz át, adhatsz hozzá vagy távolíthatsz el, megváltoztathatod a háttérképet és így tovább.
A mappanézet
Mint ahogy a mellékelt képernyőképen látható, az ikonok nem pont az asztalra kerülnek, hanem egy "mappanézetnek" nevezett tárolóba. A mappanézet alapból az Asztal mappát mutatja és fájlokat lehet bele tenni, megnyitni, kivágni, másolni, beilleszteni, átnevezni és új fájlokat/mappákat lehet benne létrehozni.
Egy asztalon több mappanézet is lehet, sőt, panelekbe is lehet integrálni őket. A mappanézet bármilyen mappa tartalmát képes megjeleníteni, helyi és távoli mappákat is. Minden mappanézetet kedv szerint lehet lehet áthelyezni vagy átméretezni külön-külön.
A mappanézetet alapértelmezett háttérként is lehet használni, ha a hagyományos "ikonok az asztalon" nézetet szeretnéd.
Panels

Panels allow you to place widgets around the edges of the screen. These collections of widgets can be configured in various ways, including making them automatically hide when not in use or aligned to certain areas of the screen.
By default, there is one panel at the bottom of the screen, but you can add more panels, move and otherwise configure the default panel and remove panels you no longer want. The widgets in all of the panels may also be adjusted to your liking.
For more information on configuring panels in Plasma Desktop and what they are capable of doing for you, visit the Plasma Panels page.
Widgets

Plasma supports widgets written specifically for Plasma (also known as Plasmoids) as well as widgets from other sources such as Google Gadgets, Superkaramba and some Dashboard Widgets from Mac OSX. Additional widgets can easily be found and installed through Get Hot New Stuff.
To see the widgets that are installed on your system and ready to use open the Plasma Widget Explorer by either
- opening the Desktop Toolbox in the upper right corner of the screen and selecting ,
- opening the Panel Toolbox furthest to the right in the Panel and selecting , or
- right clicking on the Desktop and choosing from the context menu.
To place a widget on the Desktop simply drag it from the Widget Explorer to the Desktop. To place a widget in the panel first open the Panel Toolbox and from there open the Widget Explorer (click ), locate the widget you wish to add and drag it to the desired position in the Panel.
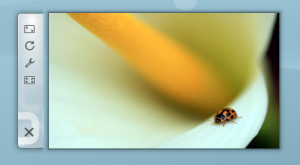
Widgets that are docked into a panel usually have an Options menu, while those on the desktop have the configuration options within the 'handle', the shaded area which pops up when hovering over the widget. Clicking and holding the mouse on the blank part of the handle will allow you to drag the widget to the desired position.

You have four tools on this handle. The top one is the re-sizer. Click and drag on the tool to resize the widget.
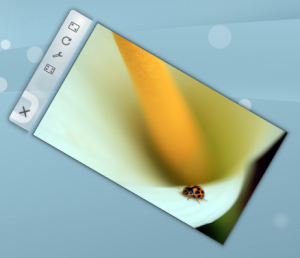
The second tool is a rotate tool. Again, click and hold the tool, while rotating to the desired angle.

The third is the wrench or spanner which allows you to configure that particular widget's settings.
Finally, the fourth tool is the "expanded view" tool and is available only on widgets that support this feature, such as the Picture Frame or Web viewers. When clicked, the Picture Frame widget will, for example, open the currently viewed in an image viewer while the Web Slice widget will open the web page in a full web browser window.
A list of Plasma widgets with their own page can be found here, and some of our favourite widgets are discussed on the Plasma Widgets page
Activities
The icons shown in the screenshot have small buttons in the top right and bottom right. The small pause button in the top right prevents the activity from being included when switching through Activities using Super + Tab. It also opens up an "x" to delete the activity. To change the names of the activities, look for the small wrench in the bottom right of the icon.

Use Cases
A user likes web comics so they add their favorite web comics via the comics widget. The user now has a full desktop activity dedicated to their favorite web comics. Now the user is happy with the web comics, but the user now has to go to work, so the user creates an activity with the folder view widgets set to the folders of the projects the user is currently working on. After work the user goes home and works on a side project of writing romance novels. The user always gains inspiration by looking at pictures of the user's significant other. The user now creates a new Activity but now puts pictures frame widgets with pictures of the user's significant other. The user also has a folder view of the romance novel project folder. Now no matter what the user is doing the user has a custom tailored activity to match it.
Go to this blog to read a few tips on using activities. Chanis blog has a number of examples as well as screencasts about activities.
Widget Layouts and Virtual Desktops
Virtual desktops, the ability to have a separate sets of windows on separate desktops, can tie in with Activities. You can have a different activity on each virtual desktop. In Plasma Desktop 4.4, this can be configured by entering and navigating to , and checking .
In Plasma Desktop 4.3, You configure this by zooming out and choosing . Then select and zoom in again.
Hints and Tips
Tweaking Plasma
- Learn how to add a sidebar with clock and news
- Customize your Plasma by mixing multiple Plasma themes
Reloading Plasma
Sometimes you might want to reload Plasma, like right after changing system language so the changes takes effect, or because of a problem with the desktop. To do that, open a terminal and run these commands:
kquitapp plasma-desktop
plasma-desktop
Further information
- The Plasma FAQ's
- Plasma HowTo's - short screencasts
- Glossary
- Some of our favourite plamoids - why not add yours?
- Here's how to install more Plasmas widgets
- Learn the versatility of KRunner
| Back to the Introduction page |

