Kdenlive/Підручник/Монтажний стіл/Редагування
Редагування
Редагування виконується на монтажному столі. Додати кліп можна перетягуванням його з контейнера проєкту або монітора кліпів. Щойно кліп буде скинуто на доріжку, його можна буде пересунути (перетягнути і скинути) на іншу позицію на тій самій або іншій доріжці.
Позиціювання у межах вашого проекту
Курсор монтажного столу показує поточну позицію у проєкті. Позиції курсорів на лінійці монтажного столу і моніторі проєкту завжди синхронізуються. Змінити позицію можна у декілька способів:
- Клавіатурні скорочення: стрілки ліворуч-праворуч для переходу на один кадр, Shift+стрілки ліворуч-праворуч для переходу на 1 секунду.
- Клацання/Перетягування на лінійці монтажного столу або на порожніх ділянках монтажного столу.
- Клацання/Перетягування на лінійці монітора проєкту.
- Гортанням коліщатка миші, коли вказівник миші перебуває на лінійці монтажного столу або моніторі проєкту.
- Редагуванням часового коду позиції на віджеті часового коду монітора проєкту.
- Натисканням кнопок зі стрілками вгору і вниз на віджеті часового коду монітора проєкту.
Вирізання кліпу
Найпростішим способом розрізати кліп є розташувати курсор монтажного столу там, де ви хочете розрізати кліп, потім позначити кліп (клацнути на ньому лівою кнопкою миші) і скористатися пунктом меню (типове клавіатурне скорочення: Shift + R).
Крім того, можна скористатися
Крім того, можете скористатися інструментом леза.
Зміна розмірів кліпу
A clip can be resized from its start or end by dragging its left or right edge. If you want a more precise resize, you can place the timeline cursor wherever you want the resize to end and use the menu (default shortcut: 1) or (default shortcut: 2)
To even more precisely control the length of a clip, double click it in the timeline and adjust its duration using the Clip duration dialog. You can have frame-level accuracy with this method.
You can also resize a clip by cutting it with the Razor Tool and then deleting the bit you do not want.
Вилучення проміжків між кліпами
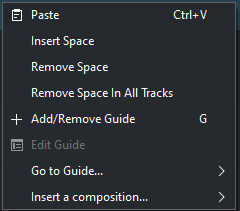
Right click in the space between the clips and choose . Be aware however that if you have clips on multiple tracks in the timeline and they are not grouped, then removing space may disturb the alignment of the clips between the different tracks — the space is only removed from the timeline where you clicked. Under this situation it may be safer to use the Spacer Tool.
Середня панель інструментів
There is a toolbar between monitors and the timeline that controls various aspects of the editor.

1. Track Compositing drop down.
1a. Немає
1c. Висока якість
2. Спадний список Режим редагування монтажного столу
Note with ver 17.04 this mode is selected via a dropdown rather then toggle buttons.
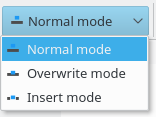
2a. Звичайний режим
2б. Режим перезапису
2в. Режим вставлення
Ті самі пункти параметрів можна знайти у меню .
Група інструментів (активним є лише один з трьох)
Активні кнопки показано сірим кольором.
6. Position indicator - displays the time point or frame number of the location of the hovering mouse. Click on the widget to change the display between time and frame number
7. Загальна тривалість проєкту
8. Insert Clip Zone in Timeline. See Insert & Overwrite Advanced Timeline Editing on Kdenlive Home page.
9. Overwrite Clip Zone in Timeline. See Insert & Overwrite Advanced Timeline Editing on Kdenlive Home page.
10. Видобути ділянку монтажного столу
11. Підняти ділянку монтажного столу
12. Улюблені ефекти
13. Розпочати попередній перегляд результатів обробки
14. Зупинити попередній перегляд результатів обробки
15. Додати ділянку попереднього перегляду
16. Вилучити ділянку попереднього перегляду
17. Вилучити усі ділянки попереднього перегляду
18. Автоматичний попередній перегляд
19. Вимкнути попередній перегляд на монтажному столі
20. Керування кешованими даними
Items 13-20 are covered by Timeline preview rendering article on the Kdenlive Home Page
21. Smaller Tracks (see track resizing icon)
22. Bigger Tracks (see track resizing icon)
23. Use timeline zone ![]() / Don't use timeline zone
/ Don't use timeline zone ![]() for insert ( toggles). See Insert & Overwrite Advanced Timeline Editing on Kdenlive Home page.
for insert ( toggles). See Insert & Overwrite Advanced Timeline Editing on Kdenlive Home page.
Нижня панель інструментів

24. Автоматично відокремити звук від відео
26. Показувати мініатюри відео
27. Показувати мініатюри звуку
28. Показувати коментарі до позначок
29. Прив’язати
Інструменти масштабування
31. Зменшити масштаб
33.Зменшити
Опис кнопок
Композиція доріжок — Немає
When Track Compositing is set to None you will not get tracks with alpha channel information to composite with the other tracks unless an explicit composite or affine transition is added between the clips. This is the behaviour that kdenlive displayed in older ( <= ver 0.9.X).
Track Compositing - Preview
When track compositing is set to Preview tracks with alpha channel information will be automatically composited with the other tracks using an algorithm that is somewhat faster than the algorithm used with Track Compositing - HighQuality but which slightly degrades the colors.
Track Compositing - HighQuality
When track compositing is set to High Quality tracks with alpha channel information will be automatically composited with the other tracks using an algorithm (qtblend) that is somewhat slower than the algorithm used with Track Compositing - Preview but which retains higher fidelity colour information.
Режим редагування монтажного столу — Звичайний режим
In this edit mode you can not drag clips on top of other clips in the same track in the timeline. You can drag them to another track in the timeline but not into the same track at the same time point as an existing clip. Contrast this to overwrite mode.
Режим редагування монтажного столу — Режим перезапису
In this edit mode you can drag a clip onto a track where there is an existing clip and the incoming clip will overwrite that portion of the existing clip (or clips) covered by the incoming clip.
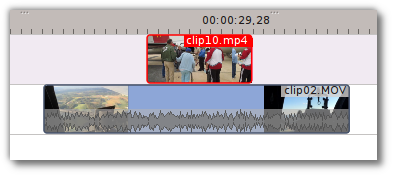
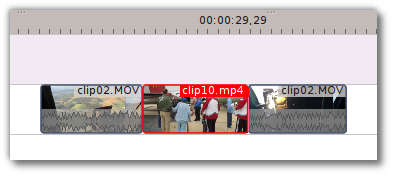
In the "After" screenshot above, you can see that the clip which was dragged from the upper track has replaced a portion of the clip on the lower track.
Режим редагування монтажного столу — Режим вставки
Якщо вибрано цей режим і ви скинете позначене на монтажний стіл, позначені дані буде вставлено на монтажний стіл з точки, де було відпущено ліву кнопку миші. Кліп, куди було скинуто позначене, буде розрізано, а решту кліпів буде пересунуто праворуч так, щоб умістити вставлені дані.


Інструмент вибору
Use this to select clips in the timeline. The cursor becomes a hand when this tool is active.
Інструмент підрізання
Use this to cut clips in the timeline. The cursor becomes a pair of scissors when this tool is active.
Інструмент-розпірка
Use this tool (![]() ) to temporarily group separate clips and then drag them around the timeline to create or remove space between clips. Very useful. Experiment with this tool to see how it works.
) to temporarily group separate clips and then drag them around the timeline to create or remove space between clips. Very useful. Experiment with this tool to see how it works.
In the above example these clips are not grouped. However, the spacer tool groups them temporarily for you so you can move them all as a group.
Масштабування за проектом
This will zoom the project out so that it all fits in the timeline window. This is the same function that is triggered by Timeline Menu item, .
Масштабування проекту
The magnifying glasses zoom in or out on the timeline. The slider adjusts the zoom by large increments. These same settings are controlled by the menu items, and .
Автоматично відокремити звук від відео
When this is on and you drag a clip to the timeline, the audio in the clip will end up on an audio track and the video on a video track. You can achieve the same result if you select the clip, right click, . When this is off and you drag a clip onto the timeline, both the audio and video tracks are combined into one video track.
Automatic Transitions
When active any transitions added to the time line will have the automatic transition option checked by default. See Automatic Transitions
Показувати мініатюри відео
When on, the video clips in the timeline will contain thumbnails as well a filename. Otherwise they just have the clip filename.
When the timeline is zoomed in to the maximum, the video track will show a thumbnail for every frame in the clip. When the timeline is not on maximum zoom, the video track will show a thumbnail for the first and last frame in the clip.
Показувати мініатюри звуку
When on, the audio clip will have a wave representation of the audio data as well as a filename. Otherwise they just have the clip filename.
Показувати коментарі до позначок
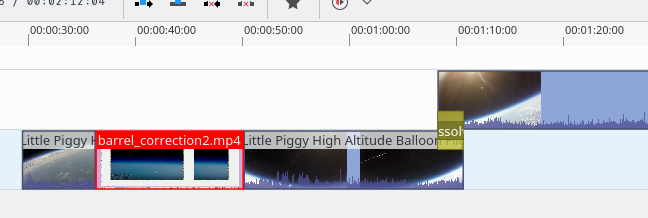
This toggles on and off the display of the comments saved within markers (the text with the gold background in the example below) and within guides (the text with the purple background).
Прив’язати
When this feature is on, dragging the beginning of one clip near to the end of another will result in the end of the first clip snapping into place to be perfectly aligned with the beginning of the second clip. As you move the two ends near to each other, as soon as they get within a certain small distance, they snap together so there is no space and no overlap. Note that this occurs even if the clips are on different tracks in the timeline.
Clips will also snap to the cursor position, markers and guides.
Cutting Footage from multiple aligned tracks - Ripple Delete
This is available on the menu under [1].
Seems missing in Kdenlive 17.04 & 18.04
Mark In and Out points in the Project Monitor, then choose (or Ctrl-X). Kdenlive deletes all footage between the In and Out points in unlocked tracks, slides everything else back to fill the gap, and puts the playhead on the In point.
- ↑ available on bleeding edge versions > 0.9.10 (Jan2015)


