Kdenlive/Manual/QuickStart
Creating a new project

The first step is creating a new (empty) folder for our new project. Then get some sample video clips, or download them from here: kdenlive-tutorial-videos-2011-avi.tar.bz2 (7 MB)[1], and extract them to e.g. a Videos subfolder inside the project folder.
Open Kdenlive and create a new project (File > New).
Chose the previously created project folder and select an appropriate project profile. The video files provided above are 720p, 23.98 fps. If you are using your own files and don’t know which one to use, Kdenlive will suggest an appropriate one when the first clip is added, so you can leave the field on whatever it is.
Adding clips

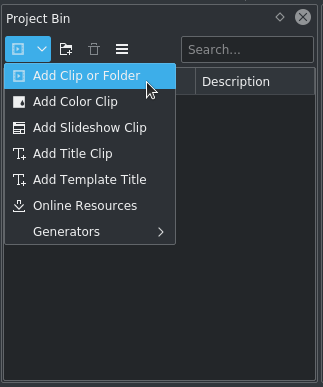
Now that the project is ready, let’s start adding some clips. This works via the Project Tree widget; A click on the Add Clip icon directly opens the file dialog, a click on the small arrow shows a list of additional clip types that can be added as well. Video clips, audio clips, images, and other Kdenlive projects can be added via the default Add Clip dialog.

After loading the clips, Kdenlive will look about like this. On the top left there is the already known project tree. Right of it are the monitors that show video; The clip monitor displays video from the original clips, the project monitor shows how the output video will look like, with all effects, transitions, etc. applied. The third, also very important, item is the timeline: This is the place where the video clips will be edited. There are two different types of tracks, Video and Audio. Video tracks can contain any kind of clip. Audio tracks as well – but when dropping a video file to the audio track, only the audio will be used.

Let’s save the work via File > Save. This saves our project, i.e. where we placed the clips on the timeline, which effects we applied, and so on. It can not be played.[2] The process of creating the final video is called Rendering.
Timeline
Now comes the actual editing. Project clips are combined to the final result on the timeline. They get there by drag and drop: Drag some Napoli (assuming you are using the files provided above, as in the rest of this quick start tutorial; If not, please make sure your screen is waterproof, and perhaps tomatoproof), and drop it onto the first track in the timeline.

Since some cutley is needed as well, drop the spoon on the first track as well. Then drag the Napoli to the beginning of the timeline (otherwise the rendered video would start with some seconds of plain black), and the Spoon right after the Napoli, such that it looks like in the image on the left. (Where I have zoomed in with Ctrl+Wheel.)

The result can already be previewed by pressing Space (or the Play button in the project monitor). You will see the Napoli directly followed by a Spoon. If the timeline cursor is not at the beginning, the project monitor will start playing somewhere in the middle; you can move it by dragging it either on the timeline ruler or in the project monitor.

Since after eating comes playing, there is a Billard clip. Add it to the timeline as well. The first 1.5 seconds nothing happens in the clip, so it should perhaps be cut to avoid the video becoming boring. An easy way[3] for this is to move the timeline cursor to the desired position, then drag the left border of the clip when the resize marker appears. It will snap in at the timeline cursor when you move close enough.

To add a transition between eating (the Spoon) and playing billard, the two clips need to overlap. To be precise: the second clip should be above or below the first one and end some frames after the second one begins. Zooming in until the ticks for simple frames appear helps there; it also makes it easy to always have the same transition duration, like five frames in this case.

Now that the clips overlap, the transition can be added. This is done either by right-clicking on the upper clip and chosing Add Transition or, easier, by clicking the lower right corner of the Spoon clip. Latter by default adds a dissolve transition, which is in this case the best idea anyway since the Spoon is not required for playing anyway.
The dissolve transitions fades the first clip into the second one.

Let’s add the last clip, the Piano, now, and again apply a dissolve transition. When adding it on the first track of the timeline, you need to click on the new clip’s lower left edge to add the transition to the previous clip.
References and notes
- ↑ If you prefer Theora (which you probably don’t since Ogg Video usually causes problems), you can alternatively download kdenlive-tutorial-videos-2011-ogv.tar.bz2.
- ↑ To be correct, it can be played using
melt yourproject.kdenlive, but this is not the way you would want to present your final video since it is (most likely) too slow. - ↑ Writing it this way suggests that there are several ways of cutting a clip. This is in fact true.

