Digikam/Processar fitxers RAW
Processar fitxers RAW en digiKam
Transcrit des de l'article d'en Dmitri Popov, el 4 de maig de 2011
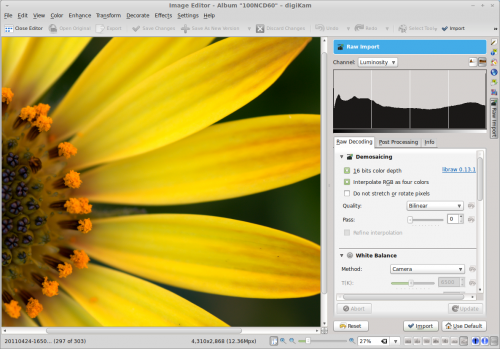
digiKam normalment fa un treball decent en la descodificació de fitxers RAW utilitzant l'ajustament per omissió. Però si preferiu tenir el control complet de com processa l'aplicació els fitxers RAW, seleccioneu , canvieu a la secció i, a activeu l'opció . La propera vegada que obriu un fitxer RAW per a l'edició, digiKam us oferirà la interfície d'importació RAW des d'on podreu ajustar la configuració d'importació RAW i post-processament. digiKam es basa en la biblioteca LibRaw per a tot el processament RAW. Libraw és una biblioteca de C++ pur, la qual inclou algoritmes d'interpolació cromàtica des del programari dcraw, així com algoritmes d'altres projectes com Rawtherapee.

La barra lateral conté tres pestanyes: , i . La secció us dóna accés a la configuració permetent-vos ajustar la interpolació cromàtica, el balanç de blancs, la reducció de soroll i la correcció de l'aberració cromàtica, i la gestió del color.
La interpolació cromàtica és un procés de reconstrucció d'una imatge a tot color des de la sortida en brut d'un sensor d'imatge. Per entendre millor el que és i com funciona, possiblement voldreu consultar l'article Understanding Digital Camera Sensors. digiKam (o més aviat la biblioteca LibRaw) suporta diversos algoritmes d'interpolació cromàtica, incloent bilineal, VNG, AHD, LMMSE, entre d'altres. Podeu utilitzar la drecera de teclat Majús + F1 per veure una breu descripció tècnica de cadascun dels algorismes. Però la millor manera de veure les diferències entre els diferents algorismes és tractar d'aplicar-los al fitxer RAW obert. Seleccioneu l'algorisme que vulgueu i premeu el botó per veure el resultat. El plafó de vista prèvia mostra una imatge que s'importarà a l'editor, i podeu utilitzar el control lliscant de zoom a la part inferior de la finestra per apropar la imatge per un estudi més detallat.
By default, digiKam converts RAW files into 8-bit color images, but you can choose the 16-bit mode instead by enabling the 16 bits color depth option. The 8-bit mode is faster, but the 16-bit conversion is by far the best way to go, as it provides better tonal range. If you choose to work in the 16-bit mode, it’s recommended that you enable and configure color management options in the section to prevent dark rendering of the image in the editor. Due to the way certain algorithms process green pixels, the resulting image can contain undesirable patterns and artifacts. Enabling the option can fix that. The option is there specifically for Fujifilm’s cameras with the Super CCD sensors and cameras using sensors with non-square pixels. When this option is enabled, the image is titled 45 degrees, so that each output pixel corresponds to one RAW pixel. This option also prevents the image from stretching to its correct aspect ratio.
In the section, you can adjust white balance settings and specify how the system should handle highlight clippings (overexposed areas in the photo). LibRaw offers several algorithms for restoring highlight clippings — Solid White, Unclip, Blend, and Rebuild — and you can view their brief description by using the Shift + F1 keyboard shortcut. To process highlights more accurately, enable the option. And if you want LibRaw to automatically adjust brightness, tick the check box. Besides white balance, you can also enable and adjust the option and manually tweak exposure compensation settings. The under- and overexposure buttons at the bottom can identify under- and overexposed areas of the photo in the preview pane, which can help you to adjust exposure settings.
Using the options in the section, you can choose to apply one of the supported noise reduction algorithms to the image as well as enable the chromatic aberration correction option and adjust its settings. And in the section, you can specify a color profile and a color space (refer to Color Management in digiKam for more info on color management).
Under the tab, you can adjust several exposure settings (e.g., brightness, contrast, gamma, and exposure) as well as adjust the luminosity curve. While these adjustments can be performed later when editing the converted image, you can choose do this during the RAW import to streamline the editing process. digiKam applies all adjustments to the preview image, so you can immediately see the result of your tweaking without performing the actual conversion.
Once you’re satisfied with the settings and adjustments you made, press the button to import and process the RAW file. And remember: if in doubt, you can always press the button to let digiKam import the RAW file using the default settings.
