Archive:Kdenlive/Manual/Monitors
Monitors
Kdenlive uses 2 monitor widgets to display your videos: Clip Monitor and Project Monitor. A third monitor - the Record Monitor - previews video capture. These monitors can be selected by clicking the corresponding tabs which appear at the bottom of the monitor window.
Clip Monitor
The Clip monitor displays the unedited clip that is currently selected in the Project Tree.

Widgets on the Clip Monitor
1) Set zone start button - click this to set an 'in' point.
2) Set zone end button - click this to set an 'out' point.
3) Zone duration indicator - selected by setting in and out points. Dragging the clip from the clip monitor to the timeline when there is a selected zone causes the selected zone, not the entire clip, to be copied to the timeline.
4) Position Caret - can be dragged in the clip. (In ver >=0.9.4 and with OpenGL turned on in Settings -> Configure Kdenlive -> Playback, audio will play as you drag this.)
5) Timecode widget - type a timecode here and hit Enter to go an exact location in the clip. Timecode is in the format hours:minutes:seconds:frames (where frames will correspond to the number of frames per second in your project profile).
6) Timecode arrows - can be used to change the current position of the clip in the clip monitor.
Creating Zones in Clip Monitor
Zones are defined regions of clips that are indictated by a colored section in the clip monitor's timeline - see item 3 above. The beginning of a zone is set by clicking [ (item 1 in the pic above). The end of a zone is set by clicking ] (item 2 in the pic above)
The clip monitor has a right-click (context menu) as described here.
Project Monitor
The Project Monitor displays your project's timeline - i.e. the edited version of your video.

Project Monitor Widgets
1) The position caret. Shows the current location in the project relative to the whole project. You can click and drag this to move the position in the project.
2) The timecode widget. You can type a timecode here and press Enter to bring the Project Monitor to an exact location.
3) Timecode widget control arrows. You can move the project monitor one frame at a time with these.
Creating Zones in Project Monitor
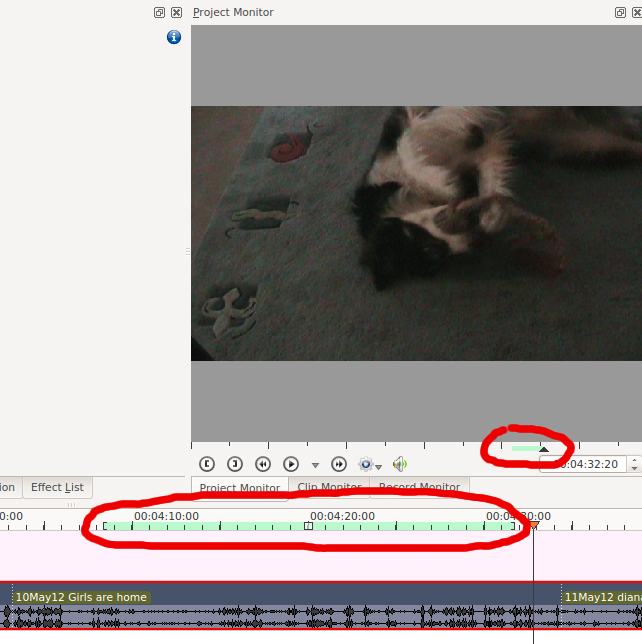
You can use the [ and ] buttons to create a zone in the Project Monitor the same way you make zones in the clip monitor. The zone will be indicated by a colored bar both on the timeline and underneath the Project Monitor.
You can get Kdenlive to only render the selected zone - see Rendering Using the Selected Zone Option.
The project monitor has a right-click (context menu) as described here.
Record Monitor
There is also a Record monitor that can be used to preview capture from Firewire, Blackmagic cards or through FFmpeg / video4linux.

