Prendre captures de pantalla
Appearance
Introducció
El propòsit de publicar captures de pantalla del programari és la introducció prospectiva dels usuaris a l'aparença i comportament per donar-los una idea de què esperar dels productes una vegada que es tenen en funcionament. Per tant, les captures de pantalla ha de documentar l'ús comú de l'entorn i les aplicacions, disponibles pels usuaris amb una configuració de maquinari estàndard.
Directrius
- Establir l'idioma a anglès, a menys que sigui una captura de pantalla localitzada.
- Desar com a imatge PNG.
- Preferiblement, utilitzeu l'arranjament per omissió (icones, esquema de colors, estil, decoració de finestra, configuració de l'aplicació, etc.)
- Preferiblement, utilitzeu la (mòdul Efectes d'escriptori en Arranjament del sistema), però no us preocupeu si la targeta gràfica no és compatible amb la composició.
- Preferiblement, utilitzeu el tipus de lletra "Sans Liberation" a 9 punts.
- Si la captura de pantalla mostra parts de l'escriptori, és preferible utilitzar el fons per omissió de plasma. Inclou un marge (al voltant de 20 píxels), si és possible, per assegurar-vos que les ombres de la finestra no es veuen retallades.
- Si esteu preparant una captura de pantalla localitzada, utilitzeu el mateix nom que l'original en anglès, amb el codi d'idioma (el mateix que es veu en l'adreça de la pàgina) annexat.
- Si la captura de pantalla és en actualització d'una existent, utilitzeu exactament el mateix nom per a que l'actualització es realitzi automàticament (veure Actualitzar una imatge).
Flux de treball
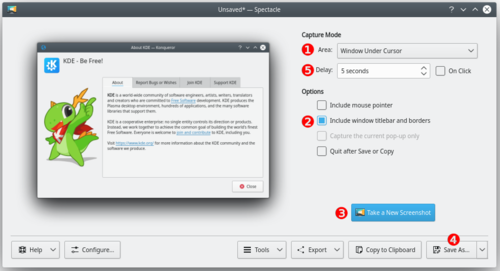
In this example Spectacle is used, but other screen capture applications work as well.

- Start Spectacle
- Choose a Capture mode (1) from the following:
- Current Screen (only visible on a multi-screen environment)
- Everything on the single screen is captured, usually used for desktop screenshots.
- Full Screen
- This works differently, depending on whether you have a single screen or a multi-screen environment. For single screen users it captures everything currently on the screen. Multi-screen users will see it capture all screens into a single window.
- Window Under Cursor
- The content of an applications or dialog window is captured. usually used for application screenshots. Preferably, check the Include window decorations option (2).
- Region
- Only a region to be defined later is captured.
- Click on (3).
- Full Screen
- Current Screen
- Window Under Cursor
- Click anywhere on the screen to take the snapshot.
- Region
-
- Use the mouse to draw a rectangle around the region to be captured (for example around a window).
- Strike the Enter key or double click in the region to take the snapshot.
- Click on (4).
- Browse to the location you want to save the image, give it a name (name.png) and click on
Consells i trucs
- The option (5) makes Spectacle wait a given amount of time (given in seconds) before taking the snapshot. This can be useful in many situations, for example when taking screenshots of drop-down menus
- It's often useful to create a separate user for taking screenshots to ensure a standard look with the default settings.
- Use in the wallpaper settings to get a white background.
