Plasma
Template:I18n/Language Navigation Bar

Un'introduzione: cos'è Plasma e cosa fa
Plasma è l'interfaccia desktop per KDE Software Compilation 4, comprende il lanciatore delle applicazioni (menu d'avvio), il desktop e il pannello del desktop (spesso indicato semplicemente come task bar, sebbene questa sia solo un componente del pannello).
Plasma a colpo d'occhio
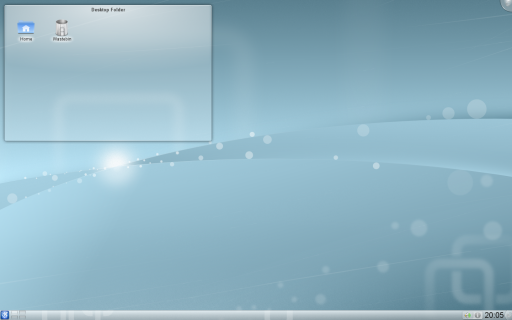
Un tipico desktop Plasma assomiglia a questo:

I tre componenti fondamentali di un desktop Plasma sono:
- Il pannello, meglio noto come barra delle applicazioni, contiene il lanciatore delle applicazioni, la lista delle attività (programmi), l'orologio e la system tray;
- Il desktop, l'area dove si trovano gli oggetti e le icone;
- La casella degli strumenti Questa è localizzata in alto a destro dello schermo. È presente anche sulla destra del pannello.
Trovare il proprio modo di utilizzare Plasma
Puoi utilizzare Plasma come utilizzeresti il desktop di qualsiasi altro sistema operativo, accedendo al menu delle applicazioni (K Menu), visualizzando i programmi attualmente attivi nella barra delle applicazioni, interagendo con le icone nella system tray e così via.
Una parte importante di Plasma sono i cosiddetti widget (oggetti). Gli oggetti sono le singole unità del desktop, includono (sebbene non limitati a questi) il menu delle applicazioni, le icone, la system tray, l'orologio... Gli oggetti possono essere presenti sul desktop stesso o essere inseriti nel pannello. Pannelli e desktop sono in effetti dei tipi speciali di oggetti con lo scopo di contenerne altri (nei termini di Plasma vengono chiamati "Contenitori" (Containments)).
Come questo si correla con l'utilizzo del desktop? Plasma presenta alcune nuove caratteristiche rispetto al modo tradizionale di utilizzare il desktop. Abbiamo già menzionato le Caselle degli strumenti, talvolta chiamate "cashew": questi sono i punti da cui iniziare ad interagire e personalizzare Plasma. Facendo clic su questi si aprirà un menu sullo schermo con una serie di scelte: puoi aggiungere oggetti al tuo pannello o al desktop, ridimensionare, aggiungere o rimuovere pannelli e altre operazioni.
Desktop e icone
Come potresti aver notato dalla schermata, non ci sono icone poste direttamente sul desktop. Invece sono collocate all'interno di un contenitore, meglio noto come Vista delle cartelle (Folder View). Sebbene ci siano una serie di ragioni tecniche per questo, Vista delle cartelle è perfettamente in grado di agire come un sostituto del desktop (infatti mostra la cartella Desktop in modo predefinito). Puoi trascinarvi icone, fare operazioni come taglia, copia, incolla, rinomina di file e anche creare nuove cartelle/file.
Le principali differenze rispetto al solito desktop sono essenzialmente due:
- è possibile avere più di una Vista delle cartelle sul desktop;
- puoi impostare Vista delle cartelle per mostrare anche altre cartelle (sia locali che di rete).
Oltre a Vista delle cartelle puoi posizionare sul desktop tutti i tipi di oggetti, come quelli dedicati al meteo, alle note, alla visualizzazione dei file... Non ci sono limiti a quello che puoi personalizzare.
Oggetti ovunque
In KDE SC 4.x Plasma supporta non solo gli oggetti scritti specificatamente per Plasma (noti anche come Plasmoidi), ma anche altri come Google Gadgets e i widget di Dashboard di Mac OS X. Oggetti aggiuntivi possono essere facilmente trovati ed installati tramite Get Hot New Stuff.
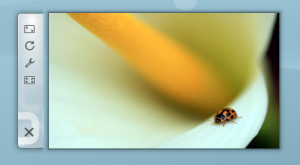
Gli oggetti che sono posizionati nel pannello hanno normalmente un menu Opzioni, mentre quelli sul desktop presentano le opzioni di configurazione tramite una "maniglia", l'area ombreggiata che compare a volte a destra a volte a sinistra dell'oggetto. Facendo clic sulla parte libera della maniglia e tenendo premuto il mouse puoi trascinare l'oggetto nella posizione desiderata.

You have four tools on this handle. The top one is the re-sizer. Click and hold on the tool and you can drag the size.
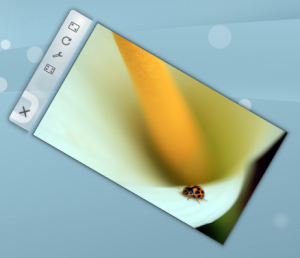
The second tool is a rotate tool. Again, click and hold the tool, while rotating to desired angle.

The third is the wrench or spanner which allows you to configure that particular widget's settings.
Finally, the forth tool is used on some widgets like the Picture Frame. If you use the Picture Frame widget for example, it will open the image viewer.
Some of our favourite widgets are discussed on the Plasma Widgets page
Start menus etc.
The Panel

The panel can be configured by clicking on the toolbox on the right of the panel which puts the panel into configure mode. This lets you configure the panel to fit your needs.
Panel Alignment: Allows the alignment of the panel to be set in three pre-set positions.
Always Visible: Keeps the panel visible at all times, even when windows are maximised.
Auto Hide: Hides the panel off screen until the mouse is placed near the screen edge.
Windows can cover: This allows windows to cover the panel and if maximised, will cover the panel.
Windows go below: This allows windows to go below the panel, even when maximised.
Maximise Panel: Makes the panel fit to the screen edges, if it has been resized.
Remove this panel: Removes the current panel.
Lock Widgets: Locks the panel and widgets in position.
Add Spacer: Allows you to add a spacer into the panel giving space between the items in it.
Add Widgets: Allows widgets to be added to the panel.
Height: Allows the panel height to be adjusted.
Screen Edge: Allows you to drag the panel to any of the four edges of the screen.

The arrows on the edge, just below the main settings allow the panel's size to be adjusted. Dragging the arrow makes the panel smaller or larger. Dragging the arrow pointing down, moves the panel's position.
Advanced usage
Special cases not covered here
Activities and the Zooming User Interface (ZUI)
KDE Plasma has brought a lot of new features to the modern linux desktop, however many people are only using a fraction of the desktop's full potential. One of the most useful and underused features is the plasma activities. The basic idea behind is that your desktop space is limited to how many widgets it can hold. A user will want to use a lot of widgets but doesn't want their desktop to be cluttered. The answer to this problem is activities; they allow you to specialize each desktop to whatever task you need to accomplish. To make a new activity you have to click on the toolbox in the upper right hand corner, from there click zoom out. The desktop will zoom out then click add new activity under the small desktop. It will make a new desktop right next to it. Now go click the zoom in button under the new desktop. With this desktop you can add whatever widgets to this desktop and it will not affect the other desktop.
Activities and Virtual Desktops
Virtual desktops, the ability to have a separate sets of windows on separate desktops, can tie in with Activities. You can have a different activity on each virtual desktop. In Plasma Desktop 4.4, this can be configured by entering System Settings and navigating to Desktop -> Multiple Desktops, and checking "Different Activity for Each Desktop".
In Plasma Desktop 4.3, You configure this by zooming out and choosing "configure Plasma". Then select "use a different activity on each desktop" and zoom in again.
Use Cases
A user likes web comics so they add their favorite web comics via the comics widget. The user now has a full desktop activity dedicated to their favorite web comics. Now the user is happy with the web comics, but the user now has to go to work, so the user creates a activity with the folder view widgets set to the folders of the projects the user is currently working on. After work the user goes home and works on a side project of writing romance novels. The user always gains inspiration by looking at pictures of the user's significant other. The user now creates a new Activity but now puts pictures frame widgets with pictures of the user's significant other. The user also has a folder view of the romance novel project folder. Now no matter what the user is doing the user has a custom tailored activity to match it.
Go to this blog to read a few tips on using activities.
Hints and Tips
The Taskbar
Accessing the Taskbar Settings Menu: Click the panel toolbox (aka cashew), then right-click on the taskbar. From there you can access the Taskbar Settings dialog. The following settings are particularly useful:
- Grouping and Sorting: Grouping can be by program name, manually, or not at all. (You can also choose to only enable grouping if the taskbar is full.) Similarly, Sorting defaults to alphabetically, but it can also be by desktop, manually, or not sorted.
- Only Show Tasks from the Current Desktop: A checkbox on the Filters section.
- Have More than One Row on the Taskbar: If you use many applications at one time you may find it advantageous to set Maximum Rows and then Force Row Settings.
- Showing or Hiding Tooltips: A simple checkbox in the Appearance section of the General page.
Tweaking Plasma
- Learn how to add a sidebar with clock and news
- Customize your Plasma by mixing multiple Plasma themes
Further information
- The Plasma FAQ
- Plasma HowTo - short screencasts
- Glossary
- Some of our favourite plamoids - why not add yours?
- Here's how to install more Plasmas widgets
- Learn the versatility of KRunner
| Back to the Introduction page |
