KWord/1.5/Manual/MultiView
Using Multiple Views
Introduction
When editing very large documents, there will be times when it is helpful to edit two parts of the document. In a situation such as this, KWord can open additional windows to edit the same document.
These new windows are called Views, since they provide a different viewpoint of the the same document.
Views are very important tools when working with large documents. Set one view to edit one part of the document, and using the other view, freely move through the document making updates and changes. These changes are automatically revealed in all views.
Creating a new view
Creating a new view creates an entirely new window, with toolbars, menubars etc. Compare this with the Split View command.
To create a new view select View->New View from the menubar.
A new window will be created. Alterations to your document can be made in either view. Updates in one window will be immediately visible in the other.
Splitting the current view into two separate views
It is also possible to split one view into two views. Both views are contained within one window, and use the same toolbars, menubars, etc. Contrast this to the effect of the New View command.
To split the current view, select View->Split View from the menubar.
The current document area will be split into two views. Alterations to your document can be made in either view. Updates in one view will be immediately visible in the other.
- The views can either be split horizontally or vertically. See the next section for instructions.
Changing the split view orientation
To change the direction that the views are split, simply select View->Splitter Orientation from the menubar. This will show a submenu. Select either Horizontal or Vertical.
All views in the current window will immediately change to the new orientation.
Changing the size of views
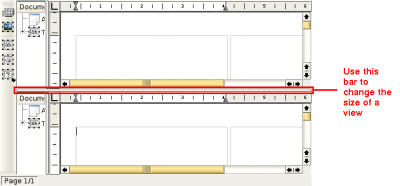
The relative sizes of each view can be adjusted with your mouse.
To adjust the view size, look at the border between the scrollbar of one view (the upper or right view) and the ruler of the other view (the lower or left view). There is a solid border which appears raised between the scrollbar and the ruler. As the mouse pointer passes over this bar, it changes from an arrow to double lines with double arrows.

When the mouse pointer changes, click once with the left mouse button and hold the button down. Drag that border to the new location. When the mouse button is released, the views will change to the new proportions.
Remove View
To remove a view, simply place the mouse pointer in the view to be deleted and click with the left mouse button. Then select View->Remove View from the menubar.
Close all views
To close all views, select View->Close All Views from the menubar.
| Prev | Contents | Next |
| Editing your Document | Undo and Redo |
