Amarok/QuickStartGuide/TheMusicCollection
The Music Collection
The Media Sources pane
The Media Sources pane is the place where you browse and display your total collection of music. This includes the tracks on your local hard disk, as well as those on any external devices or media connected to your computer, such as audio CD, USB devices, media players, network disks or Internet sources.
Setting up a collection
Do you have music tracks in mp3, ogg or FLAC format on your computer? Begin by telling Amarok where to find those files, so it can begin creating your collection. Click Settings in the top-level menu, and choose Configure Amarok, then Collection.
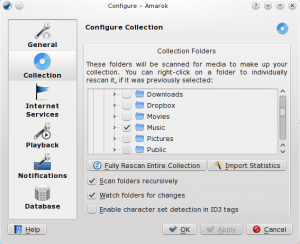
A tree-view of your Home directory is shown above. Click the checkbox where your music is stored; usually ~/Music. Then click 'Fully Rescan Entire Collection'. This will take some time, so don't be alarmed if Amarok seems slow for a while. Once the scan is complete, it's best to quit Amarok using the top-level Amarok menu, or Ctrl+Q, and then restart it. Now you should see your collection in the left pane -> Local Music. You newly added music should show up under the Local Collection.
Adding Media Devices to the Collection
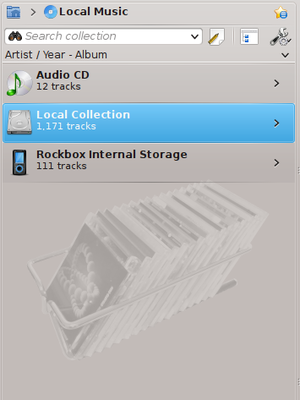
Underneath the search bar near the top of the Media Sources pane you see the different devices and/or content categories within the Content Browser. If you insert an Audio CD in the CD drive it will appear in the Media Sources pane, along with Media Players, thumb drives, and other USB devices. After an external device has been mounted, it should show automatically within the Media Sources pane. You do not need to go through any additional actions to see the external devices in your Media Sources pane, as long as they have been successfully mounted by your computer. Below is a screenshot showing three connected sources with music: Audio CD, mp3 player, and the Local Collection.
Ripping a CD into the collection
If you don't have any music files on your computer, it's easy to "rip" them (copy the tracks from your CDs to your collection). Just pop in a CD, and right-click on the banner of the CD device in the Content Browser to play, or copy to your collection, which will rip and "tag" your tracks (see image below). If you copy music from an audio CD to your Local Collection, the message bar at the bottom of the Amarok screen will indicate that it is busy copying. The ripping may take several minutes. Once the rip is complete, the message in the message bar disappears and the music appears in the content browser of your Local Collection. If the ripped music does not appear in your Media Sources pane it's best to quit Amarok from the Amarok top-level menu, or Ctrl+Q, and then restart it. Now you should see your collection in the left pane (Media Sources). The screenshot below shows how you move tracks from your audio CD, iPod or other device to your collection, using the right-click menu.
In the above context menu, you can also see the the choice to Edit Track Details. Use this option if you have a track that needs a tag edited. This becomes important when you rip music to .WAV format, losing some of the tags. If quite a bit of your collection needs tagging, consider dedicated tagging software, such as
Correct tagging is important to help Amarok show your tracks in the appropriate albums and proper sort order.
Accessing other media sources
You might have wondered why the Media Sources pane is not simply called the 'Collections pane'. Amarok gives you access to much more music than just your collection. Listen to content on Internet shops, books, podcasts, music files stored in arbitrary places outside your collection and previously stored playlists. The Amarok file system is the key to all of this. The starting icon for accessing the file file system is the blue home folder icon at the extreme top left of the Media Sources pane. This icon expands and contracts as you browse through the Amarok file system. We call this Breadcrumb bar (shown below), allowing you to easily navigate the file structure of your Amarok by clicking the folder in the breadcrumb bar you wish to access.

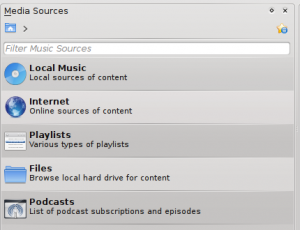
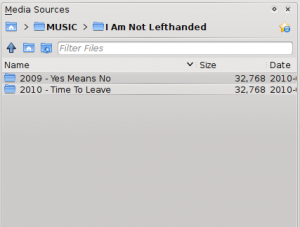
If you click the Amarok home folder you see the Media Sources pane on the left below, containing icons to the various available resources. If you clicked on the Files icon (second from bottom, left below), you might see something similar to the image on the right, below. Notice how the breadcrumb bar expands and how the content of the folder you have selected is shown in the Media Sources pane (image on right, below). Clicking the '>' symbols among the breadcrumbs allows you to view the folders available at that level of the folder structure. You have access to your music at any arbitrary place in your file system, even outside your Local Collection.
| Media Sources pane | Files Icon clicked |
|---|---|
 |
 |
The Internet category above lets you browse through some of the online services, such as Magnatune.com, Jamendo.org, Last.fm and many others. To use these services, return to Settings > Configure Amarok > Internet Services to enable the services you want. For Last.fm "scrobbling", enter your account information. If you want to use Last.fm streams, you'll need a paid account.
The functions of the icons in the Amarok Home folder (left above) are:
Clicking the Local Music icon above or on the Local Music folder in the Breadcrumbs bar returns you to your collection, showing you a list of all the available resources, artists, albums and tracks that you have previously defined as part of your collection. The Breadcrumbs bar indicates that you are viewing your Local Music.
Using the Content Browser
The hard disk of your computer, audio CDs, external devices and the Internet are the basic resources for defining your collection. After your collection has been compiled it is likely that your collection will hold a large number of albums and tracks, much more than can be shown on a single screen.
How to adjust the display of your collection, below:
Hiding or expanding information
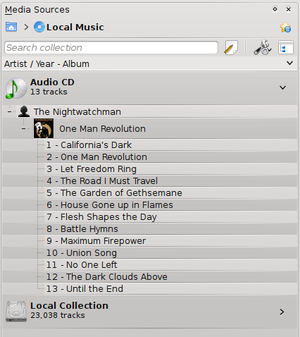
The area of the Media Sources pane below the search bar is called the Content Browser. Three media sources are indicated in the image of a Content Browser below: CD, iPod and Local Collection. Clicking the banner for a device (the blue bar for Audio CD above) shows or hides the content of that device. The direction of the green arrow on the right indicates whether the contents for that device is hidden or shown. The content on a particular device can, in turn, be hidden or shown using the same principle, clicking on the appropriate artist or album. A '-' symbol on the left of an artist or an album indicates that the contents has been expanded. A '+' symbol indicates more contents for that category is available / currently hidden. In the image below, the information for Beethoven has been expanded, indicating the individual tracks. On the other hand, the albums and tracks for Jacques Brel are hidden. The information for music on the iPod device is hidden, whereas the artists on the CD are shown, but the different tracks on the CD are hidden. By clicking these '+' or '-' symbols you also can expand or hide information.
Changing the order of tracks and albums
The order in which tracks are sorted in the Content Browser can be customised by using the Sort Options button at the top of the Media Sources pane:

The sort order is indicated on the top left of the Media Sources pane, just below the Search text box. The default order is Artist / Year - Album. The display order of the content Browser can be temporarily switched between the user-defined sort order (described above) and a Merged view in which which artists are listed alphabetically, no matter on which media the music is stored. Merged view: click the arrow to the right of the sort order indication or click the Merge icon at the top right-hand of the Media Sources pane:

To search your collection, type your search term into the search bar at the top of the Local Music section. Not only can you search by artist, album or track name, but any part. You might create a nice playlist by searching for 'winter', for instance, or merely find a track when you only remember one word of the title. You can also search by rating, playcount, even filetype. See [Amarok Insider Issue 14] for more detail.
Deleting items from the collection
You can delete any item from you collection by right-clicking on it and choosing the bottom item "Delete Tracks". A confirmation panel will appear, preventing the accidental deletion of any tracks. More than one item can be selected with Ctrl+click.
| Previous |
| The Amarok Window |
| Next |
| Playlists |


