Kopete/ICQ/connect through kopete
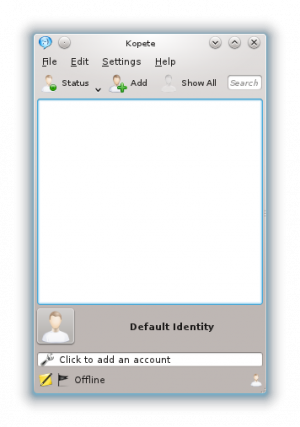
The first time, you start Kopete, you will see a window like this:

To add your ICQ account click on "Click to add an account". Or if you have already entered another account (like MSN or Jabber) you go to menu Settings->Configure and click on "add Account".
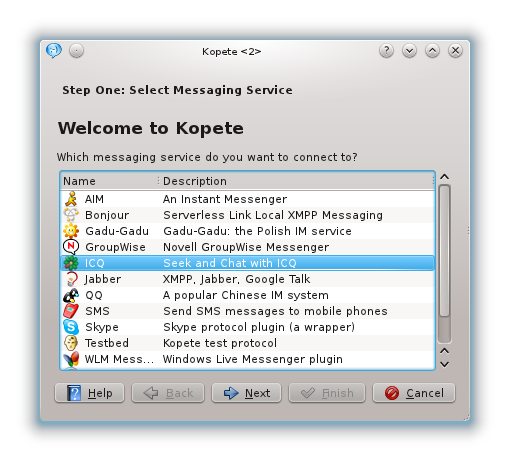
Now you see a list of all chat protocols available for Kopete. In this case, as you want to use ICQ, you have to choose the ICQ entry:

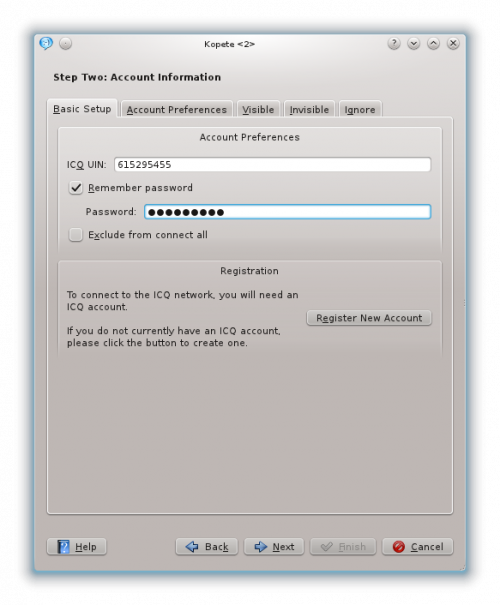
Now you see the configure dialog for your account. Click on Basic Setup above in the tab bar. There you have to enter your UIN. If you don't want to enter your password every startup, you can add your password, too. Up to now, Kopete does not support connection via e-mail!

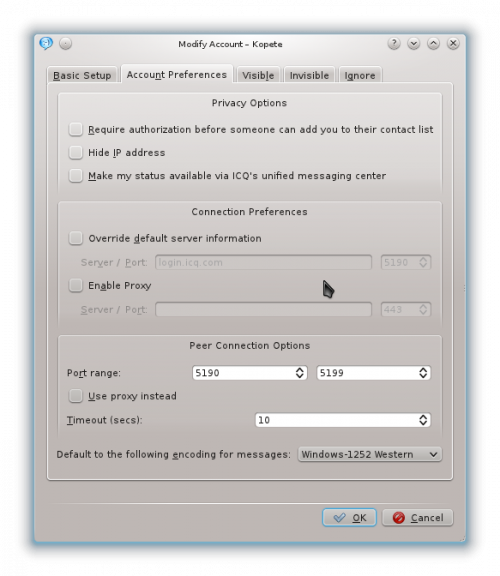
The Account Preferences tab contains more detailed settings:

A short explanation:
- Require authorization before someone can add you to their contact list: Choose this option if you want to be asked before someone else can add you to his buddy list. Normally, everyone can search you and add you to his list. This means every stranger you don't even know can see whether you are online or not or can send you messages. If you don't want this, you can check this options and afterwards you will be asked if you want to confirm someone before he can chat with you.
- Hide IP address: If you don't want others to see your IP, you can check this option. The IP address is an ID to identify you in the Internet. This number is unique. An average internet user cannot get your name out of your IP Address, only your provider can do this! ICQ saves your IP address anyway for a specific time. So it is no real privacy problem not to choose this option.
- Make my status available via ICQ's unified messaging center: If you choose this option, your status will be published on the messaging center (visible for everyone at www.icq.com/people).
- Override default server information: If you want to modify the address where Kopete log in to the ICQ network, this option makes it possible (normally you won't need this setting).
- Enable Proxy: connect through a Proxy server. Proxy servers are servers that transfer requests. Some companies, school and universities use these servers to deny access to some websites. Users connecting from their home won't need this setting.
- Port Range: This options tells Kopete which ports should be used for peer to peer connection. Further explanations of the function of ports would go too far here. If you want more information take a look at the Wikipedia article. Normally you won't get any problems with the default settings.
- Timeout: defines, how many seconds Kopete should wait before it drops connection. For example you send a file to one of your contacts but your contact's Internet connection is troubled so he does not get the file. This option tells Kopete how long it should try to send the file. Normally you don't have to change this.
- Default encoding: set the encoding of the messages (if you chat with peoples who uses windows, this is the right setting). Text is send as a binary (0 and 1) through the web and your computer has to know which combination of 0 and 1 is which letter. Your computer has to encode the text out of numbers. There are different encodings (e.g. utf-8 or windows 1252). Windows users use the windows-1252 encoding by default so it is the best to choose this encoding)
If you are not sure what to do here, it is no problem, the default settings should work.
Now you have successfully configured your ICQ account. You can click on next and finish. If you have more than one account, you can choose different colors for them, so you can easily see which contacts come from which account.
- ← Create your ICQ Account
- Kopete/ICQ/connect through kopete
- Add your contacts to your buddy list →
