Dolphin/Gestionarea fișierelor
Descoperă Dolphin
Prima secțiune te va duce la un tur ghidat al Dolphin-ului.A doua secțiune se ocupă cu conceptele diferitelor tipuri de marcaje.A treia secțiune discută de gestionarea arhivei. În final ne uităm la 'More Cool Things'. Se poate da click pe imagini - poți vedea imaginea mărită.
Informaţii generale
Dolphin sau Konqueror?
Acest tutorial descrie Dolphin pentru KDE SC 4. Konqueror a fost managerul de fișier standard în KDE 2 și 3. Poți de asemenea folosi Konqueror ca managerul implicit de fișier în KDE SC 4.Pentru a face acest lucru,începând cu KDE SC 4.2, deschide System Settings și mergi la modulul .Puteți selecta Konqueror sau o serie de alte aplicații pentru a folosi ca manager implicit de fișier.
- D3lphin este o furculiță a lui Dolphin pentru KDE 3.Îi lipsesc câteva caracteristici ale Dolphin-ului de la KDE SC 4. De asemenea este mai puțin cunoscut deoarece pentru managerul implicit de fișier al lui KDE 3 a fost Konqueror.Această furculiță nu este susținută de comunitate și nu mai este menținută de către autorul său.
Introducere către Dolphin
Dolphin este managerul de fișier al Compilației Software KDE.
Voi arăta cum se folosește Dolphin pentru sarcini comune de gestionare a fișierului, și cum să-l personalizați nevoilor dumneavoastră.
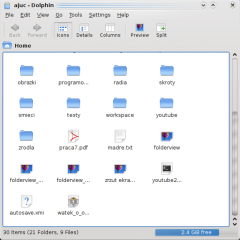
Când deschidem Dolphin din meniul Kickoff vă arată directorul de pornire - În mod implicit este Directorul dumneavoastră de bază.
Pentru a deschide un fișier, sau a merge către un folder, doar faceți click pe el.(Acest lucru poate fi schimbat în dublu click în , dacă preferați. Unele distribuții setează dublu click ca implicit.) În KDE 4.5 Acest lucru devine
Pentru a selecta și deselecta fișiere și foldere ,plasați cursorul mouse-ului deasupra pictogramei și faceți click pe semnul plus în curs de dezvoltare pentru a selecta, și semnul minus pentru a deselecta.Cam asa:
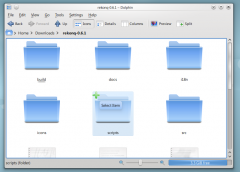
Când apăsați pe semnul plus, acest fișier sau folder va fi adăugat la selecția dumneavoastră.Puteți selecta fișiere multiple în același mod. Selecția se poate face de asemenea prin glisarea unui dreptunghi ( uneori numită metoda "bandei de cauciuc"), iar selectarea și deselectarea cu Ctrl + click pentru unul la un moment dat și Shift + click pentru un interval continuu.
Multe fișiere selectate arată așa:

Crearea unui nou folder : Puteți crea un nou folder în directorul activ folosind sau comanda rapidă F10.
File: Dolphin suportă navigarea cu file. O nouă filă poate fi deschisă de exemplu de la , prin Ctrl + T sau prin apăsarea butonului din mijloc a mouse-ului pe pictograma folder-ului și butoanelor de navigare.
Dolphin se deschide în mod implicit când facem click pe orice folder. Poate fi de asemenea pornit din meniul Kickoff.
Dolphin integrează un nou concept pentru a folosi bara de navigare printr-o cale mult mai rapidă și precisă:prin urmare, o bară de navigare breadcrumb este folosită.În loc să afișeze calea completă, doar punctele de navigare care pleacă de la unul din locuri sunt afișate ca butoane.Făcând click pe unul din aceste butoane navighezi direct la acest folder.În acest caz poți ajunge la un folder părinte dintr-un sub folder printr-o cale foarte rapidă.
Între butoanele care reprezintă un folder există o mică săgeată care este de asemenea un buton.Făcând click pe această săgeată poți vedea o listă cu toate subdirectoarele pe același nivel ca cel actual al tău, oferindu-vă o schimbare rapidă de director.
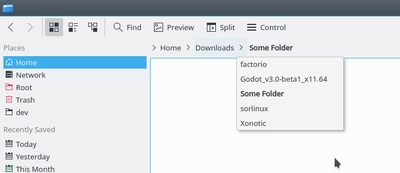
Există de asemenea o bară clasică de navigare care afișează calea completă.Pentru a folosi acest stil puteți selecta , sau activați comanda rapidă a tastaturii Ctrl + L. Făcând click pe spațiul liber de lângă ultimul folder afișat în stilul breadcrumb, puteți să vă schimbați de asemenea pe stilul clasic.Dacă stilul clasic este selectat, un marcaj de verificare este afișat la sfârșitul barei de navigare. Acest marcaj de verificare este un buton ce poate fi folosit pentru a vă schimba înapoi la stilul breadcrumb.Bineînțeles pot fi folosite scurtături de meniu și tastatură.
Vizualizare împărțită
Dolphin oferă posibilitatea de a impărți vizualizarea folderului curent astfel încât sunt afișate două vizualizări de folder una lângă cealaltă cunoscute de la Midnight Commander. Aceasta este o vedere foarte confortabilă pentru a copia sau muta fișiere dintr-un folder în altul.
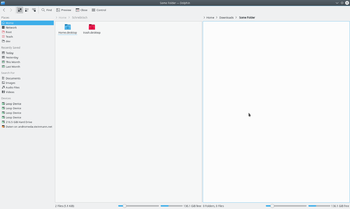
Puteți ămparți vizualizarea cu ( comanda rapidă F3). Pentru a schimba înapoi la o singură vizualizare de folder , puteți folosi . Simbolul vă va arăta care vedere va fi închisă.În funcție de vederea activă curentă semnul minus va fi afișat în partea stângă sau dreaptă a simbolului. Vederea activă va fi închisă. Este important de știut dacă dorești să folosești comenzi rapide ale tastaturii. Există de asemenea un buton pentru împărțirea și închiderea vederii situat în bara de instrumente.Acest buton afișează de asemenea simbolul minus , așadar este ușor să știi care vedere ar fi închisă.
Desigur, fiecare vizualizare are propria sa bară de navigare și fiecare vizualizare poate folosi un mod de vedere diferit.
Modul de vizionare
Dolphin suportă trei moduri diferite de vizionare: "Pictograme", "Detalii" și "Coloane". Acestea pot fi modificate prin intermediul meniului sau prin intermediul comenzilor rapide ale tastaturii Ctrl+1 (Pictograme), Ctrl+2 (Detalii) și Ctrl+3 (Coloane). Există de asemenea un buton pentru fiecare mod de vizionare în bara de instrumente și meniul contextual al folderului de vizionare oferă un submeniu pentru a schimba modul de vizionare.
Pictograme
Fiecare fișier și fiecare folder este reprezentat de o pictogramă în modul de vizionare "Pictograme". În loc să afișeze o pictogramă , o previzualizare a fișierului poate fi demonstrată. Acest comportament poate fi pornit/oprit prin intermediul meniului sau prin intermediul unui buton al barei de instrumente. Există o limită de dimensiune pentru previzualizarea fișierelor.Această limitare de dimensiune poate fi configurată prin intermediul opțiunii . Există de asemenea o opțiune de a utiliza miniaturi încorporate în fișiere.În KDE 4.5 previzualizările sunt activate (și dimensiunea maximă definită) de
Fișierele din folderul selectat recent sunt sortate în ordine alfabetică în mod implicit.Modul de sortare poate fi schimbat prin intermediul meniului .Următoarele criterii de sortare sunt disponibile:
- Nume
- Dimensiune
- Dată
- Permisiuni
- Proprietar
- Grup
- Tip
În plus, secvența de sortare poate fi definită prin .
Există posibilitatea de a afișa informații suplimentare sub pictograme.Acestea pot fi pornite/oprite prin intermediul . În principal aceleași criterii care sunt disponibile ca și criterii de căutare pot fi selectate.
Poți grupa pictogramele pentru a obține o mai bună imagine de ansamblu.Acest lucru este pornit prin intermediul .Acum pictogramele sunt grupate iar grupurile sunt împărțite de o linie orizontală ce conține numele grupului ca legendă.Gruparea este legată de criteriile de căutare selectate.
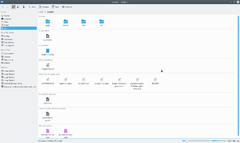
Detalii
În modul de vizionare "Details", informația suplimentară este afișată în mod implicit în contrast în modul de vizionare "Pictograme". Toate fișierele sunt listate într-un tabel.Meniul contextual din antetul tabelului oferă posibilitatea de a adăuga coloane suplimentare.Următoarele coloane sunt disponibile:
- Dimensiune
- Dată
- Permisiuni
- Proprietar
- Grup
- Tip
"Numele" coloanei este întotdeauna afișat.Făcând click pe antetul uneia dintre coloane, tabelul va fi sortat după această coloană.Făcând click pe același antet de coloană, secvența de sortare este inversată.
De când e KDE 4.1 este posibilă afișarea folderelor ca un arbore.În acest mod un semn plus este prezentat lângă folder.Făcând click pe acest semn , folderul este extins și toate folderele ce conțin sub foldere și fișiere sunt de asemenea prezentate în tabel dar sunt atenuante.Făcând click pe semnul care acum afișează un minus, din nou extinderea este închisă.Desigur structura arbore poate fi folosită pentru atâtea foldere dorite.Vizualizarea arborescentă este dezactivată în mod implicit, dar poate fi activată prin intermediul cu opțiunea .
Columns
View mode "Columns" is inspired by the file manager Finder of Mac OS X. Entering a sub folder does not replace the current folder view but the content of the sub folder is listed in an additional column next to the column of the parent folder. This can be used for several hierarchies, so that you can navigate in an easy and fast way in the file system.
Setting defaults for all folders
Under the menu item you can set any of these attributes to be the default for all folder views.
Panels
Dolphin contains several panels, which can be activated via menu . Each panel can be placed in the left or right docking area. To move a panel you have to click on the header and Drag&Drop the panel. The area where the panel will be placed on mouse released is highlighted. It is possible to stack panels on top of each other. In this case the panels are placed into tabs.
In the header of each panel there are two buttons. The button near to the caption undocks the panel. This makes the panel an independent window which "floats" above Dolphin. The window is still combined with Dolphin and cannot be displayed without Dolphin and cannot for example be minimized like normal windows. By clicking the button again the panel is docked again. The second button will close the panel.
Non Modal Dialogs
When Moving, Copying or Deleting files/directories the dialog disappears even when the operation has not yet completed. A progress bar then appears in the bottom right of the screen, this then disappears also, if you want see the progress you need to click a small (i) information icon in the system tray.
Places
Dolphin contains a new kind of bookmarks Places. These are displayed in a panel which can be activated via (keyboard shortcut F9). The default Places are identical to the one shown in the category System of the K-Menu Kickoff.
By clicking one of these places it will be opened in the current folder view. The context menu offers the possibility to edit the places or to remove them again. It is also possible to hide entries temporarily.
The context menu of a folder can be used to add this folder an another entry to the Places panel. Therefore there is a menu item . You can also Drag&Drop a folder to the Places panel.
The places panel also contains entries to connected removable devices like USB-keys or CDs. A small plug icon indicates if the device is mounted. The context menu offers the possibility to unmount the device.
The places are used as the basis in the breadcrumb navigation bar. Each address is shown in relation to the nearest parent folder which is one of the places.
Information
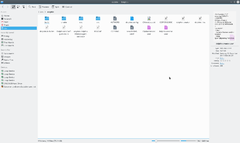
The information panel can be activated via (keyboard shortcut F11). This panel displays a preview or an icon of the currently selected file/folder or of the file/folder below the mouse cursor. Some additional information like change date or size to the file/folder is displayed as well.
The information panel offers the possibility to rate files, add a comment or tag a file. This is one of the interfaces to the semantic Desktop Nepomuk which provides the advantages of the semantic web for the desktop. Starting from KDE 4.2 it is possible to search for the semantic links given by the tags.
Folders
A panel providing a tree structure for the file system can be displayed via (keyboard shortcut F7). The tree structure offers the possibility by clicking the + and - signs to expand/collapse sub folders. By clicking on one of the folders the content will be displayed in the current view.
Terminal
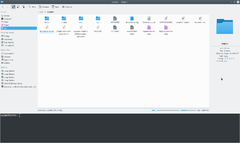
The terminal emulator Konsole can be displayed directly in Dolphin via (keyboard shortcut F4). This makes it possible to use shell commands directly in Dolphin. The terminal is opened in the folder which is displayed in the current view. Shift + F4 opens Konsole in new window.
External links
Road to KDE 4: Dolphin and Konqueror
Ars Technica: A First Look at Dolphin
Youtube - KDE 4 rev 680445 - Dolphin
Introducing KDE 4 Blog - Dolphin
Bookmarks and Places
In KDE3 you could create bookmarks in Konqueror, but they were not available to any other application. KDE SC 4.x opens up a great deal more flexibility - but that inevitably means more complication. In fact KDE SC 4 has three classes of Bookmarks, which need to be differentiated. They reside in different files, and have different functions.
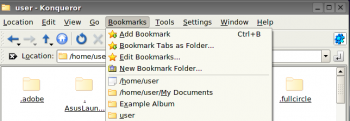
Three kinds of bookmark
First, there is the set of bookmarks available only to Konqueror - web bookmarks. These are stored in ~/.kde/share/apps/konqueror/bookmarks.xml. Then there is a set which Dolphin calls Places. This set is available to all applications as well as the Dolphin file manager. Every time you use you will see this set. The third set of bookmarks are Application Bookmarks. These share one file, regardless of the application that set them, and are available to all applications, unless you restrain them to a specific application. More of that later.
Enable bookmarks
In most distros Bookmarks are not enabled by default. In order to use bookmarks we first have to enable them. Open a in most KDE applications and you will see, at the right-hand edge of the icon panel, a spanner or wrench. From the drop-down list, choose .
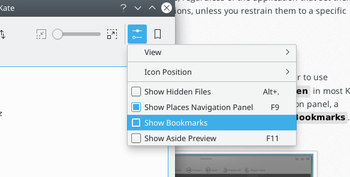
There is a default set of Places -
- Home
- Network
- Root
- Trash
but you can add other places. In Dolphin, right-click on a folder and select , or just drag a folder onto Places.
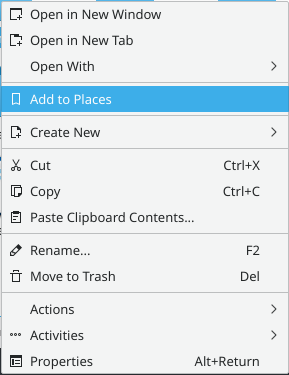
By default this "Place" will be visible in all applications. If you want to keep it constrained to Dolphin, you need to right-click on the new name in the Places list, where you will find the option to Edit it. There is a check-box for .
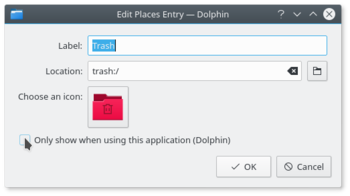
You can see the result of that command if you read ~/.kde4/share/apps/kfileplaces/bookmarks.xml.
In some applications too there is an option in the File menu to add a folder to Places. At this stage, however, applications vary in which features are available. The important thing to remember is that the default is for Places items to be available to all applications in the dialogue.
Bookmarks in applications
This is the second class of bookmarks. Remember opening and using the spanner/wrench? Next to it is a yellow star. This is the bookmark management menu.
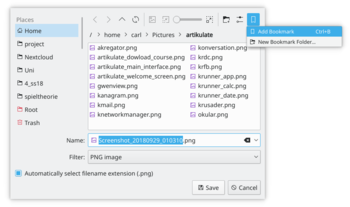
Here you can define bookmarks that will be visible in the same menu on any application. They are stored in one file, ~/.kde4/share/apps/kfile/bookmarks.xml, which is used by all applications having that menu.
Constraining to one application
Some applications allow you to edit items in the Places menu. For instance, if in Gwenview you right click on a folder in Places you can set an option to .
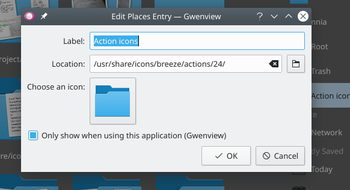
If you need to constrain to an application that does not yet allow you to do that, the only way left is to edit the file ~/.kde/share/apps/kfile/bookmarks.xml. Immediately before the </metadata> tag you will need to add the line
<OnlyInApp>appname</OnlyInApp>
Archive Management in Dolphin
Managing archives now becomes simple. In any directory in Dolphin, highlight the files that you want to compress, and right-click. Here, using the Compress option, you can elect to create a RAR archive, a Gzipped tar archive, or define another compression mode that you have already set up.
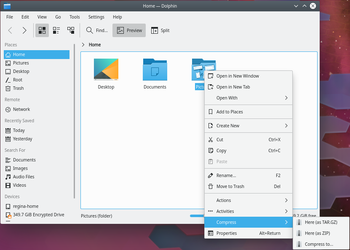
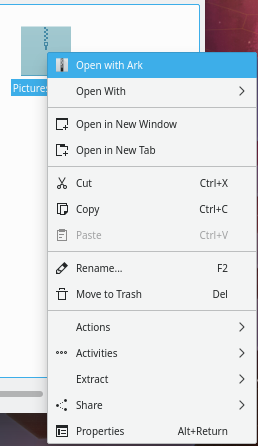
Similarly, if you right-click on an existing archived file you get a range of actions added to the right-click menu. You can extract the archive to the current folder, to an autodetected subfolder or to another place of your choosing.
Should you wish to add files to an existing archive, you can choose .
More Cool Actions
Change a File Association on-the-fly
Have you ever wanted to open a file, only to find that it is associated with an application that is not of your choice? You can, of course, alter this in . But Dolphin and Konqueror offer you a quick and cool method for changing a single association.
Right-click on the file and select . The first line there is descriptive, something like:
Type: XML document
At the same level, on the right, there is a spanner (wrench). Click on that and you can add or change an association.
Similarly, by working on a folder, you can change the default file manager to/from Konqueror, if you choose, or add another image browser to the possible associations.
The sub-menu opens up a whole lot more cool things to do from Dolphin. Some possibilities only appear when applicable to the file you have selected. Some of the options are
- Convert an image file to a different format
- Preview the file
- Download a remote file with KGet
- Sign and/or encrypt the file, according to the encryption software installed
Encode and copy audio CD tracks
- Insert an audio CD
- Navigate to this CD in Dolphin: it must appear as "Volume" in your Dolphin 'Places' or you can reach it by typing audiocd:/ in the address bar.
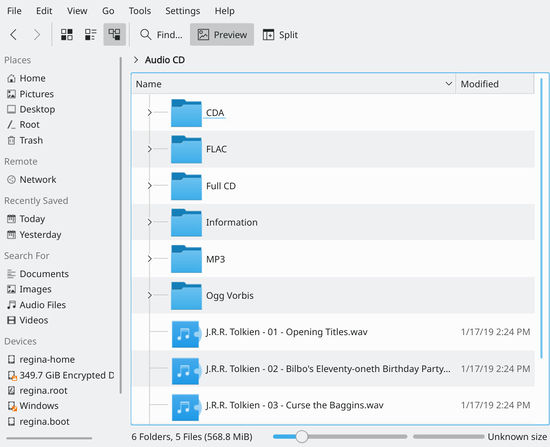
You now notice that Dolphin is proposing a WAV file for each track, plus:
- a CDA folder containing indexing information in the usual CDA format.
- a Whole CD folder, containing one file for each format (.cda, .flac, .mp3, .ogg, .wav) holding all the tracks
- a FLAC folder, containing the tracks encoded into FLAC format (lossless information format)
- an Information folder containing the CDDB informations
- an MP3 folder, containing all the tracks in MP3 format
- a Ogg Vorbis folder, containing the tracks encoded in OGG format
You then just have to copy the folder of your choice, in your preferred format to obtain the relative encoded version of your CD!


