Digikam/Regola livelli
Utilizzare lo strumento Regola livelli in digiKam
Trascrizione di un articolo del blog di Dmitri Popov, 20 gennaio 2011
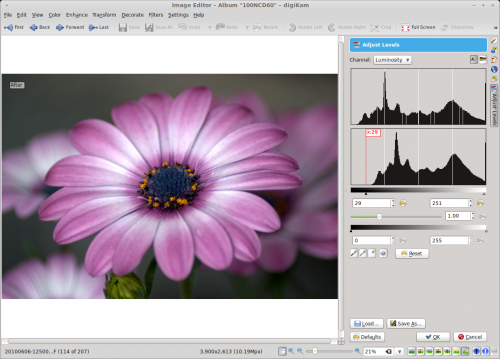
When it comes to tweaking photos, Levels is the most important weapon in digiKam’s arsenal. This tool lets you adjust brightness and contrast by specifying the location of complete black, complete white, and midtones in a histogram, which makes it a perfect tool for fixing under- and overexposed photos as well as improving the overall tonal range of a photo.
You can access the Levels tool in the image editor by choosing . Select from the drop-down list, and press the button.

The key element in the pane is the histogram with the black point and white point sliders. Simply put, the black point slider controls shadows, while the white point slider controls highlights. So to darken shadow areas in the photo, move the black point slider to the right. Need to boost highlights? Move the white point slider to the left.
Instead of using sliders, you can let digiKam adjust levels automatically by pressing the button. Using this feature is often hit and miss, but you can easily revert all changes using the button.
Three color pickers next to the button provide yet another way to tweak levels. To adjust shadows, press the the appropriate color picker button and click on an area in the photos that should be black. In a similar manner, you can adjust midtones and highlight using the appropriate color pickers.
Adjusting levels in the Luminosity channel can help to increase contrast without affecting color saturation. To change the color balance, you can adjust levels in the Red, Green, and Blue channels (select the appropriate channel in the drop-down list). This can be useful for boosting colors and fixing photos which suffer from unnatural color casts.
