digiKam/Håndtering af Batch-kø og script
Behandl fotos med digiKams batch-kø-håndtering og et Bash-script
Fra Dmitri Popovs blog, 11. juli 2011
En af digiKams mindre kendte funktioner er muligheden for at koble scripts til bekendtgørelser. Det kan umiddelbart forekomme at være et ret obskur funktion, men den kan bruges til ret smarte ting. Lad os sige, at du vil have en portfolio af udvalgte fotos på en mobil enhed. Det er ikke særlig praktisk at skulle ændre mange billeders til en bestemt størrelse, som gør det let at vise dem på den mobile enhed, og så overføre de behandlede billeder fra digiKam til enheden manuelt. Det er her muligheden for at udløse et script via bekendtgørelser bliver praktisk. Du kan knytte et simpelt Bash-script til Bekendtgørelsen "Batch-kø gennemført", sådan at det udføres automatisk, når værktøjet Håndtering af Batch-kø er færdig med behandling af fotoene.
The Bash script is very simple, indeed. It uses the rsync tool to copy the processed photos from the source directory (in this case, it’s /home/user/Photos/Processed) to the /DCIM/Camera directory on the mounted SD card:
#!/bin/bash
rsync -avz --delete /home/user/Photos/Processed /media/0CFA-5602/DCIM/Camera
Paste the code above into an empty text file and save it as a postprocess.sh file (don’t forget to replace the example paths with the actual paths to the source and destination directories). Make then the script executable using the chmod o+x postprocess.sh command.

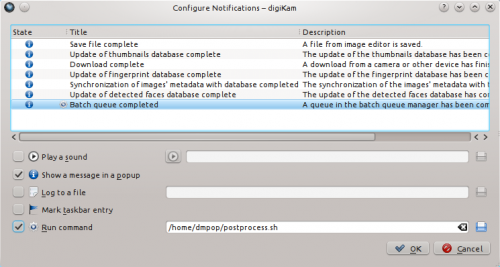
In digiKam, choose and select the item. Tick the command check box, and enter the path to the postprocess.sh script in the appropriate field. As you might have guessed, this links the script to the notification, so the script is triggered as soon as the batch operation is finished.
Next, create a tag (e.g.,transfer) in digiKam and assign it to the photos you want to transfer to the mobile device. Alternatively, you can use a specific color label for that. Use then the right sidebar to display the tagged or labelled photos, select them, and press Ctrl + B (or choose ) to add them to a new batch queue. In the section, click on the tab and select the sub-album. Under the tab, double-click on the tool to add it to the section. In the pane, specify the desired length. You can choose between several presets, or enable the option and specify the desired length.
Hit then the button, and once the batch operation is completed, the assigned Bash script copies the resized photos to the mounted SD card.
You can tweak the script to perform other post-processing actions, too. For example, if you use the llgal command-line tool to generate static HTML photo galleries, you can tweak the script to add the processed photos to an HTML album. The script may look something like this:
cd /home/user/Photos/Processed
llgal --exif --li -L --sx 800 --sy 600
In other words, you can do all kinds of clever tricks by linking scripts to notifications.
