K3b
↓{|*style="*text-*align:*center" ¡*K3*b é un programa simple, potente e moi configurable para a grabación de discos ópticos de audio, vídeo, datos e moito máis! |thumb|550px|K3b's default opening screen|| |}
↓==Introdución==
↓Si usaches algún programa de grabación como por exemplo Nero en Windows, K3b resultarache bastante familiar.
↓K3b proporciona unha interfaz gráfica simple pero potente, que permite múltiples opcións para a grabación de CD, DVD, ou BD (discos Blu-ray). Están dispoñibles varios tipos de proxectos por exemplo proxectos de datos e audio, proxectos de vídeo para DVD e VCD, así como discos multisesión e discos de modo mixto. K3b tamén che permite borrar discos regrabables e pode levar a cabo tarefas máis complicadas tales como a codificación e decodificación audiovisual.
↓== Preinstalación ==
↓Cando executes K3b por primeira vez poida que infórmeche de que non se atoparon unidades de grabación, o que significa que non poderás gravar ningún disco, pero non te asustes porque k3b abrirá unha fiestra de configuración que che axudará a configurar e executar varias ferramentas. Isto inclúe o grupo de usuario que posúe estas aplicacións. Non deberías cambiar nada posto que K3b aplicará os permisos correctos aos programas externos automáticamente (estes programas xeneralmente son cdrecord, growisofs e cdrdao). Se o desexas, podes dicirlle a K3b que use o grupo de grabación burning e asígneo á unidade óptica. Abaixo podes ver unha imaxe da fiestra de configuración onde aparecen estas opcións.
↓==Configurar a Interfaz de usuario==
↓Unha vez iniciado K3b ofrécese a posibilidade de iniciar rápidamente un dos tres proxectos máis populares:
↓:* Novo proxecto de datos
- Novo proxecto de audio
- Copiar disco
↓K3b pode facer moito máis separadamente destas tarefas, e podes atopar que algunhas destoutras posibilidades son útiles para ti. Bota unha ollada a esta lista para ver unha mostra das outras funcións dispoñibles (fai clic na imaxe para ampliala):
↓Quizais un acceso rápido para algunha destoutras tarefas che sexa útil, polo que K3b pódecho proporcionar: simplemente fai clic co botón dereito no escritorio da aplicación e verás un menú para engadir botóns:
Configuring the internals
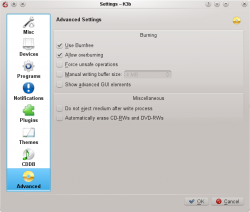
Most of the default settings can simply be left alone. It is however, recommended that you do take a look at the Advanced Settings page. Here you can set various important settings, if required.

- Use Burnfree should be set — it controls the burn, ensuring that the buffer never gets dangerously low (which reduces the quantity of bad burns).
- You may wish to automatically erase re-writable disks.
- The option Do not eject medium after write process is invaluable if your drive is one that cannot be closed quickly enough for Verify to happen.
Preparing to burn a disk
When starting a new project, you should ensure that K3b has detected the correct optical media, such as CD or DVD. On the status line at the bottom of the screen you should see the size of disk which is currently set. If this is not correct, or you require a different size, simply right-click on it and set the preferred size from the provided list:

Now choose what is to be burnt.
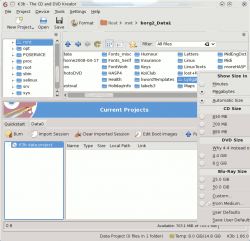
The top half of the screen is the source pane; it functions like a file manager. You can choose ordinary files from mounted data volumes or audio tracks from inserted audio discs. Names of audio tracks are automatically read from CD-TEXT data, if your CD drive supports reading it, or generated using CDDB; the exact format is controlled by a button in the bottom pane. If the names are incorrect or simply do not match the description of the disc, you can edit them using the toolbar button. Your changes will be cached locally and submitted to the master registry at FreeDB. Internet connection fees apply.
Now that you have your sources at hand, simply drag and drop the files and directories you wish to burn onto the large pane to the right at the bottom; this is the model pane. Behold a tree of your chosen files forming to the left. Should there be some files or directories which you do not want to burn, these can be easily removed from the project by simply removing them from the panel at the bottom. Select the file to be removed (you can control-click to select multiple ones), then choose from the context menu.
The top line will be the title of the disk. In many cases this will be fine, but if you would like to change this to something else, simply rename it using the context menu.
Final Steps
You are now ready to hit the Burn button.

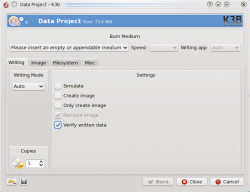
You will see on my screenshot that no disk was present. When you have inserted the appropriate disk you will see a description of it on that line.
There are still one or two choices to be made. I would recommend that you set Verify written data, then hit the Save icon at the bottom of the screen, ensuring that it becomes your personal default. For most modern drives it's safe to leave mode and speed to Auto. If you may wish to burn another copy of the disk at a later date, select Create image, which will save having to set up the burn again. Set the number of copies you want to burn, then, when you are satisfied, hit Burn.
Burning an Audio CD
This page tells you how to burn an audio CD from your stored files.

