Dolphin/File Management
Открийте "Dolphin"
В първата част "Dolphin ще ви покаже как да работите с него . Вторият раздел се разглеждат с концепциите на различни видове маркери. В третата част се обсъжда управлението на архива. И накрая се спираме на погледнем 'More Cool Things'. Изображенията могат да бъдат кликвани - можете да ги видите и в голям размер.
{{Информация |. Когато пътеките са споменати, не забравяйте, че те могат да се отнасят до ~ / KDE или ~ / KDE4, в зависимост от вашите дистрибуции}.}
Обща информация
Dolphin или Konqueror?
This tutorial describes Dolphin for KDE 5. Konqueror was the standard file manager in KDE 2 and 3. You can also use Konqueror as the default file manager in KDE 5. To do this, open System Settings and go to the module. You can select Konqueror or a range of other applications to use as the default file manager.
Въведение в Dolphin
'"Делфин е файлов мениджър за KDE софтуер за съставяне.
Ще покажем как да използвате '"Делфин за общо управление на задачи на файла, и как да я персонализирате според вашите нужди.
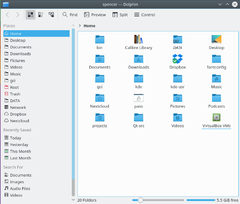
When we open the Dolphin from the Kickoff menu it shows your starting directory - by default it is your Home directory.
To open a file, or go to a folder just click on it. (This can be changed to double-click in
За да изберете и махнете отметката на файлове и папки курсора на мишката над иконата на мишката и натиснете бутона за нововъзникващите знак "плюс", за да изберете и знак минус да премахнете. Харесва ми това:
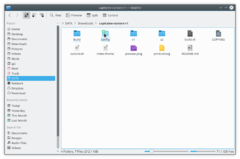
Когато щракнете върху знак плюс, този файл или папка ще бъдат добавени към вашия избор. Можете да изберете няколко файла в един и същи начин. Подборът може да се извърши и чрез плъзгане правоъгълник (понякога се нарича "ластик" метод), както и подбор и отзоваването с Ctrl + клик за един по един и Shift + щракване за пореден кръг.
Много от избраните файлове изглежда така:

Създаване на нова папка: Можете да създадете нова папка в активната директория използване или F10 прекия път.
Tabs: Dolphin supports tabbed browsing. A new tab can be opened for example from (if you have enabled menu bar), by Ctrl + T or by middle mouse click on folder icon and navigation buttons.
Dolphin opens by default when we click on any folder. It can also be started from Kickoff menu.
Location Bar
Dolphin integrates a new concept to use the location bar in a faster and more precise way: therefore a breadcrumb location bar is used. Instead of displaying the complete path only the navigation points starting from one of the places are displayed as buttons. By clicking one of these buttons you navigate directly to this folder. In this way you can reach a parent folder from a sub folder in a very quick way.
Между бутони, които представляват папка има една малка стрелка, която е бутон, както добре. Като кликнете тази стрелка можете да видите списък на всички поддиректории на същото ниво като текуща едно, което ви позволява бързо се смени.
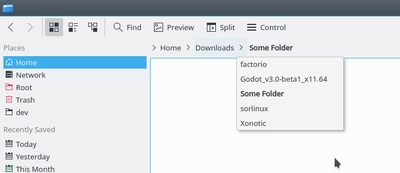
There is also a classical location bar which displays the complete path. To use this style you can right click on the Location Bar and select . If you want the Location bar to become editable, trigger the keyboard shortcut Ctrl + L or select . By clicking on the free space next to the last displayed folder in the breadcrumb style you can switch to an editable Location Bar as well. If the editable style is selected a checkmark is displayed at the end of the location bar. This checkmark is a button which can be used to change back to the breadcrumb style. Of course menu and keyboard shortcut can be used, too.
Split View
'"Делфин предлага възможността да се раздели на текущия изглед папка, така че две мнения папката, се показват един до друг, както е известно от Midnight Commander. Това е много удобен изглед за копиране или преместване на файлове от една папка в друга.
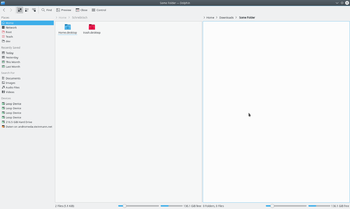
You can split the view by clicking on in the tool bar or, if you have enabled menu bar, (keyboard shortcut F3). To change back to only one folder view you can click on or just press F3 again. The symbol will show you which view will be closed. Depending on the currently active view the minus sign will be shown in the left or right part of the symbol. The active view will be closed. This is important to know if you want to use the keyboard shortcut. There is also a button for splitting and closing the view situated in the toolbar. This button displays the minus symbol as well, so it is easy to know which view would be closed.
Of course each view has its own location bar and each view can use a different view mode.
Вижте режим
Dolphin supports three different view modes: "Icons", "Details" and "Compact". These can be changed from , via the menu (if menu bar is enabled) or via the keyboard shortcuts Ctrl+1 (Icons), Ctrl+2 (Compact) and Ctrl+3 (Details). There is also a button for each view mode in the toolbar and the context menu of the folder view offers a submenu to change the view mode.
Икони
Each file and each folder is represented by an icon in the view mode "Icons". Instead of displaying an icon a preview of the file can be shown. This behaviour can be turned on/off via the menu (if menu bar is enabled) or via the main toolbar button . There is a size limit for the file previews. This size limitation can be configured via option . There is also an option to use thumbnails embedded in files. In KDE 4.5 Previews are enabled (and maximum size defined) by . Starting from KDE 4.8, the aforementioned settings can be configured via .
The files in the currently selected folder are sorted in alphabetical order by default. The way of sorting can be changed via menu . The following sort criteria are available:
- Name
- Size
- Date
- Permissions
- Owner
- Group
- Type
- Link Destination
- Path
Additionally the sorting sequence can be defined by or .
There is the possibility to display additional information below the icons. These can be turned on/off via or (if menu bar is enabled). In principal the same criteria which are available as search criteria can be selected.
You can group the icons to achieve a better overview. This is turned on via or (if menu bar is enabled). Now the icons are grouped and the groups are divided by a horizontal line containing the name of the group as caption. The grouping is related to the selected search criteria.
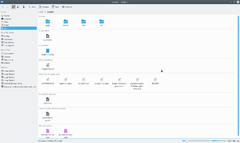
Детайли
В режим на преглед "Подробности" допълнителна информация се показва по подразбиране в контраст с оглед вземане на "Икони". Всички файлове са дадени в табличен. В контекстното меню на таблицата заглавието предлага възможност за добавяне на допълнителни колони. Следните колони са достъпни:
- Size
- Date
- Permissions
- Owner
- Group
- Type
- Link Destination
- Path
Column "Name" is always displayed. By clicking on the header of one of the columns the table will be sorted by this column. By clicking on the same column header the sorting sequence is reversed.
Since KDE 4.1 it is possible to display the folders as a tree. In this mode a plus sign is shown next to the folder. Plus sign has been replaced by > symbol in newer KDE versions. By clicking on this sign the folder is expanded and all containing sub folders and files are also shown in the table but they are attenuated. By clicking the sign, which displays a minus now (or an arrow pointing downwards in latest versions), again the expansion is closed again. Of course the tree structure can be used for as many folders as wished. In latest KDE releases, the tree view is enabled by default, but can be deactivated via with option .
Колони
View mode "Columns" was inspired by the file manager Finder of Mac OS X. Entering a sub folder did not replace the current folder view but the content of the sub folder was listed in an additional column next to the column of the parent folder. This could be used for several hierarchies, so that you could navigate in an easy and fast way in the file system. Since KDE 4.8, view mode "Columns" has been dropped and will not be available in future Dolphin releases.
Setting defaults for all folders
Under (or under the menu item if you have enabled menu bar) you can set any of these attributes to be the default for all folder views.
Панели
Dolphin contains several panels, which can be activated via menu . Each panel can be placed in the left or right docking area. To move a panel you have to unlock panels (right clik on a panel and select ), click on the header and Drag&Drop the panel. The area where the panel will be placed on mouse released is highlighted. It is possible to stack panels on top of each other. In this case the panels are placed into tabs.
В заглавната част на всеки панел има два бутона. Бутонът в близост до надписа undocks на панела. Това прави групата на независим прозорец, който "плава" над "'Делфин'. Прозорецът е все още в съчетание с "'делфините'и не могат да бъдат показани без "'Делфин' и не могат да бъдат сведени до минимум, например като нормални прозорци. С натискане на бутона на панела отново е в нея отново. Вторият бутон ще затвори панела.
Без Прехвърляне на диалогови прозорци
При преместване, копиране и изтриване на файлове и директории диалоговия изчезва дори когато операцията все още не е завършена. А прогрес бар след това се появява в долната дясна част на екрана, това след това изчезва също така, ако искате видите развитието, което трябва да щракнете върху малките (и) информация икона в системния трей.
Места
Dolphin contains a new kind of bookmarks Places. These are displayed in a panel which can be activated via (keyboard shortcut F9). The default Places are identical to the ones shown in the category Computer of the K-Menu Kickoff.
Като щракнете върху една от тези места ще бъдат открити в текущия изглед папка. В контекстното меню дава възможност за редактиране на места или да бъдат отстранени отново. Също така е възможно да се скрие вписванията временно.
В контекстното меню на папката може да се използва, за да добавите тази папка един друг запис на места панел. Ето защо не е елемент от менюто . Можете също така да Drag & Drop на папка към Места.
Местата панел също съдържа информация за свързани преносими устройства като USB-ключ или CD-та. Една малка икона щепсела показва, когато устройството е монтирано. В контекстното меню дава възможност за демонтирането на устройството.
Местата, които се използват като основа в навигационен път лента за навигация. Всеки адрес е показано във връзка с точност до основната папка, която е едно от местата.
Информация
The information panel can be activated via (keyboard shortcut F11). This panel displays a preview or an icon of the currently selected file/folder or of the file/folder below the mouse cursor. Some additional information like change date or size to the file/folder is displayed as well.
Информацията панел предлага възможността да гласуват за файлове, добавите коментар или етикет файл. Това е една от връзките на семантични Desktop Nepomuk, който предоставя предимствата на семантични уеб за работния плот. Като се започне от KDE 4.2 е възможно да се търси за семантични връзки, дадени от тагове.
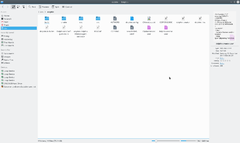
Папки
A panel providing a tree structure for the file system can be displayed via (keyboard shortcut F7). The tree structure offers the possibility by clicking the > and ˇ signs to expand/collapse sub folders. By clicking on one of the folders the content will be displayed in the current view.
Терминал
The terminal emulator Konsole can be displayed directly in Dolphin via (keyboard shortcut F4). This makes it possible to use shell commands directly in Dolphin. The terminal is opened in the folder which is displayed in the current view. Shift + F4 opens Konsole in new window.
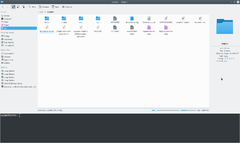
Навигация файловата система
Отметки и Места
В KDE3 можете да създадете отметки в Konqueror, но те не са били достъпни за всяко друго приложение. KDE 4.x SC отваря много по-голяма гъвкавост - но това неминуемо означава повече усложнения. Всъщност KDE 4 има SC три класа на отметки, които трябва да бъдат диференцирани. Те живеят в различни файлове, и имат различни функции.
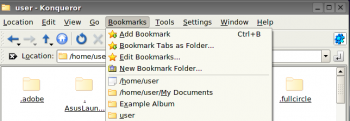
Три вида отметка
Първо, това е набор от маркери на разположение само на Konqueror - отметки в Мрежата. Те се съхраняват в ~ / .kde / акции / Apps / Konqueror / bookmarks.xml. Тогава там е набор, които '"Делфин призовава места. Този комплект е на разположение на всички приложения, както и файлов мениджър "'Делфин на. Всеки път, когато използвате ще видите този набор. В третия сет с маркери са Заявление Bookmarks. Това споделя един файл, независимо от приложението, което ги, и са достъпни за всички приложения, освен ако не ги ограничават до определено приложение. Повече от това по-късно.
Разрешаване на отметки
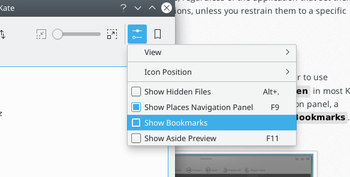
В най-Bookmarks дистрибуции не са активирани по подразбиране. За да използвате маркери ние първо трябва да ги разрешите. Отваряне на в повечето KDE приложения и ще видите, по десния ръб на иконата панел, гаечен ключ или ключ. От падащия списък, изберете .
"Места" за цялата система за навигация
Налице е неизпълнение на определени места'-
- Начало
- Мрежа
- Root
- Боклук
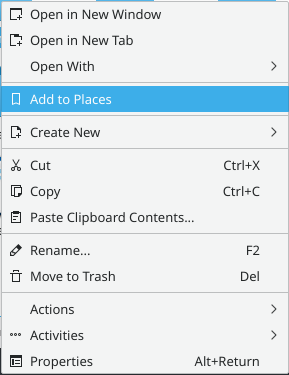
но можете да добавите други места. В Делфин, щракнете с десния бутон върху папката и изберете , Или просто да плъзнете папка на места.
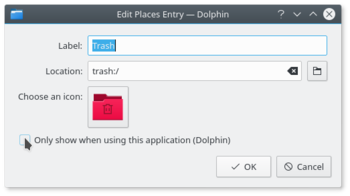
По подразбиране това "Place", ще бъдат видими във всички приложения. Ако искате да го налага да Делфин, трябва да щракнете с десния бутон на ново име в списъка с места, където ще намерите възможност да го редактирате. Има чек-кутия за .
Можете да видите резултата от тази команда, ако сте прочели ~ / .kde4/share/apps/kfileplaces/bookmarks.xml.
В някои приложения също не е опция в меню "Файл", за да добавите папка, за да места. На този етап обаче документи се различават, в която са налични. Най-важното нещо, което трябва да запомните е, че по подразбиране е за места обекти да бъдат достъпни за всички заявления в диалог.
Отметки в приложения
Това е втори клас с маркери. Запомни отваряне и използване на гаечен ключ / гаечен ключ? До нея е жълта звезда. Това е маркер за управление на менюто.
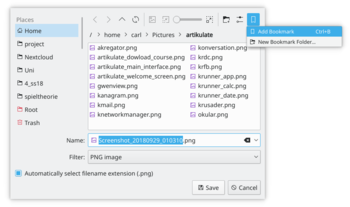
Тук можете да определите маркери, които ще бъдат видими в същото меню на всяко приложение. Те се съхраняват в един файл, ~ / .kde4/share/apps/kfile/bookmarks.xml, която се използва от всички приложения, като това меню.
Ограничава до едно заявление
Някои приложения ви позволяват да редактирате обекта в "Места" меню. Например, ако в Gwenview десен бутон върху папката, в места можете да зададете опция за .
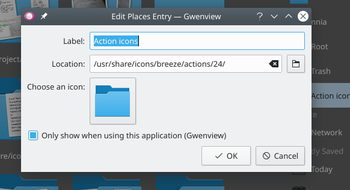
Ако трябва да се ограничите до приложение, което все още не позволява да направите това, остава само начин е да редактирате файла ~ / .kde / акции / Apps / kfile / bookmarks.xml. Непосредствено преди </metadata> етикет ще трябва да добавите линия
<OnlyInApp>appname</OnlyInApp>
Архив управление на делфините
Managing archives now becomes simple. In any directory in Dolphin, highlight the files that you want to compress, and right-click. Here, using the Compress option, you can elect to create a RAR archive, a Gzipped tar archive, or define another compression mode that you have already set up.
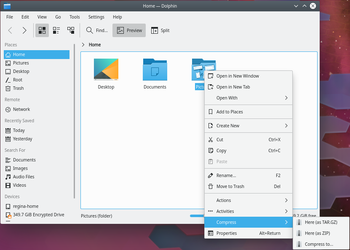
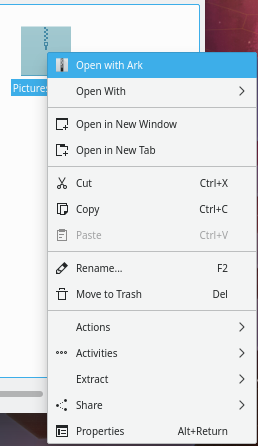
Similarly, if you right-click on an existing archived file you get a range of actions added to the right-click menu. You can extract the archive to the current folder, to an autodetected subfolder or to another place of your choosing.
Should you wish to add files to an existing archive, you can choose .
More Cool Actions
Change a File Association on-the-fly
Have you ever wanted to open a file, only to find that it is associated with an application that is not of your choice?
You can, for one, alter this in . This is the same as running kcmshell5 filetypes in a Konsole.
Alternatively, if you want to change multiple associations right quick, you would edit the *.desktop file directly, e.g. the file /usr/share/applications/org.gnome.Builder.desktop . For example, Gnome Builder associates with a great number of file-types which may not be desirable. So the line
MimeType=application/javascript; # we do not want all of these ....
may be shortened or commented out with # . Maybe a line
   InitialPreference=2
   X-KDE-InitialPreference=3
in the builder.desktop file helps to keep your previous default associated app, with builder being only secondary or tertiary option.
Thirdly, Dolphin and Konqueror offer a quick method for changing a single association:
Right-click on the file and select . The first line there is descriptive, something like:
Type: XML document
At the same level, on the right, there is a spanner (wrench). Click on that and you can add or change an association.
Similarly, by working on a folder, you can change the default file manager to/from Konqueror, if you choose, or add another image browser to the possible associations.
The sub-menu opens up a whole lot more cool things to do from Dolphin. Some possibilities only appear when applicable to the file you have selected. An apps .desktop file below /usr/share/applications defines what actions are applicable for a particular type of file. Some of the options are
- Convert an image file to a different format
- Preview the file
- Download a remote file with KGet
- Sign and/or encrypt the file, according to the encryption software installed
Encode and copy audio CD tracks
- Insert an audio CD
- Navigate to this CD in Dolphin: it must appear as "Volume" in your Dolphin 'Places' or you can reach it by typing audiocd:/ in the address bar.
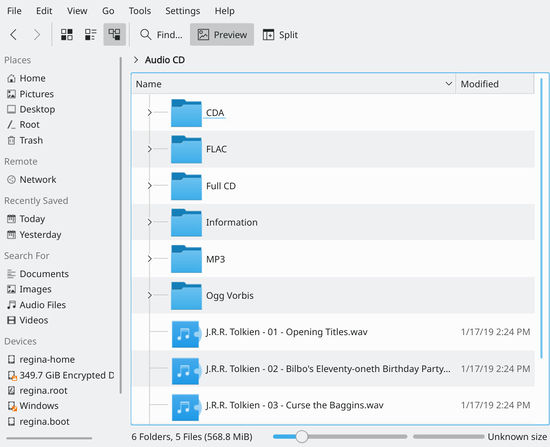
You now notice that Dolphin is proposing a WAV file for each track, plus:
- a CDA folder containing indexing information in the usual CDA format.
- a Whole CD folder, containing one file for each format (.cda, .flac, .mp3, .ogg, .wav) holding all the tracks
- a FLAC folder, containing the tracks encoded into FLAC format (lossless information format)
- an Information folder containing the CDDB informations
- an MP3 folder, containing all the tracks in MP3 format
- a Ogg Vorbis folder, containing the tracks encoded in OGG format
You then just have to copy the folder of your choice, in your preferred format to obtain the relative encoded version of your CD!
timeline:/ and have your recent files as startup folder
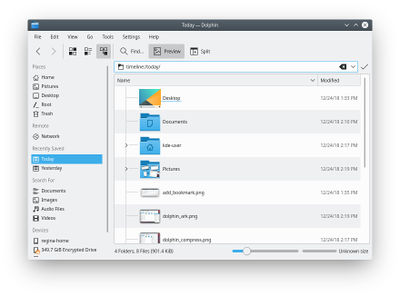
In a current (2017, Version 16.08.3 of) dolphin (with baloo up and running), you can start up dolphin with a view of recently modified files: Just navigate to the address/location of timeline:/today/ (copy paste it to the address bar) or use it as dolphin start-up-folder in dolphin-settings. With older versions of dolphin, this required the below manual steps:
Dolphin has access to a large number of file transfer protocols (KIO Slaves). One of those is provided by the KDE semantic search system (Nepomuk). Nepomuk offers a transfer protocol named history. You can navigate to it by entering timeline:/ in the location bar.
One particularly neat thing there is the ability to have the Today folder from the timeline:/ protocol in the Places sidebar (you can just drag it there!). You can then change the name and icon (do a right click on the new Today entry and choose ).
It could be very useful to have this view of recently used files immediately when you start Dolphin. Unfortunately, as of Dolphin 2.1 (part of KDE SC 4.9) this is not possible without editing the Dolphin configuration file. See this blog for more details on that.
To edit the configuration file, first close all Dolphin windows. Dolphin will save its configuration upon closing, overwriting any changes you might make!
Then use KRunner (Alt + F2) to edit ~/.kde4/share/config/dolphinrc (or ~/.kde/share/config/dolphinrc, depending on your distribution) with KWrite as follows: kwrite ~/.kde4/share/config/dolphinrc. You can of course use any other editor as well, like Kate. In the configuration file, locate the [General] section to edit the HomeUrl into: HomeUrl=timeline:/today and save the file. You should now have the today view as default and have the files you're most often looking for at your fingertips!


