KDevelop5/Manual/Code generation with templates

Code generation with templates
KDevelop uses templates for generating source code files and to avoid writing repeatable code.
Creating a new class
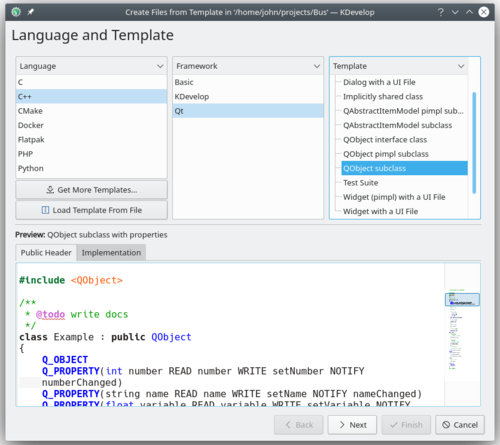
The most common use for code generation is probably writing new classes. To create a new class in an existing project, right-click on a project folder and choose . The same dialog can be started from the menu by clicking , but using a project folder has the benefit of setting a base URL for the output files. Choose C++ in the Language selection view, the desired Framework and Template in the other two views. At the bottom of the dialog, a Preview pane shows you the files it will generate and allows you to browse the files. After you are through with your selections, you will have to specify the details of the new class in the Class Basics dialog after clicking .
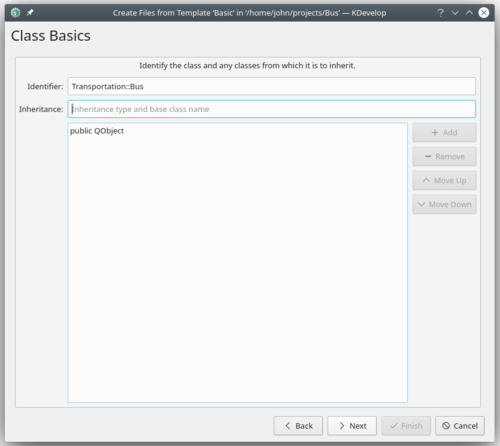
First, you have to specify an identifier for the new class. This can be a simple name (like Bus) or a complete identifier with namespaces (like Transportation::Bus). In the latter case, KDevelop will parse the identifier and correctly separate the namespaces from the actual name. On the same page, you can add base classes for the new class. You may notice that some templates choose a base class on their own, you are free to remove it and/or add other bases. You should write the full inheritance statement here, which is language-dependent, such as public QObject for C++, extends SomeClass for PHP or simply the name of the class for Python.
On the next page, you are offered a selection of virtual methods from all inherited classes, as well as some default constructors, destructors and operators. Checking the checkbox next to a method signature will implement this method in the new class.
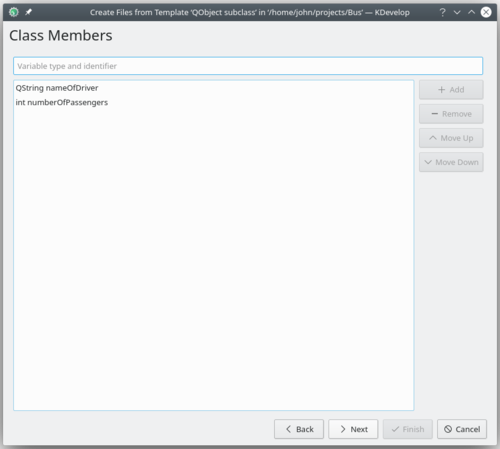
Clicking brings up the Class Members dialog box where you can add members to a class. Depending on the selected template, these may appear in the new class as member variables, or the template may create properties with setters and getters for them. In a language where variable types have to be declared, such as C++, you have to specify both the type and the name of the member, such as int number or QString name. In other languages, you may leave out the type, but it is good practice to enter it anyway because the selected template could still make some use of it. Optionally you can rearrange the order of the class members by selecting a member and then hitting either or . The chosen order will be the sequence used in generating the source file.
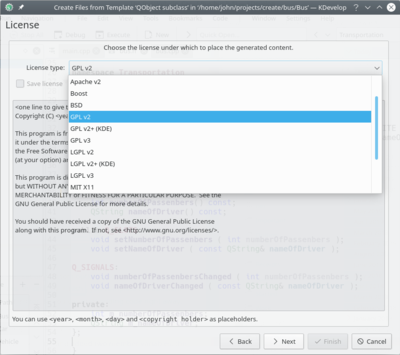
In the following pages, you can choose a license for your new class, set any custom options required by the selected template, and configure output locations for all the generated files. By clicking , you complete the assistant and create the new class. The generated files will be opened in the editor, so you can start adding code right away.
After creating a new C++ class, you will be given the option of adding the class to a project target. Choose a target from the dialog page, or dismiss the page and add the files to a target manually.
If you chose the QObject subclass template, checked some of the default methods, and added two member variables, the output should look like on the following picture. All of the automatically added documentation headers for each class, function, and data items have been removed for clarity.
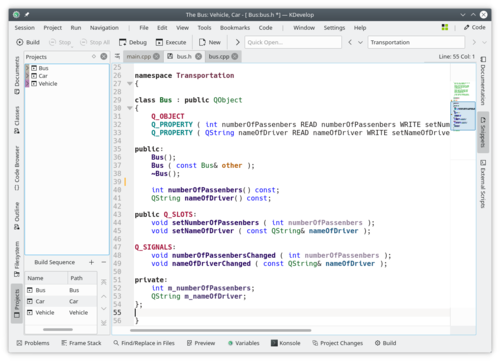
You can see that data members are converted into Qt properties, with accessor functions and the Q_PROPERTY macros. Arguments to setter functions are even passed by const-reference, where appropriate. If you chose QObject pimpl subclass, a private class is declared, and a private pointer created with Q_DECLARE_PRIVATE. All this is done by the template, choosing a different template in the first step could completely change the output.
Creating a new unit test
Even though most testing frameworks require each test to also be a class, KDevelop includes a method to simplify the creation of unit tests. To create a new test, right-click on a project folder and choose . In the Language and Template selection page, choose your Programming Language, your Framework and Template and click .
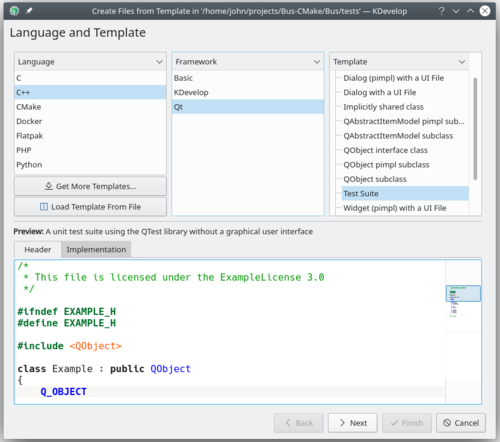
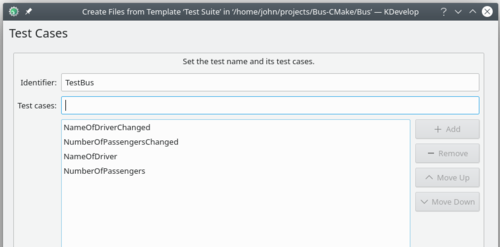
You will be prompted for the test name and a list of test cases. For the test cases, you only have to specify a list of names. Some unit testing frameworks, such as PyUnit and PHPUnit, require that test cases start with a special prefix. In KDevelop, the template is responsible for adding the prefix, so you do not have to prefix the test cases here. After clicking , specify the license and output locations for the generated files, and the test will be created. Unit tests created this way will not be added to any target automatically.
Adding test units and a CMakeLists.txt file to add the test units to the Bus project, gives the following CMakeLists.txt for the Bus project and the test subdirectory:
- Bus project:
cmake_minimum_required(VERSION 3.0)

project(Bus LANGUAGES CXX)

set(QT_REQUIRED_VERSION "5.14.0")
find_package(Qt5 ${QT_REQUIRED_VERSION} CONFIG REQUIRED COMPONENTS Core Test)

set(CMAKE_AUTOUIC ON)
set(CMAKE_AUTOMOC ON)
set(CMAKE_AUTORCC ON)

set(CMAKE_CXX_STANDARD 11)
set(CMAKE_CXX_STANDARD_REQUIRED ON)

# Docs only available if this is the main app
find_package(Doxygen)
if(Doxygen_FOUND)
	add_subdirectory(docs)
else()
	message(STATUS "Doxygen not found, not building docs")
endif()

add_subdirectory(src)

enable_testing()
add_subdirectory(tests)
- Test units:
include_directories("../src")

add_executable(TestBus testbus.cpp ../src/bus.cpp)

add_test(NAME TestBus COMMAND TestBus)

target_link_libraries(TestBus PRIVATE Qt5::Test)
Looking at the testbus.h file, you will see the test cases that were specified in the add test sequence of steps, the test prefix was added by the template:
class TestBus: public QObject
{
    Q_OBJECT

// each private slot is a test
private slots:
    // -- tests to run on slots --
    void testNumberOfPassengers();
    void testNameOfDriver();
    // -- tests to run on signals --
    void testNumberOfPassengersChanged();
    void testNameOfDriverChanged();
private:
    Transportation::Bus m_bus;
};
The functions completed functions in testbus.cpp are detailed below:
- testNumberOfPassengers
void TestBus::testNumberOfPassengers()
{
    m_bus.setNumberOfPassengers(1);
    QVERIFY(m_bus.numberOfPassengers() == 1);
}
- testNameOfDriver
void TestBus::testNameOfDriver()
{
    m_bus.setNameOfDriver(QString("Billy"));
    QVERIFY(m_bus.nameOfDriver() == QString("Billy"));
}
- testNumberOfPassengersChanged
void TestBus::testNumberOfPassengersChanged()
{
    // create spy object
    QSignalSpy spy1(&m_bus,
                    &Transportation::Bus::numberOfPassengersChanged);
    // now change the number of passengers
    m_bus.setNumberOfPassengers(4);
    // verify the check was made
    QVERIFY(m_bus.numberOfPassengers() == 4);
    // verify the signal was sent
    QCOMPARE(spy1.count(), 1);
}
- testNameOfDriverChanged
void TestBus::testNameOfDriverChanged()
{
    // create spy object
    QSignalSpy spy1(&m_bus,
                    &Transportation::Bus::nameOfDriverChanged);
    // now change the name of driver
    m_bus.setNameOfDriver(QString("Jim"));
    // verify the check was made
    QVERIFY(m_bus.nameOfDriver() == QString("Jim"));
    // verify the signal was sent
    QCOMPARE(spy1.count(), 1);

}
At this point, running build on the project also builds the tests. You can run Bus and TestBus separately. Right clicking on the TestBus target gives a pop-up menu where you can select then . This opens the Run tool view with the following output:
********* Start testing of TestBus *********
Config: Using QtTest library 5.14.1, Qt 5.14.1 (x86_64-little_endian-lp64 shared (dynamic) release build; by GCC 7.4.0)
PASS   : TestBus::initTestCase()
PASS   : TestBus::testNumberOfPassengers()
PASS   : TestBus::testNameOfDriver()
PASS   : TestBus::testNumberOfPassengersChanged()
PASS   : TestBus::testNameOfDriverChanged()
PASS   : TestBus::cleanupTestCase()
Totals: 6 passed, 0 failed, 0 skipped, 0 blacklisted, 8ms
********* Finished testing of TestBus *********
*** Finished ***
If you are using CTest or some other testing framework, make sure to add the new files to a target. KDevelop provides a Unit Tests toolview that integrates with CTest.
Other files
While classes and unit tests receive special attention when generating code from templates, the same method can be used for any kind of source code files. For example, one could use a template for a CMake Find module or a .desktop file. This can be done by choosing , and selecting the wanted category and template. If the selected category is neither Class nor Test, you will only have the option of choosing the license, any custom options specified by the template, and the output file locations. As with classes and tests, finishing the assistant will generate the files and open them in the editor.
Managing templates
From the assistant, you can also download additional file templates by clicking the button. This opens a Get Hot New Stuff dialog, where you can install additional templates, as well as update or remove them. There is also a configuration module for template, which can be reached by clicking . From there, you can manage both file templates (explained above) and project templates (used for creating new projects).
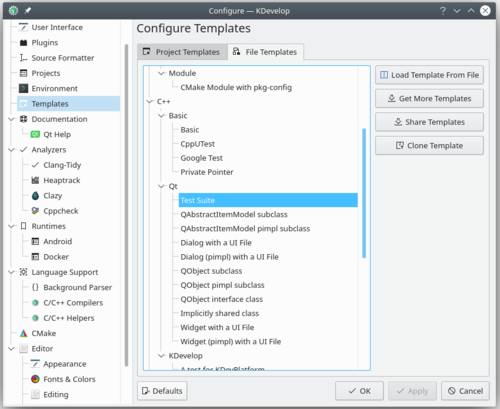
Of course, if none of the available templates suit your project, you can always create new ones. The easiest way is probably to copy and modify an existing template, while a short tutorial and a longer specification document are there to help you. To copy an installed template, open the template manager by clicking , select the template you wish to copy, then click the button. Select a destination folder, then click , and the contents of the template will be extracted into the selected folder. Now you can edit the template by opening the extracted files and modifying them. After you are done, you can import your new template into KDevelop by opening the template manager, activating the appropriate tab (either or ) and clicking . Open the template description file, which is the one with the suffix either .kdevtemplate or .desktop. KDevelop will compress the files into a template archive and import the template.
If you want to write a template from scratch, you can start with a sample C++ class template by creating a new project and selecting the C++ Class Template project in category KDevelop.
