KDevelop5/Manual/Working with version control systems
Working with version control systems
If you are working with larger projects, chances are that the source code is managed by a version control system such as subversion or git. The following section is written with subversion in view but will be equally true if you use git or any other supported version control system.
Subversion
First not that if the directory in which a project is located is under version control, KDevelop will automatically notice. In other words: It is not necessary that you tell KDevelop to check out a copy itself when setting up your project; it is ok to point KDevelop at a directory into which you have previously checked out a copy from the repository. If you have such a directory under version control, open the Projects tool view. There are then a number of things you can do:
- If your directory has become outdated, you can update it from the repository: Click on the project name with the right mouse button, go to the menu and select . This will bring all files that belong to this project up to date with respect to the repository.
- If you want to restrict this action to individual subdirectories or files, then expand the tree view of this project to the level you want and right click on a subdirectory or file name, then do the same as above.

- If you've edited one or more files, expand the view of this project to the directory in which these files are located and right click on the directory. This gives you a menu item that offers you different choices. Choose to see the differences between the version you have edited and the version in the repository you had previously checked out (the revision "base"). The resulting view will show the "diffs" for all files in this directory.
- If you only edited a single file, you can also get the menu for this file by simply right clicking on the corresponding file name in the project view. Even simpler, just right clicking into the Editor view in which you have opened this file will also give you this menu option.
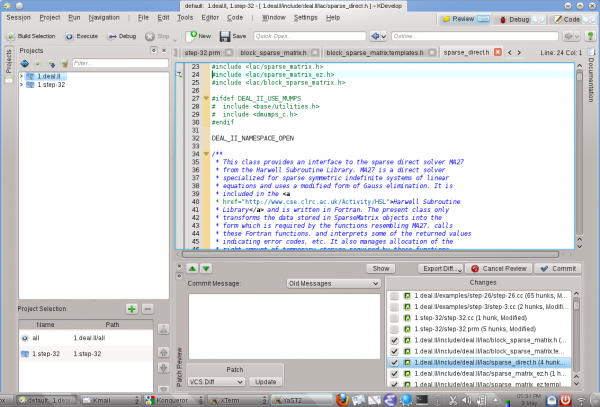
- If you want to check in one or more edited files, right click either on an individual file, subdirectory, or whole project and select . This will get you into mode, the third mode besides and as you can see in the top right corner of the KDevelop main window. The picture on the right shows you how this looks. In mode, the top part shows you diffs for the entire subdirectory/project and each individual changed file with changes highlighted (see the various tabs on this part of the window). By default, all changed files are in the changeset you are about to commit, but you can unselect some of the files if their modifications are unrelated to what you want to commit. For example, in the example on the right I have unselected
step-32.ccandstep-32.prmbecause the changes in these files have nothing to do with the other ones I made to this project and I don't yet want to check them in yet (I may later want to do so in a separate commit). After reviewing the changes you can enter a commit message into the text box and hit on the right to send things off.
- As with seeing differences, if you want to check in a single file you can also just right click into the editor window to get the menu item.
Git

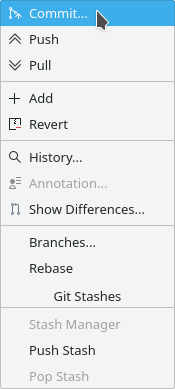
Since git is becoming more and more popular with companies programmers, let us look at the options for git. Whether you right-click on the project name or on an individual file, one of the menu choices it gives you is . When clicked it produces the submenu shown on the right with some of the more common git commands.
- Commit
- Commit your changes to the local repository with an optional message describing the changes made.
- Push
- Update the remote repository.
- Pull
- Fetch from and integrate with the local repository from the remote repository.
- Add
- Add the file to the list of files to be committed when you perform the commit. This can be used as many times as needed before the commit.
- Revert
- Reverse an earlier commit due to a commit error or a patch that is creating a problem.
- Search History
- Search history pulls up a dialog that displays the log of the commits along with the commit message and a list of files affected.
- Annotation
- Annotates each line in the given file with commit information.
- Show Differences
- Shows the differences of a patch.
- Branches
- Opens a dialog that shows the current branches as well as a search box, and buttons for the following branch actions: create, delete, rename, compare, checkout, and merge.
- Rebase
- Opens a dialog to select the branch to rebase to.
- Stash Manager
- Opens a dialog displaying a list of stashes that have been pushed with buttons to determine what to do next. The buttons have the following actions:
- Show: Shows the selected stash as a diff and switches to diff view
- Apply: Applies the stash but does not remove the stash
- Pop: Applies the stash and removes it from the Stash Manager
- Branch: Opens a dialog for a branch name to create with the stash
- Drop: Deletes the stash
- Close: Closes the Stash Manager
- Push Stash
- Save your local modifications to the current working branch to a new stash entry and roll them back to HEAD. The <message> part is optional and gives the stash a description.
- Pop Stash
- Remove a single stash from the stash list and apply it on top of the current working tree, i.e., do the opposite operation of git stash push. The working directory must match the index.
