Системні параметри/Принтери
Printer Configuration
 |
За допомогою цієї програми ви зможете з’єднати ваш комп’ютер з принтером і встановити відповідні параметри роботи пристрою. |
Список можливостей
- Додавання принтера до списку принтерів вашої системи
- Надання принтерам назв, які допоможуть у пошуку принтерів у списку
- Виконання тестування та завдань догляду за принтером
- Вилучення принтера

Якщо ваш принтер не з’єднано напряму з комп’ютером за допомогою USB-кабелю, вам доведеться скористатися інструментом налаштування принтерів для додавання запису принтера. З подібною ситуацією можна зіткнутися, якщо ви плануєте друк на принтері спільного використання, з’єднаному з іншим комп’ютером, або бажаєте встановити з’єднання з іншими принтером, який працює у мережі з сервером друку.
Приклад
Щоб додати до списку принтерів ваш принтер, виконайте прості кроки прикладу налаштування, наведеного нижче. Перш ніж почати, зберіть відомості про ваш принтер (виробник, модель, IP-адреса тощо).
Getting to the program is a sequence of straightforward steps.
- KDE
- Once you get to the tool, click the button to add a printer (Find and click the button between steps.)
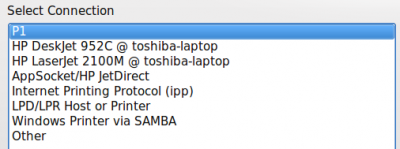
- Your computer will search your local area network for printers that have been shared on other computers or are directly attached to the network.
In this example, I have an HP Laserjet 2100M which is connected directly to my network using a small print server on the printer.
The next illustration also shows that I have another computer sharing two printers on a Toshiba laptop. If I wanted to use either of them, that other computer would need to be on for the printer to work. Remote printers work best if directly connected to the network or are connected to a dedicated print server computer.

- I choose which is the choice for my HP/printserver.

- I enter the IP address number in the Host blank (Currently, the Printer Configuration tool does not identify what that number is, so you will need to ask your network administrator what the IP address is).
- Choose the manufacturer (Mine is HP)
- Choose the model (HP has many)
- Choose the recommended Driver unless you have a reason to do otherwise.
- Give the printer a useful name since "printer" may not be good enough.
- Give a description including the physical location if not in your own room.
- The "Location" defaults to your computer's name in case you decide to share it later. Sharing is one of the options of the printer configuration tool.
On the configuration screen, you will now see a new "Local Printer" because the printer is "attached" to your computer. If you have more than one printer, you should be sure to thoughtfully select one as the default. You might not want to set the big high speed departmental printer/copier in the department manager's office as your default if you have a small printer hooked directly to your computer.


