Krita/Tutorial 3A
Krita Tutorial - Part III: Brushes
This current part will cover Brush-related items:
- Brush management
- Drawing modes
- Drawing assistants.
Originally I wanted to at least include the part on Pixel Brushes, but that got ridiculously long so...
Preliminary: Help! Krita isn't working properly
Erasing is acting weird: it's making all these boxes!
- Are you erasing on the white, background layer? The boxes you see below is Krita's way of displaying full transparency. To avoid this effect, it's better to paint with white on the background layer than to erase.
- Better yet, always make a new, transparent layer to draw on. Lock the background layer, even.

Why isn't my brush working?
- Are you using a brush tool? If you switched to a selection tool, gradient, fill tool or assistant, then you won't be able to access your brushes.
- Are you drawing on a paint layer? If you selected a group layer, a mask or a vector layer, you won't be able to draw on it with a normal brush.
- Is your layer locked? Locking prevents you from drawing on that layer by accident.
- Which brush engine are you using? If you switched to the Deform brush for example, then you may not be getting a proper effect.
- Which composite mode are you using? For example, if you are using a brush or layer with lighten-type composite mode like Linear Dodge, then using a light color on a light color may not produce visible results.
- Is your brush on erase mode? Press E again to toggle to normal mode.
- Are there any selections active? If there are, you can't draw outside the selection. Shift + Ctrl + A to unselect all, or if you have a local selection, turn it off. These happen to me all the time.

- Did you resize your brush too much? You may have resized it to 0 by accident. Ctrl + Drag to make it big again.
Hey, the new file I created has an image in it...
- This feature can catch you off-guard. When you have an image on the clipboard, by default the "first layer from clipboard" option will be checked when you create a new file. Toggle it off.

- Make sure this is unchecked when creating a new image (bottom-left)
- Then, if necessary, restore the file size to whatever needed, like the default Width 1600 x Height 1200.
Help! I made a grid and can't get rid of it!
- In the top menu toggle off (I panicked the first few times...)
I closed the layer/color/whatever docker by accident!
- Check the docker you want in the top menu
Brush management
Saving / Deleting presets
Krita makes it very easy to save and delete presets, so don't hesitate, save anything you like. You can always delete them later. To save a preset:
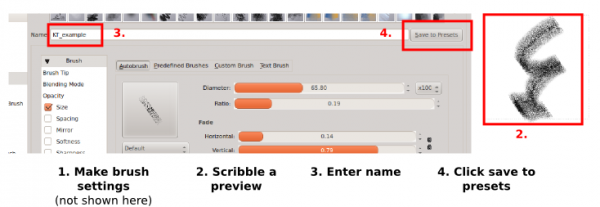
- To overwrite, just save under the same name. Be careful not to overwrite by accident, the name will turn red if it exists already.
- To delete, just select the preset in the brush preset docker and click the "delete resource" button.
Tips:
- Easy brush search: the "Brush Preset" docker allows you to quickly find any group of brushes through the brush name so:
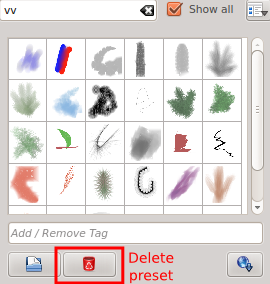
- Give all the brushes in a same group of presets the same initials: such as "aa_scribble". They'll also be neatly grouped within the brush presets windows.
Ramon Miranda has a video tutorial on brush management.
Brush folders
Q: Where are my brushes stored? Where do I add the presets I downloaded?
Brush folders:
On Linux you will find the brush folders in
- /home/[username]/.kde/share/apps/krita or
- /home/[username]/.kde4/share/apps/krita
On Windows you will find the brush folders in something like
- C:\Users\[username]\AppData\Roaming\.krita\share\apps\krita\ or
- C:\Documents and Settings\[username]\AppData\Roaming\.krita\share\apps\krita
Replace [username] by your user name. You will likely have to show hidden files, which you should be able to do from
Here you will find among others the following:
- Brushes folder: These are the images for your brush tips.
- Paintoppresets folder: These are your stored brush presets.
- kis_brushes.blacklist: This file lists the blacklisted ("deleted") brushes.
- kis_paintoppresets.blacklist: This file lists the blacklisted ("deleted") presets.

- To add new downloaded brushes or presets, simply add to the corresponding folder.
Q: Hey, I deleted a few brushes by accident.
A: Krita never deletes any of your brushes or presets. Instead it adds them to the "blacklist" files in the above-shown folder.
- To restore a "delete" (blacklisted) brush or preset, open the .blacklist file with a text editor and simply delete the corresponding entry.
- To permanently delete (as opposed to blacklist) a brush or preset, find it in the folders and delete it.
Q: Help! I wrote over a preset by accident (example: "mybrush")
A: Krita never "deletes" an overwritten preset either. Instead:
- It blacklists the original file
- Then it creates a new file with a similar name ("mybrushx1234") Just remove the original preset from the blacklist and delete the new preset.
Drawing modes
- Krita has 9 drawing tools (not to be confused with "brush engines").
- Of these, 4 have fill options (accessed from tool options).
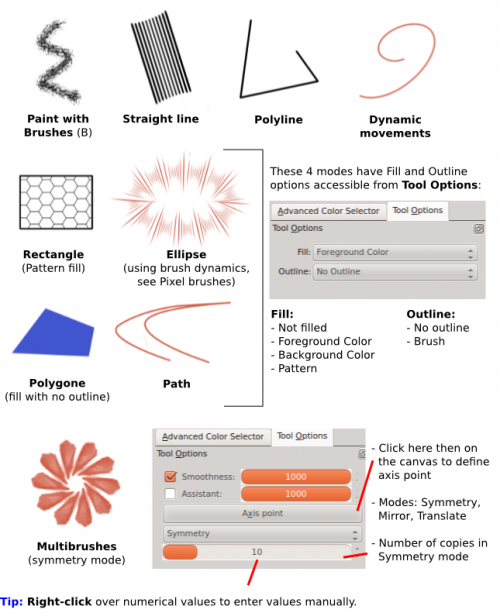
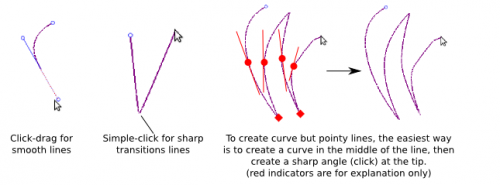
Tips: Using paths
I have already covered the corresponding tool in Selections in the last tutorial, but in case you skipped it, here it is again:
- Turn off snapping: Unless you actually want this behavior, turn it off, it's what's making your path points jump around when you're trying to place one.
- Drawing paths:
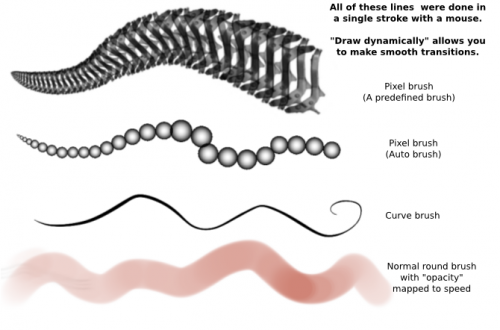
Tips: Smooth lines with "Draw dynamically"
- In the Tool Options docker, set to 40~70% . You can also play with for more control. Doing this will allow you to draw smooth lines with a great degree of control, even with a mouse.
- Set dynamics to "speed": In the brush settings editor, setting either the brush size or opacity to while in "draw dynamically" mode will generate smooth dynamics transitions.
This is one of my favorite tricks. So if you see anything in this tutorial that looks as though I drew it with a tablet, I am most probably using this trick.
Assistants

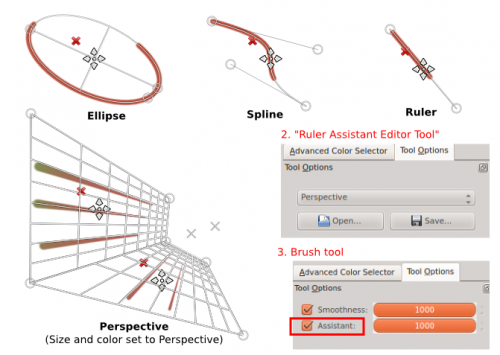
Drawing assistants constrains (or at least "pulls") your line to the form of the assistant. To use drawing assistants:
- Select the 'Ruler Assistant Editor Tool (they should rename it...)
- Select the assistant type in the Tool Options docker, and create one
- Switch to Brush tool, and check . The higher the value, the more closely the brush will follow the shape of the assistant.
- Draw over the assistant with the brush tool. (the extra crosses etc. disappear unless the assistant tool is selected again)
Note:
- The "Edit the Perspective Grid" feature will apparently be merged into this tool in a future version, along with the ability to drag out new sides from a perspective grid.
- In the meantime though, you can also create several perspective grids and "snap" the corners to one another.
Tips:
- As shown in the example, you can use Perspective Assistants with brush dynamics to make lines fade in size, opacity, color or more! Just go the brush editor and activate the corresponding Dynamics.
- You can also use Perspective assistants for radial speedlines!
- You can save assistants for later re-use.
See the third episode of Anitim's comic tutorial on Youtube for a video example.


