Digikam/Watermark/da: Difference between revisions
Importing a new version from external source |
Importing a new version from external source |
||
| Line 5: | Line 5: | ||
Denne artikel blev oprindeligt bragt i [http://scribblesandsnaps.wordpress.com/category/software/open-source/ Scribbles and Snaps] og bringes med Dimitri Popovs tilladelse. | Denne artikel blev oprindeligt bragt i [http://scribblesandsnaps.wordpress.com/category/software/open-source/ Scribbles and Snaps] og bringes med Dimitri Popovs tilladelse. | ||
Selv om du kan beskytte dine fotos imod uautoriseret brug på mange måder, så er ''vandmærker'' stadig den enkleste og formodentlig den mest effektive teknik, hvormed du kan identificere dig som fotoets skaber og gøre det vanskeligt at bruge dit arbejde uden tilladelse. | |||
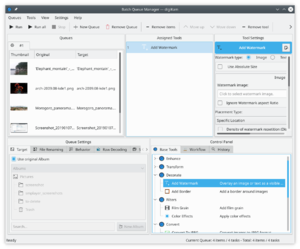
Although '''digiKam''' supports watermarking, this feature is hidden so well that you might not even realize that it’s there. This is because the watermarking function in '''digiKam''' is tucked under the <menuchoice>Batch Queue Manager</menuchoice> tool which you can use to watermark multiple photos in one go. Here is how this works in practice. Choose <menuchoice>Tools</menuchoice> -> <menuchoice>Batch Queue Manager</menuchoice> (or press the <keycap>B</keycap> key) to open the <menuchoice>Batch Queue Manager</menuchoice> tool. Drag the photos you want to watermark from a '''digiKam''' album onto the <menuchoice>Queues</menuchoice> pane to add them to the current queue. Click on the <menuchoice>Base Tools</menuchoice> tab in the <menuchoice>Batch Tools Available</menuchoice> pane and double-click on the <menuchoice>Add Watermark</menuchoice> tool to add it to the <menuchoice>Assigned Tools</menuchoice> pane. | Although '''digiKam''' supports watermarking, this feature is hidden so well that you might not even realize that it’s there. This is because the watermarking function in '''digiKam''' is tucked under the <menuchoice>Batch Queue Manager</menuchoice> tool which you can use to watermark multiple photos in one go. Here is how this works in practice. Choose <menuchoice>Tools</menuchoice> -> <menuchoice>Batch Queue Manager</menuchoice> (or press the <keycap>B</keycap> key) to open the <menuchoice>Batch Queue Manager</menuchoice> tool. Drag the photos you want to watermark from a '''digiKam''' album onto the <menuchoice>Queues</menuchoice> pane to add them to the current queue. Click on the <menuchoice>Base Tools</menuchoice> tab in the <menuchoice>Batch Tools Available</menuchoice> pane and double-click on the <menuchoice>Add Watermark</menuchoice> tool to add it to the <menuchoice>Assigned Tools</menuchoice> pane. | ||
Revision as of 19:08, 30 October 2010
Lav vandmærker i fotos med digiKam
Denne artikel blev oprindeligt bragt i Scribbles and Snaps og bringes med Dimitri Popovs tilladelse.
Selv om du kan beskytte dine fotos imod uautoriseret brug på mange måder, så er vandmærker stadig den enkleste og formodentlig den mest effektive teknik, hvormed du kan identificere dig som fotoets skaber og gøre det vanskeligt at bruge dit arbejde uden tilladelse.
Although digiKam supports watermarking, this feature is hidden so well that you might not even realize that it’s there. This is because the watermarking function in digiKam is tucked under the tool which you can use to watermark multiple photos in one go. Here is how this works in practice. Choose -> (or press the B key) to open the tool. Drag the photos you want to watermark from a digiKam album onto the pane to add them to the current queue. Click on the tab in the pane and double-click on the tool to add it to the pane.

digiKam can use text or images as watermarks, and you can choose the desired watermark type in the pane. If you want to use the type, make sure that you already have a graphics file handy. Specify then the available settings such as , , and . Next, select the target folder in the section of the pane. In the section, you can specify what the system should do if it detects a file with the same name as the processed one in the target folder. You can either choose to overwrite the existing file or rename the processed file before saving it. You can also use the options available in the section to specify a renaming rule to automatically rename the processed files.
Once you are satisfied with the settings, hit the button, and once digiKam’s finished, you’ll find the watermarked photos in the target folder.
