Dolphin/File Management/fr: Difference between revisions
Loquehumaine (talk | contribs) Created page with "== Panneaux ==" |
Loquehumaine (talk | contribs) Created page with "'''Dolphin''' contient plusieurs panneaux, qui peuvent être activés via le menu <menuchoice>Affichage -> Panneaux</menuchoice>. Chaque panneau peut être placé dans la zone d'..." |
||
| Line 122: | Line 122: | ||
== Panneaux == | == Panneaux == | ||
'''Dolphin''' | '''Dolphin''' contient plusieurs panneaux, qui peuvent être activés via le menu <menuchoice>Affichage -> Panneaux</menuchoice>. Chaque panneau peut être placé dans la zone d'ancrage à gauche ou à droite. Pour déplacer un panneau, vous n'avez qu'à cliquer sur l'en-tête et ''glisser/déposer'' le panneau. La zone où le panneau sera placé lors du relâchement du bouton de la souris est mis en surbrillance. Il est possible d'empiler des panneaux les uns sur les autres. Dans ce cas, les panneaux sont placés dans des onglets. | ||
In the header of each panel there are two buttons. The button near to the caption undocks the panel. This makes the panel an independent window which "floats" above '''Dolphin'''. The window is still combined with '''Dolphin''' and cannot be displayed without '''Dolphin''' and cannot for example be minimized like normal windows. By clicking the button again the panel is docked again. The second button will close the panel. | In the header of each panel there are two buttons. The button near to the caption undocks the panel. This makes the panel an independent window which "floats" above '''Dolphin'''. The window is still combined with '''Dolphin''' and cannot be displayed without '''Dolphin''' and cannot for example be minimized like normal windows. By clicking the button again the panel is docked again. The second button will close the panel. | ||
Revision as of 13:15, 14 December 2010
Découvrez Dolphin
La première section vous propose une visite guidée de Dolphin. La deuxième section porte sur les concepts des différents types de marque-pages. La troisième section traite de la gestion des archives. Enfin, nous examinons « plus de choses cools ». Les images sont cliquables - vous pouvez voir une vue agrandie.
Informations générales=
Dolphin ou Konqueror ?
Ce tutoriel décrit Dolphin pour KDE SC 4. Konqueror était le gestionnaire de fichiers standard dans KDE 2 et 3. Vous pouvez toujours utiliser Konqueror en tant que gestionnaire de fichiers par défaut dans KDE SC 4. Pour cela, à partir de KDE SC 4.2, ouvrez la configuration du système et allez vers le module . Vous pouvez choisir Konqueror ou tout un tas d'autres applications comme gestionnaire de fichiers.
- D3lphin est un fork de Dolphin pour KDE 3. Il lui manque certaines fonctionnalités de Dolphin de KDE SC 4. Il est aussi moins connu, parce que le gestionnaire par défaut de KDE 3 était Konqueror. Ce fork n'est pas supporté par la communauté et n'est plus maintenu par son auteur.
Introduction à Dolphin
Dolphin est le gestionnaire de fichiers de KDE Software Compilation.
Je vais vous montrer comment utiliser Dolphin pour les tâches courantes de gestion de fichiers, et comment le personnaliser en fonction de vos besoins.
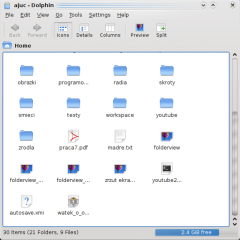
Lorsque l'on ouvre Dolphin depuis le menu Kickoff il affiche votre répertoire de départ - par défaut, votre répertoire Home.
Pour ouvrir un fichier, ou aller dans un dossier, il suffit de cliquer dessus. (Ceci peut être changé pour un double clic dans si vous préférez. Certaines distributions activent le double clic par défaut.) Dans KDE 4.5 il faut aller dans
Pour sélectionner et désélectionner les fichiers et dossiers, laissez le curseur de la souris au-dessus de l'icône et cliquez sur le signe plus qui s'affiche pour sélectionner et le signe moins pour désélectionner. Comme ceci :
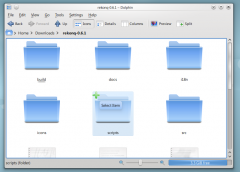
Lorsque vous cliquez sur le signe plus, ce fichier ou le dossier sera ajouté à votre sélection. Vous pouvez sélectionner plusieurs fichiers de la même manière. La sélection peut aussi se faire en dessinant un rectangle (parfois appelé méthode « élastique ») et sélectionner et désélectionner avec Ctrl + clic pour un à la fois et Maj + clic pour plusieurs à la suite.
Pleins de fichiers sélectionnés ressemble à ceci :

Créer d'un nouveau dossier : vous pouvez créer un nouveau dossier dans le répertoire actif en utilisant le ou le raccourci F10.
Onglets : Dolphin supporte la navigation par onglets. Un nouvel onglet peut être ouvert par exemple à partir de , avec Ctrl + T ou par un clic du milieu sur l'icône du dossier ou les boutons de navigation.
Dolphin' s'ouvre par défaut lorsque l'on clique sur n'importe quel dossier. Il peut également être démarré à partir du menu Kickoff.
Dolphin intègre un nouveau concept d'utilisation de la barre de navigation, plus rapide et plus précise : une barre de navigation en fil d'Ariane est utilisé. Au lieu d'afficher le chemin complet, seuls les points de navigation sont affichés sous forme de boutons. En cliquant sur un de ces boutons, vous accédez directement à ce dossier. De cette façon vous pouvez accéder à un dossier parent à partir d'un sous-dossier de manière très rapide.
Entre les boutons qui représentent un dossier il ya une petite flèche qui est aussi un bouton. En cliquant sur cette flèche vous pouvez voir une liste de tous les sous-répertoires sur le même niveau que le dossier actuel, vous permettant un changement de répertoire rapide.
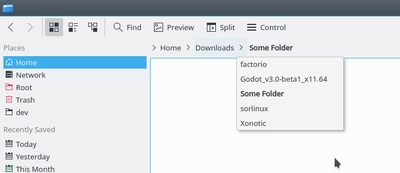
Il ya aussi une barre de navigation classique, qui affiche le chemin complet. Pour l'utiliser, vous pouvez sélectionner , ou en déclenchant le raccourci clavier Ctrl + L. En cliquant sur l'espace libre à côté du dernier dossier affiché dans le style fil d'Ariane, vous pouvez aussi changer vers le style classique. Si le style classique est sélectionné, une coche s'affiche à la fin de la barre de navigation. Ce signe est un bouton qui peut être utilisé pour revenir au style fil d'Ariane. Bien entendu, le menu et les raccourcis clavier peuvent être utilisés également.
Vue séparée
Dolphin offre la possibilité de scinder la vue du dossier courant afin que deux vues du dossier soient affichées côte à côte, comme pour Midnight Commander. C'est une vue très agréable pour copier ou déplacer des fichiers d'un dossier vers un autre.
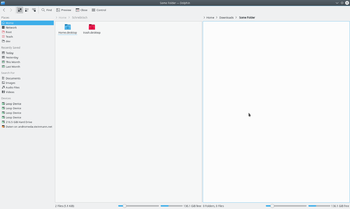
Vous pouvez scinder la vue avec (raccourci clavier F3). Pour revenir à une seule vue du dossier, vous pouvez utiliser . Le symbole vous montrera quelle vue sera fermée. En fonction de la vue actuellement active sur le signe moins sera montré dans la partie gauche ou droite du symbole. La vue active sera fermé. Il est important de le savoir si vous souhaitez utiliser le raccourci clavier. Il y a aussi un bouton pour la division et la fermeture de la vue situé dans la barre d'outils. Ce bouton affiche le symbole moins aussi, il est donc facile de savoir quel point de vue sera fermé.
Bien entendu, chaque point de vue a sa propre barre de navigation et chaque vue peut utiliser un mode d'affichage différents.
Mode d'affichage
Dolphin prend en charge trois modes de vue différents : « Icônes », « Détails » et « Colonnes ». Ceux-ci peuvent être changés via le menu ou via les raccourcis clavier Ctrl+1 (Icônes), Ctrl+2 (Détails) et Ctrl+3 (Colonnes). Il y a aussi un bouton pour chaque mode d'affichage dans la barre d'outils et le menu contextuel de la vue du dossier propose un sous-menu pour changer le mode d'affichage.
Icônes
Chaque fichier et chaque dossier est représenté par une icône dans le mode d'affichage « Icônes ». Au lieu d'afficher une icône, un aperçu du fichier peut être montré. Ce comportement peut être activé/désactivé via le menu ou via un bouton de la barre d'outils. Il y a une limite de taille pour les aperçus de fichiers. Cette limitation de taille peut être configuré via option . Il y a aussi une option pour utiliser les vignettes incorporées dans des fichiers. Dans KDE 4.5 les aperçus sont activés (et la taille maximale définie) dans
Les fichiers dans le dossier actuellement sélectionné sont classés par ordre alphabétique par défaut. Le mode de tri peut être modifié via le menu . Les critères de tri suivants sont disponibles :
- Nom
- Taille
- Date
- Droits d'accès
- Propriétaire
- Groupe
- Type
En outre, l'ordre de tri peut être défini par .
Il y a la possibilité d'afficher des informations supplémentaires en dessous des icônes. Elles peuvent être activées/desactivées via . En principe, les mêmes critères que ceux disponibles comme critères de recherche peuvent être sélectionnés.
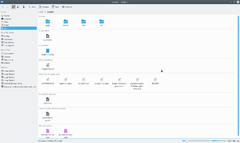
Vous pouvez regrouper les icônes pour obtenir une meilleure vue d'ensemble. Ceci est activé via . Maintenant, les icônes sont regroupées et les groupes sont divisés par une ligne horizontale contenant le nom du groupe dans la légende. Le groupement est lié aux critères de recherche sélectionnés.
Détails
En mode d'affichage « Détails » des renseignements supplémentaires sont affichés par défaut en contraste avec le mode « Icônes ». Tous les fichiers sont répertoriés dans un tableau. Le menu contextuel de l'en-tête du tableau offre la possibilité d'ajouter des colonnes supplémentaires. Les colonnes suivantes sont disponibles :
- Taille
- Date
- Droits d'accès
- Propriétaire
- Groupe
- Type
La colonne « Nom » est toujours affichée. En cliquant sur l'en-tête de l'une des colonnes, la table sera triée par cette colonne. En cliquant sur l'en-tête de la même colonne l'ordre de tri est inversé.
Depuis KDE 4.1, il est possible d'afficher les dossiers comme un arbre. Dans ce mode, un signe plus apparaît à côté du dossier. En cliquant sur ce signe, le dossier est élargi et tous les dossiers contenant les fichiers et les sous sont également indiquées dans le tableau, mais de façon atténuée. En cliquant sur le signe encore une fois, qui affiche désormais un moins, l'expansion est à nouveau fermée. Bien sûr, la structure d'arbre peut être utilisée pour autant de dossiers que souhaité. L'arborescence est désactivé par défaut, mais peut être activée via avec l'option .
Colonnes
Le mode d'affichage « Colonnes » est inspiré par le gestionnaire de fichiers de Mac OS X Finder. Entrer dans un sous-dossier ne remplace pas la vue du dossier courant mais le contenu du sous-dossier est listé dans une colonne supplémentaire, à côté de la colonne du dossier parent. Ceci peut être utilisé pour plusieurs hiérarchies, afin que vous puissiez naviguer de manière simple et rapide dans le système de fichiers.
Réglages par défaut pour tous les dossiers
Dans l'élément de menu vous pouvez choisir n'importe quel attribut pour être activé par défaut dans toutes les vues de dossiers.
Panneaux
Dolphin contient plusieurs panneaux, qui peuvent être activés via le menu . Chaque panneau peut être placé dans la zone d'ancrage à gauche ou à droite. Pour déplacer un panneau, vous n'avez qu'à cliquer sur l'en-tête et glisser/déposer le panneau. La zone où le panneau sera placé lors du relâchement du bouton de la souris est mis en surbrillance. Il est possible d'empiler des panneaux les uns sur les autres. Dans ce cas, les panneaux sont placés dans des onglets.
In the header of each panel there are two buttons. The button near to the caption undocks the panel. This makes the panel an independent window which "floats" above Dolphin. The window is still combined with Dolphin and cannot be displayed without Dolphin and cannot for example be minimized like normal windows. By clicking the button again the panel is docked again. The second button will close the panel.
Non Modal Dialogs
When Moving, Copying or Deleting files/directories the dialog disappears even when the operation has not yet completed. A progress bar then appears in the bottom right of the screen, this then disappears also, if you want see the progress you need to click a small (i) information icon in the system tray.
Places
Dolphin contains a new kind of bookmarks Places. These are displayed in a panel which can be activated via (keyboard shortcut F9). The default Places are identical to the one shown in the category System of the K-Menu Kickoff.
By clicking one of these places it will be opened in the current folder view. The context menu offers the possibility to edit the places or to remove them again. It is also possible to hide entries temporarily.
The context menu of a folder can be used to add this folder an another entry to the Places panel. Therefore there is a menu item . You can also Drag&Drop a folder to the Places panel.
The places panel also contains entries to connected removable devices like USB-keys or CDs. A small plug icon indicates if the device is mounted. The context menu offers the possibility to unmount the device.
The places are used as the basis in the breadcrumb navigation bar. Each address is shown in relation to the nearest parent folder which is one of the places.
Information
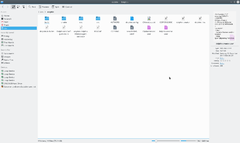
The information panel can be activated via (keyboard shortcut F11). This panel displays a preview or an icon of the currently selected file/folder or of the file/folder below the mouse cursor. Some additional information like change date or size to the file/folder is displayed as well.
The information panel offers the possibility to rate files, add a comment or tag a file. This is one of the interfaces to the semantic Desktop Nepomuk which provides the advantages of the semantic web for the desktop. Starting from KDE 4.2 it is possible to search for the semantic links given by the tags.
Folders
A panel providing a tree structure for the file system can be displayed via (keyboard shortcut F7). The tree structure offers the possibility by clicking the + and - signs to expand/collapse sub folders. By clicking on one of the folders the content will be displayed in the current view.
Terminal
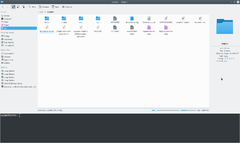
The terminal emulator Konsole can be displayed directly in Dolphin via (keyboard shortcut F4). This makes it possible to use shell commands directly in Dolphin. The terminal is opened in the folder which is displayed in the current view. Shift + F4 opens Konsole in new window.
External links
Road to KDE 4: Dolphin and Konqueror
Ars Technica: A First Look at Dolphin
Youtube - KDE 4 rev 680445 - Dolphin
Introducing KDE 4 Blog - Dolphin
Bookmarks and Places
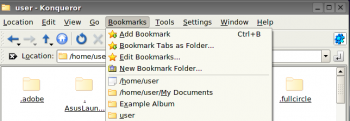
In KDE3 you could create bookmarks in Konqueror, but they were not available to any other application. KDE SC 4.x opens up a great deal more flexibility - but that inevitably means more complication. In fact KDE SC 4 has three classes of Bookmarks, which need to be differentiated. They reside in different files, and have different functions.
Three kinds of bookmark
First, there is the set of bookmarks available only to Konqueror - web bookmarks. These are stored in ~/.kde/share/apps/konqueror/bookmarks.xml. Then there is a set which Dolphin calls Places. This set is available to all applications as well as the Dolphin file manager. Every time you use you will see this set. The third set of bookmarks are Application Bookmarks. These share one file, regardless of the application that set them, and are available to all applications, unless you restrain them to a specific application. More of that later.
Enable bookmarks
In most distros Bookmarks are not enabled by default. In order to use bookmarks we first have to enable them. Open a in most KDE applications and you will see, at the right-hand edge of the icon panel, a spanner or wrench. From the drop-down list, choose .
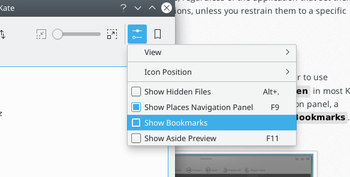
There is a default set of Places -
- Home
- Network
- Root
- Trash
but you can add other places. In Dolphin, right-click on a folder and select , or just drag a folder onto Places.
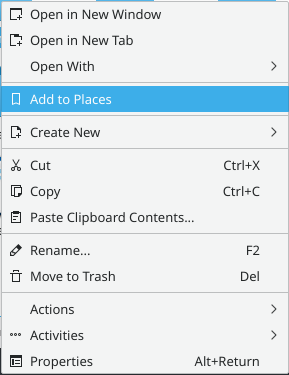
By default this "Place" will be visible in all applications. If you want to keep it constrained to Dolphin, you need to right-click on the new name in the Places list, where you will find the option to Edit it. There is a check-box for .
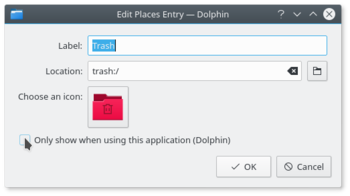
You can see the result of that command if you read ~/.kde4/share/apps/kfileplaces/bookmarks.xml.
In some applications too there is an option in the File menu to add a folder to Places. At this stage, however, applications vary in which features are available. The important thing to remember is that the default is for Places items to be available to all applications in the dialogue.
Bookmarks in applications
This is the second class of bookmarks. Remember opening and using the spanner/wrench? Next to it is a yellow star. This is the bookmark management menu.
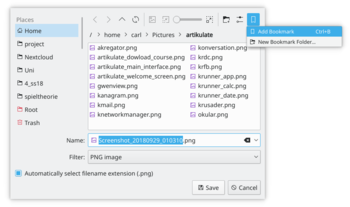
Here you can define bookmarks that will be visible in the same menu on any application. They are stored in one file, ~/.kde4/share/apps/kfile/bookmarks.xml, which is used by all applications having that menu.
Constraining to one application
Some applications allow you to edit items in the Places menu. For instance, if in Gwenview you right click on a folder in Places you can set an option to .
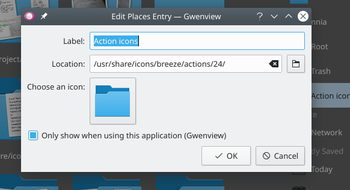
If you need to constrain to an application that does not yet allow you to do that, the only way left is to edit the file ~/.kde/share/apps/kfile/bookmarks.xml. Immediately before the </metadata> tag you will need to add the line
<OnlyInApp>appname</OnlyInApp>
Archive Management in Dolphin
Managing archives now becomes simple. In any directory in Dolphin, highlight the files that you want to compress, and right-click. Here, using the Compress option, you can elect to create a RAR archive, a Gzipped tar archive, or define another compression mode that you have already set up.
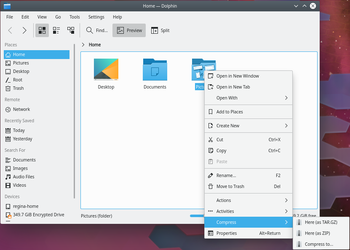
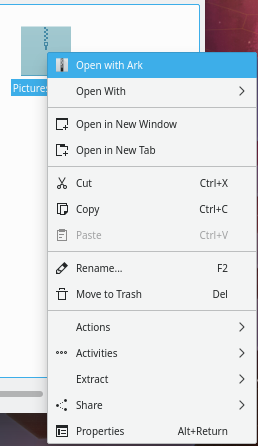
Similarly, if you right-click on an existing archived file you get a range of actions added to the right-click menu. You can extract the archive to the current folder, to an autodetected subfolder or to another place of your choosing.
Should you wish to add files to an existing archive, you can choose .
More Cool Actions
Change a File Association on-the-fly
Have you ever wanted to open a file, only to find that it is associated with an application that is not of your choice? You can, of course, alter this in . But Dolphin and Konqueror offer you a quick and cool method for changing a single association.
Right-click on the file and select . The first line there is descriptive, something like:
Type: XML document
At the same level, on the right, there is a spanner (wrench). Click on that and you can add or change an association.
Similarly, by working on a folder, you can change the default file manager to/from Konqueror, if you choose, or add another image browser to the possible associations.
The sub-menu opens up a whole lot more cool things to do from Dolphin. Some possibilities only appear when applicable to the file you have selected. Some of the options are
- Convert an image file to a different format
- Preview the file
- Download a remote file with KGet
- Sign and/or encrypt the file, according to the encryption software installed
Encode and copy audio CD tracks
- Insert an audio CD
- Navigate to this CD in Dolphin: it must appear as "Volume" in your Dolphin 'Places' or you can reach it by typing audiocd:/ in the address bar.
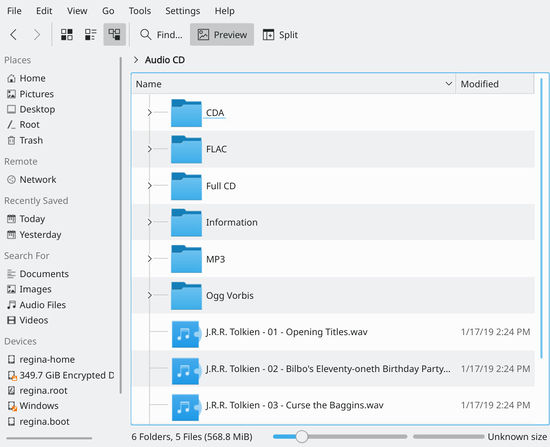
You now notice that Dolphin is proposing a WAV file for each track, plus:
- a CDA folder containing indexing information in the usual CDA format.
- a Whole CD folder, containing one file for each format (.cda, .flac, .mp3, .ogg, .wav) holding all the tracks
- a FLAC folder, containing the tracks encoded into FLAC format (lossless information format)
- an Information folder containing the CDDB informations
- an MP3 folder, containing all the tracks in MP3 format
- a Ogg Vorbis folder, containing the tracks encoded in OGG format
You then just have to copy the folder of your choice, in your preferred format to obtain the relative encoded version of your CD!


