Digikam/Watermark/ca: Difference between revisions
Created page with "Aquest article va aparèixer originalment a [http://scribblesandsnaps.wordpress.com/category/software/open-source/ Scribbles and Snaps] i ha estat reproduït amb el permís d'en ..." |
Created page with "Category:Graphics Category:Fotografia/ca Category:Tutorials" |
||
| Line 15: | Line 15: | ||
Once you are satisfied with the settings, hit the <menuchoice>Run</menuchoice> button, and once '''digiKam'''’s finished, you’ll find the watermarked photos in the target folder. | Once you are satisfied with the settings, hit the <menuchoice>Run</menuchoice> button, and once '''digiKam'''’s finished, you’ll find the watermarked photos in the target folder. | ||
[[Category: Graphics]] | [[Category:Graphics]] | ||
[[Category: | [[Category:Fotografia/ca]] | ||
[[Category: Tutorials]] | [[Category:Tutorials]] | ||
Revision as of 10:10, 26 March 2012
Marca d'aigua a les fotos amb digiKam
Aquest article va aparèixer originalment a Scribbles and Snaps i ha estat reproduït amb el permís d'en Dmitri Popov.
While there are many ways to protect your photos from unauthorized use, watermarking still remains the simplest and probably the most effective technique that can help you to identify you as the creator and make it difficult to use your works without permission.
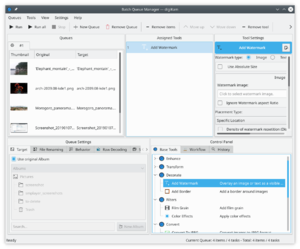
Although digiKam supports watermarking, this feature is hidden so well that you might not even realize that it’s there. This is because the watermarking function in digiKam is tucked under the tool which you can use to watermark multiple photos in one go. Here is how this works in practice. Choose -> (or press the B key) to open the tool. Drag the photos you want to watermark from a digiKam album onto the pane to add them to the current queue. Click on the tab in the pane and double-click on the tool to add it to the pane.

digiKam can use text or images as watermarks, and you can choose the desired watermark type in the pane. If you want to use the type, make sure that you already have a graphics file handy. Specify then the available settings such as , , and . Next, select the target folder in the section of the pane. In the section, you can specify what the system should do if it detects a file with the same name as the processed one in the target folder. You can either choose to overwrite the existing file or rename the processed file before saving it. You can also use the options available in the section to specify a renaming rule to automatically rename the processed files.
Once you are satisfied with the settings, hit the button, and once digiKam’s finished, you’ll find the watermarked photos in the target folder.
