Adding an entry to the Create New menu/ru: Difference between revisions
Created page with "Добавление пункта в меню «Создать»" |
Aisekleovus (talk | contribs) Created page with "В этой папке создайте новый файл с расширением {{Path|.desktop}} Например: {{Path|custom-file.desktop}}." |
||
| Line 3: | Line 3: | ||
{|class="tablecenter vertical-centered" | {|class="tablecenter vertical-centered" | ||
|[[Image:CustomCreateNewMenuEntry.png|300px]] | |[[Image:CustomCreateNewMenuEntry.png|300px]] | ||
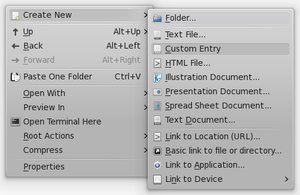
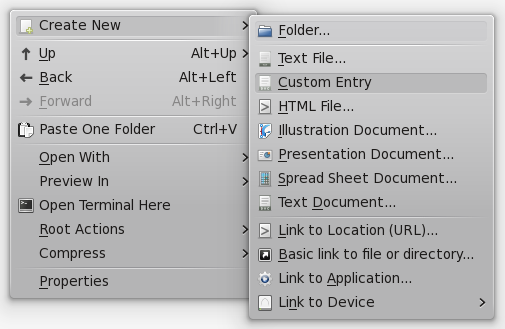
| | |Руководство, описывающее, как добавить пункт в меню <menuchoice>Создать</menuchoice> диспетчера фалов, подобных [[Special:myLanguage/Dolphin|Dolphin]] или [[Special:myLanguage/Konqueror|Konqueror]] | ||
|} | |} | ||
Пункты меню <menuchoice>Создать</menuchoice> носят название ''Шаблоны''. Эти шаблоны, влияющие на отображение пунктов меню для всех пользователей можно найти в {{Path|/usr/share/templates}} , шаблоны только для текущего пользователя располагаются в {{Path|~/.kde4/share/templates}}. В этом руководстве мы собираемся добавить шаблон в {{Path|~/.kde4/share/templates}}. | |||
== | == Метаданные == | ||
Создайте {{Path|templates}} папку в {{Path|~/.kde4/share}} если она еще не создана, и перейдите в {{Path|templates}}. | |||
В этой папке создайте новый файл с расширением {{Path|.desktop}} Например: {{Path|custom-file.desktop}}. | |||
Откройте созданный файл и вставьте в него следующее содержимое: | |||
<source lang="ini"> | <source lang="ini"> | ||
| Line 25: | Line 25: | ||
</source> | </source> | ||
Заполните эти поля, как показано ниже: | |||
* '''Name''' | * '''Name''' текст, появляющийся в меню <menuchoice>Создать</menuchoice> . | ||
*: [[Image:CustomCreateNewMenuEntry.png]] | *: [[Image:CustomCreateNewMenuEntry.png]] | ||
*: "Custom Entry" | *: "Custom Entry" заполняется значением поля '''Name''' . | ||
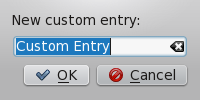
* '''Comment''' | * '''Comment''' - текст, появляющийся, когда вы переходите по пункту меню <menuchoice>Создать</menuchoice> , и попадаете в диалог, например, создания нового файла, значение этого поля будет содержаться в поле выбора имени для создаваемого файла. | ||
*: [[Image:CustomCreateNewMenuEntryComment.png]] | *: [[Image:CustomCreateNewMenuEntryComment.png]] | ||
*: "New custom entry:" | *: "New custom entry:" содержит значение поля '''Comment''' field. | ||
* '''URL''' | * '''URL''' - это путь к файлу, с исходными данными, которые обычно содержат новые файлы данного типа. Такие файлы обычно находятся внутри скрытой {{Path|.source}} папки в {{Path|templates}} папке, так, что используйте относительный путь, начинающийся с {{Path|.source/}}, такой, например, как {{Path|.source/custom-entry.txt}}. | ||
* '''Icon''' | * '''Icon''' - это код иконки, появляющейся в меню <menuchoice>Создать</menuchoice> у созданного вами пункта. Код - это имя файла иконки, которую вы собираетесь использовать. Вы можете посмотреть MIME типы файлов иконок в {{Path|/usr/share/icons/<theme>/<size>/mimetypes/}}. Например, что бы использовать {{Path|/usr/share/icons/<theme>/<size>/mimetypes/application-vnd.oasis.opendocument.text.png}}, заполните поле '''Icon''' следующим содержимым "application-vnd.oasis.opendocument.text". | ||
Это пример заполненного файла {{Path|.desktop}} : | |||
<source lang="ini"> | <source lang="ini"> | ||
| Line 49: | Line 49: | ||
</source> | </source> | ||
=== | === Перевод для полей Name и Comment === | ||
Содержимое полей '''Name''' и '''Comment''' может быть переведено на любой язык. Чтобы сделать это, включите в ваш файл {{Path|.desktop}} поле следующего содержания "Field[language code]=Значение" для каждого языка, который хотите использовать. Например: | |||
<source lang="ini"> | <source lang="ini"> | ||
| Line 60: | Line 60: | ||
</source> | </source> | ||
== | == Определение содержимого создаваемого файла == | ||
Создайте папку {{Path|.source}} в {{Path|~/.kde4/share/templates}} если она еще не создана, и войдите в скрытую папку {{Path|.source}}. | |||
Создайте новый файл с тем же именем, которое вы указывали в поле '''URL''' файла метаданных для вашего пункта меню. Заполните созданный файл данными, которые бы вы хотели видеть в файлах создаваемых вашим пунктом меню по умолчанию. | |||
[[Category:Tutorials]] | [[Category:Tutorials]] | ||
Latest revision as of 23:01, 23 September 2022

|
Руководство, описывающее, как добавить пункт в меню диспетчера фалов, подобных Dolphin или Konqueror |
Пункты меню носят название Шаблоны. Эти шаблоны, влияющие на отображение пунктов меню для всех пользователей можно найти в /usr/share/templates , шаблоны только для текущего пользователя располагаются в ~/.kde4/share/templates. В этом руководстве мы собираемся добавить шаблон в ~/.kde4/share/templates.
Метаданные
Создайте templates папку в ~/.kde4/share если она еще не создана, и перейдите в templates.
В этой папке создайте новый файл с расширением .desktop Например: custom-file.desktop.
Откройте созданный файл и вставьте в него следующее содержимое:
[Desktop Entry]
Name=
Comment=
Type=Link
URL=
Icon=
Заполните эти поля, как показано ниже:
- Comment - текст, появляющийся, когда вы переходите по пункту меню , и попадаете в диалог, например, создания нового файла, значение этого поля будет содержаться в поле выбора имени для создаваемого файла.
- URL - это путь к файлу, с исходными данными, которые обычно содержат новые файлы данного типа. Такие файлы обычно находятся внутри скрытой .source папки в templates папке, так, что используйте относительный путь, начинающийся с .source/, такой, например, как .source/custom-entry.txt.
- Icon - это код иконки, появляющейся в меню у созданного вами пункта. Код - это имя файла иконки, которую вы собираетесь использовать. Вы можете посмотреть MIME типы файлов иконок в /usr/share/icons/<theme>/<size>/mimetypes/. Например, что бы использовать /usr/share/icons/<theme>/<size>/mimetypes/application-vnd.oasis.opendocument.text.png, заполните поле Icon следующим содержимым "application-vnd.oasis.opendocument.text".
Это пример заполненного файла .desktop :
[Desktop Entry]
Name=Custom Entry
Comment=New custom entry:
Type=Link
URL=.source/custom-entry.txt
Icon=application-vnd.oasis.opendocument.text
Перевод для полей Name и Comment
Содержимое полей Name и Comment может быть переведено на любой язык. Чтобы сделать это, включите в ваш файл .desktop поле следующего содержания "Field[language code]=Значение" для каждого языка, который хотите использовать. Например:
[Desktop Entry]
Name=Custom Entry
Name[ca]=Entrada personalitzada
Name[gl]=Entrada personalizada
Определение содержимого создаваемого файла
Создайте папку .source в ~/.kde4/share/templates если она еще не создана, и войдите в скрытую папку .source.
Создайте новый файл с тем же именем, которое вы указывали в поле URL файла метаданных для вашего пункта меню. Заполните созданный файл данными, которые бы вы хотели видеть в файлах создаваемых вашим пунктом меню по умолчанию.


