Digikam/Watermark/de: Difference between revisions
Created page with "Dieser Artikel erschien ursprünglich auf [http://scribblesandsnaps.wordpress.com/category/software/open-source/ Scribbles and Snaps] und darf mit der Erlaubnis von a Dmitri P..." |
Created page with "Es gibt zwar viele Möglichkeiten, um Ihre Fotos vor unbefugter Nutzung zu schützen, ''Wasserzeichen'' bleiben jedoch noch immer die einfachste und wahrscheinlich die effekt..." |
||
| Line 5: | Line 5: | ||
Dieser Artikel erschien ursprünglich auf [http://scribblesandsnaps.wordpress.com/category/software/open-source/ Scribbles and Snaps] und darf mit der Erlaubnis von a Dmitri Popov verwendet werden. | Dieser Artikel erschien ursprünglich auf [http://scribblesandsnaps.wordpress.com/category/software/open-source/ Scribbles and Snaps] und darf mit der Erlaubnis von a Dmitri Popov verwendet werden. | ||
Es gibt zwar viele Möglichkeiten, um Ihre Fotos vor unbefugter Nutzung zu schützen, ''Wasserzeichen'' bleiben jedoch noch immer die einfachste und wahrscheinlich die effektivste Technik, die Ihnen hilft, Sie als den Schöpfer ersichtlich zu machen und damit wird es schwierig ihre Werke ohne Erlaubnis zu verwenden. | |||
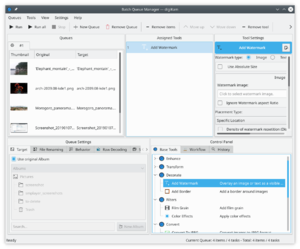
Although '''digiKam''' supports watermarking, this feature is hidden so well that you might not even realize that it’s there. This is because the watermarking function in '''digiKam''' is tucked under the <menuchoice>Batch Queue Manager</menuchoice> tool which you can use to watermark multiple photos in one go. Here is how this works in practice. Choose <menuchoice>Tools</menuchoice> -> <menuchoice>Batch Queue Manager</menuchoice> (or press the <keycap>B</keycap> key) to open the <menuchoice>Batch Queue Manager</menuchoice> tool. Drag the photos you want to watermark from a '''digiKam''' album onto the <menuchoice>Queues</menuchoice> pane to add them to the current queue. Click on the <menuchoice>Base Tools</menuchoice> tab in the <menuchoice>Batch Tools Available</menuchoice> pane and double-click on the <menuchoice>Add Watermark</menuchoice> tool to add it to the <menuchoice>Assigned Tools</menuchoice> pane. | Although '''digiKam''' supports watermarking, this feature is hidden so well that you might not even realize that it’s there. This is because the watermarking function in '''digiKam''' is tucked under the <menuchoice>Batch Queue Manager</menuchoice> tool which you can use to watermark multiple photos in one go. Here is how this works in practice. Choose <menuchoice>Tools</menuchoice> -> <menuchoice>Batch Queue Manager</menuchoice> (or press the <keycap>B</keycap> key) to open the <menuchoice>Batch Queue Manager</menuchoice> tool. Drag the photos you want to watermark from a '''digiKam''' album onto the <menuchoice>Queues</menuchoice> pane to add them to the current queue. Click on the <menuchoice>Base Tools</menuchoice> tab in the <menuchoice>Batch Tools Available</menuchoice> pane and double-click on the <menuchoice>Add Watermark</menuchoice> tool to add it to the <menuchoice>Assigned Tools</menuchoice> pane. | ||
Revision as of 15:16, 8 March 2014
Wasserzeichen für Fotos mit digiKam
Dieser Artikel erschien ursprünglich auf Scribbles and Snaps und darf mit der Erlaubnis von a Dmitri Popov verwendet werden.
Es gibt zwar viele Möglichkeiten, um Ihre Fotos vor unbefugter Nutzung zu schützen, Wasserzeichen bleiben jedoch noch immer die einfachste und wahrscheinlich die effektivste Technik, die Ihnen hilft, Sie als den Schöpfer ersichtlich zu machen und damit wird es schwierig ihre Werke ohne Erlaubnis zu verwenden.
Although digiKam supports watermarking, this feature is hidden so well that you might not even realize that it’s there. This is because the watermarking function in digiKam is tucked under the tool which you can use to watermark multiple photos in one go. Here is how this works in practice. Choose -> (or press the B key) to open the tool. Drag the photos you want to watermark from a digiKam album onto the pane to add them to the current queue. Click on the tab in the pane and double-click on the tool to add it to the pane.

digiKam can use text or images as watermarks, and you can choose the desired watermark type in the pane. If you want to use the type, make sure that you already have a graphics file handy. Specify then the available settings such as , , and . Next, select the target folder in the section of the pane. In the section, you can specify what the system should do if it detects a file with the same name as the processed one in the target folder. You can either choose to overwrite the existing file or rename the processed file before saving it. You can also use the options available in the section to specify a renaming rule to automatically rename the processed files.
Once you are satisfied with the settings, hit the button, and once digiKam’s finished, you’ll find the watermarked photos in the target folder.
