Krita/Tutorial 4A: Difference between revisions
No edit summary |
Marked this version for translation |
||
| Line 8: | Line 8: | ||
<!--T:223--> | |||
'''''Stable Brushes''''' | '''''Stable Brushes''''' | ||
1. Pixel (Normal) brushes | 1. Pixel (Normal) brushes | ||
| Line 17: | Line 18: | ||
7. Experimental Brushes | 7. Experimental Brushes | ||
<!--T:224--> | |||
'''''Chalk brushes''''' | '''''Chalk brushes''''' | ||
1. Color Smudge brushes | 1. Color Smudge brushes | ||
Latest revision as of 13:27, 30 March 2015
Tutorial: Pixel Brushes I
Stable Brushes
1. Pixel (Normal) brushes
2. Smudge brushes
3. Duplicate brushes
4. Filter brushes
5. Hairy brushes
6. Hatching brushes
7. Experimental Brushes
Chalk brushes 1. Color Smudge brushes 2. Curve brushes 3. Deform brushes 4. Dyna (Dynamic) brushes 5. Experiment brushes 6. Grid brushes 7. Particle brushes 8. Sketch brushes 9. Spray brushes
All elements in this tutorial done by mouse
Welcome to the tutorial on Pixel Brushes, probably the most versatile brush.
Many brush engines may share similar elements like brush tips and dynamics, so this part on the Pixel Brush will also serve as a crash course to understanding the different brush elements. So, I won't repeat the corresponding parts for other brush engines. So, pay attention to this section.
Brush tips (i.e. brush shape)
A brush tip is the area over which the brush will leave a mark. In the case of a pixel brush, it's basically the brush itself, but this won't always be the case. For the Spray brush, for example, brush tips refers to the area over which you're spraying, while "brush size" refers to the size of particles.
I will address other brushes as they come.
Autobrush
Did I say that this was a "boring round brush"? Okay, I was way wrong about that.
Autobrush has 2 shapes and 3 modes:
- Shapes: Round or Square
- Modes: Default, Soft brush and Gaussian brush.
I will actually start with the simplest case: the Gaussian brush.
Gaussian brush
Since this is the simplest brush mode, I'll use this as the base case to describe all the common options.
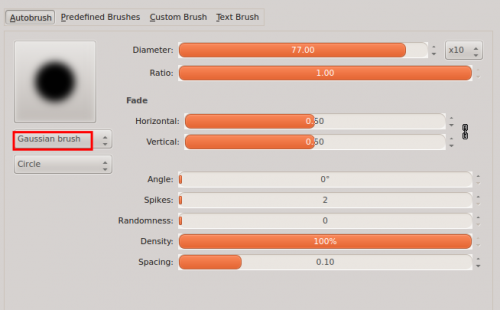
Tip: As with everywhere else, Right-click over numerical values to type values manually.
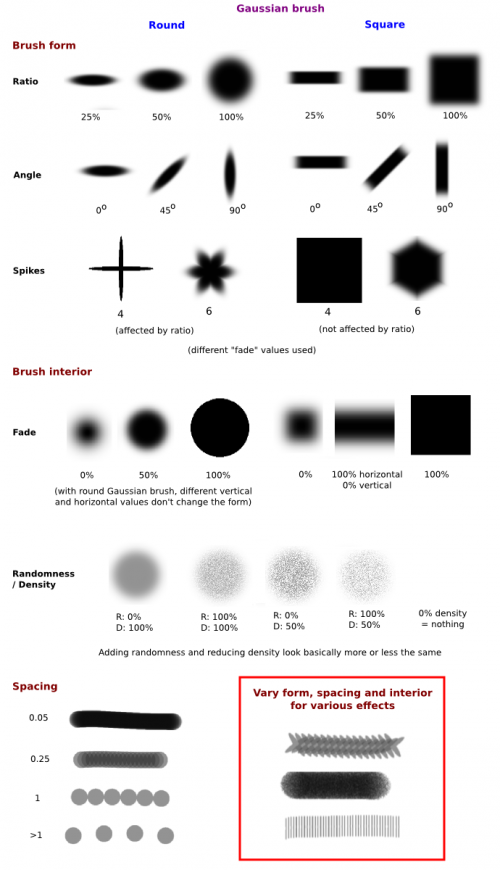
That was the most simple brush tip mode. That's before adding dynamics.
Soft brush
Now that we have an overview of brush options, I'll skip most of them. There are basically two major differences with Gaussian:
- First, unlike Gaussian brushes, the Square soft brush is affected by ratio

- Second, and the most unique part of soft brushes, is the curve setting:
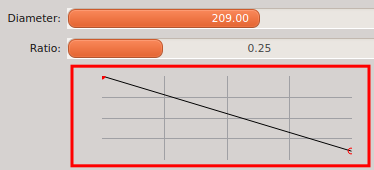
This curve basically sets the opacity of the brush, from the center to outwards.
And this allows for all sorts of interesting results.
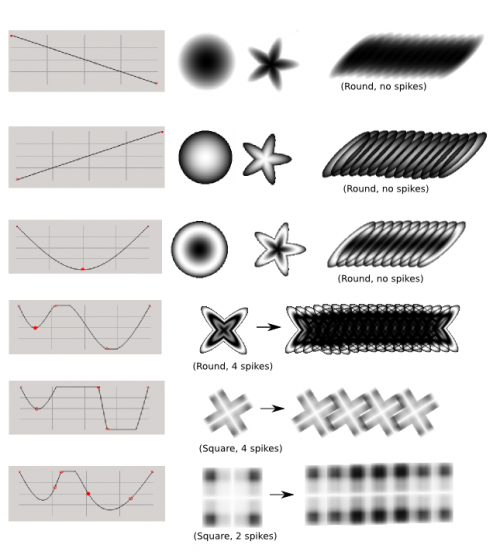
To delete a point, select and press delete.
Basically, playing around will give all sorts of weird shapes. You may wonder what it's all for right now, but it gets really interesting when you add dynamics. More on that much later.
Default brush
On first glance, nothing out of the ordinary. A comparison:
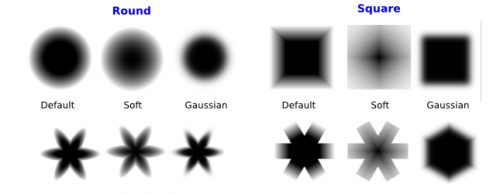
You can unlink the values. The round brushes will give the following:
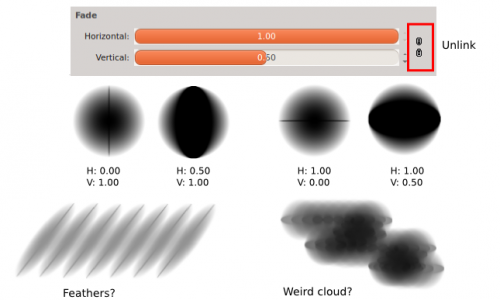
Things get really weird, though, when you do this for the square brushes:
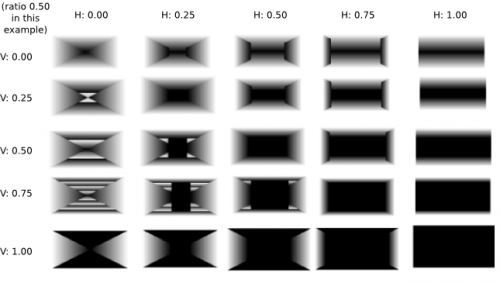
Well okay, but what are they For? Well, by varying the ratio, spacing and the density, you can obtain a whole range of geometric designs.
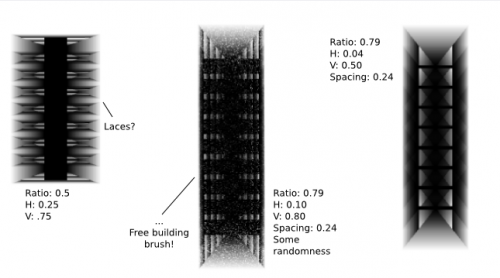
Predefined brushes
And now that we're done with those boring round brushes, we're moving on to the next category of brushes: predefined brushes. For my own convenience, I like to divide Kritra's predefined brushes into the following, non-official categories:
- Texture
- Line texture
- Vegetation
- Objects
- Decorative
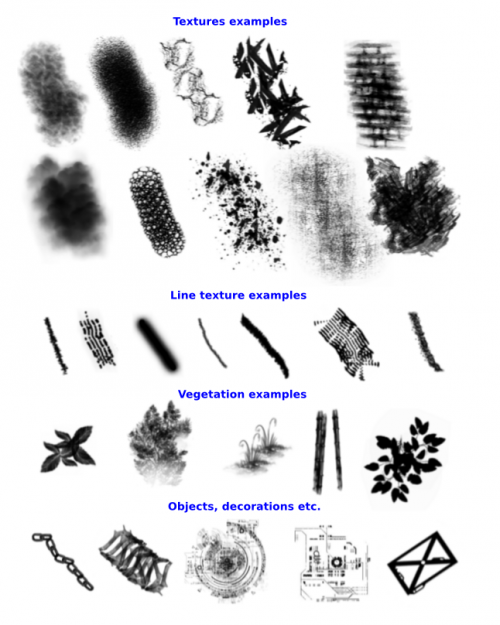
There are nearly 200 predefined brushes in Krita, so including all of them in this tutorial is wholly unreasonable. Instead of stuffying them into this tutorial, I'll point you to the ref sheet I made.
If there's a predefined brush you really like:
- Make a brush preset. In fact, check if there isn't one already.
- Make tags for your favourites: To add a tag, select the predefined brush and type the tag ,in the , then hit Enter. You can now search that tag by entering it in the search bar and hitting Enter.
- Vote for the bug/feature request (make predefined brushes, gradient, textures etc. searchable)
- If you can code, join the Krita development team! :D
I suspect this wasn't higher priority before because everybody's using brush presets, for which the search is excellent.
If you've deleted any predefined brushes by accident, refer to my previous tutorial for how to get them back.
Animated brushes
Those of you who have tested the brushes may have noticed a quite large portion of animated / multi-frame brushes. In fact, you can find 3 brush types in predefined brushes:
- .png : plain images
- .gbr : Gimp brushes. Still a normal image.
- .gih : Gimp animated brushes. These will have either completely different images in succession, or look as though it has some in-built dynamics (like rotation).
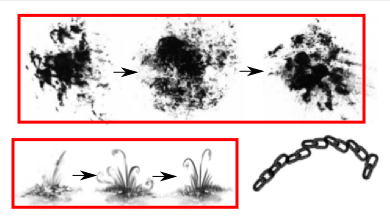
In the examples:
- The two brushes in red produce a succession of different images
- The chain brush will adjust to the direction of the mouse, even without adding dynamics.
Just keep this in mind for now, because you can make them in Krita! More in the part on Custom Brushes.
Color images as brushes
Krita also allows you to use color images as brushes, or convert it to a normal brush:
- With off, it will just use that color image as it is.
- With on, however, the image will be converted to a grayscale mask, with white and transparent areas as transparency, and darker areas as full opacity.
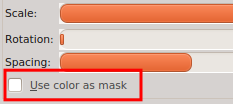
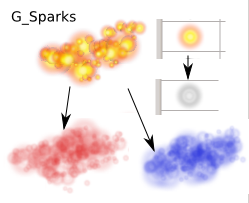
With on, the previously color brush behaves like a normal brush
Other brush options
The remaining options are pretty much self-explanatory:
- Scale
- Rotation
- Spacing
You may want to vary the spacing for some of the brushes.
Custom brushes
Now let's say you want to make your own custom brush tips! The following may seem long, but it's basically "draw your brush on a transparent layer, select it and use it as a custom brush." It takes less than a minute.
Before that, Krita has two ways of selecting the custom brush area:
- With no selections active, or with animated brushes: the brush size is the whole image size.
- With a selection active (style -> regular only): it will only select the opaque areas, and cut out excessive transparent areas.
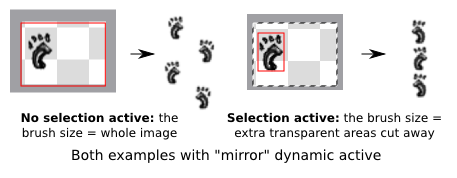
Note: It is actually quite hard to synchronize the spacing and the mirror dynamic, so for these sorts of brush just create a two-layer animated brush instead.
For static brushes I will address the first method, and describe the second one with animated brushes.
Static brushes
1. Make a new, transparent layer, and turn off the visibility of other layers.
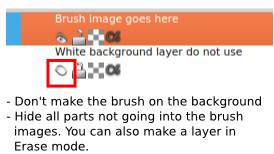
Krita will use all visible parts on all layers within the selected area, so you have to make sure nothing else is visible in that area. This includes the background (bottom) layer: it must be hidden too.
Note: Speaking of the background layer, don't draw your custom brush on it. For some reason Krita won't constrain to selection on this layer.
Tip: To hide excessive areas, there are 2 ways:
- Hide all other layers (Ctrl+Click on the layer to keep visible)
- Or create an opaque layer on erase mode underneath. Delete it once you're done.
2. Draw your brush shape on this transparent layer.
3. Switch to a selection tool, and select the area around your brush shape.
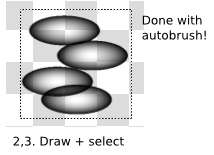
4. Switch back to a brush tool, go to the brush editor Reminder: you can't access the brush editor unless your active tool is a brush.
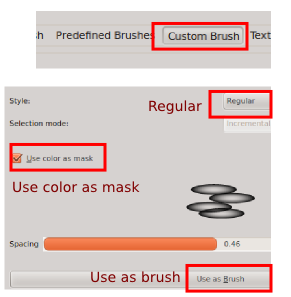
5. Click and check . Make sure the style is . Adjust spacing.
6. Return to the canvas, and Shift + Ctrl + A to undo the selection. You can also turn the other layers visible again.
7. Wee!

Colored image brushes
But of course, you remember that toggles between two modes:
- : Brush that takes on the color of your foreground
- : Just copies the image, colors and all.

Note: Be sure your brush preview is drawn on transparent background, or the white background will also be included in the brush. You also have to turn off the visibility of the background layer, which is usually white and fully opaque.

Tips: Saving your custom brush tips
- That's easy, just add a name and click .
- I suggest starting the names of your custom brushes with zz or some other tag, like zz_ColorScales. This way they will all be neatly grouped at the end of the list, where it's easy to find back.
- You will notice that two previews will appear in the predefined brush list.
- One is the newly saved predefined brush
- The other is the current available custom brush
- Basically you didn't save it twice, so don't delete it.

- You can't resize a custom with Ctrl + Drag (though you can add dynamics), but you can with a predefined brush you've saved from a custom brush.
Animated brushes
Making custom animated brushes is a lot like making static ones, though as I said earlier:
1. Animated brushes ignore selections. Instead it will be the same size as the whole image. So make a new image of the size of the brush.
2. Make each frame on a separate, transparent layer. Krita will ignore layers with visibility turned off.
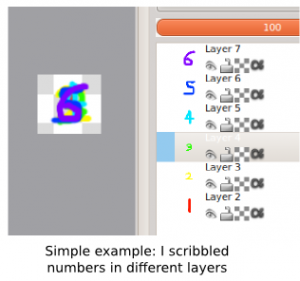
3. In Custom brushes, choose:
- (see list below)
4. Click "Use as brush"

Notes:
- Even if you make a custom brush in a separate image, you will still be able to use the custom brush in all other images also open with Krita.
- For the Angular option: Krita will divide all angles according to the number of layers.
Text brushes
All this and we're Still at brush tips, but the final option, text brush, is thankfully much more simple.
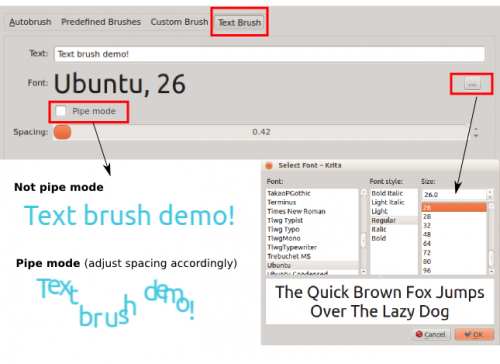
- In mode, clicking once basically paints the whole sentence.
- In mode, the brush will drop off each letter in succession.
- You cannot adjust the size with Ctrl + Drag. Instead click on the button on the upper-right to adjust text options.
- Strangely enough, it still Does work with Dynamics though.
That's it with brush tips. On to other things!
Paint build-up behaviours
The following features aren't grouped in the same sections of the brush editor, and that's because they aren't necessarily related features.
However, I've decided to make a section for this because they all somehow impact the drawing behaviour, perhaps even more so for mouse users.
I will actually cover several things here:
- Default settings: Opacity vs Flow
- Airbrush mode
- Wash vs Build-up mode
- Blending modes
Default behavior
Opacity vs flow
I remind you again: you can right click the value to type in a number manually. Make sure your mouse is still over the box when you type "enter": it will unselect if you move away.

Opacity
The Opacity setting simply sets the maximum opacity a single brush stroke can leave:
- No matter how many time you can pass over the same area many times with a single stroke, it will not go over that value.
- A non-uniform brush will leave areas less opaque than others, though passing over that area enough times will bring it to the maximum opacity value.
- This also sets the maximum opacity when using flow and airbrush mode: they will only build up to that opacity level.
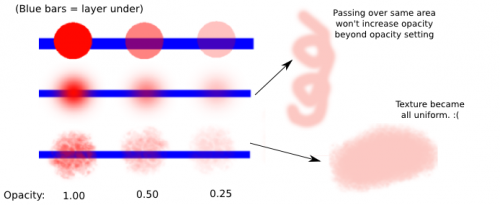
As you can see in the examples to the right, if you hold down the mouse button and draw over a big area several times, you end up with a boring, uniform area, of the opacity defined by the opacity bar. This isn't a problem for tablet users, who can:
- Vary opacity with pen pressure
- Build up opacity with a series of short, low opacity strokes. Unless you enjoy clicking games, though, doing so is Much more annoying with a mouse.
That's where flow comes in.
Flow
With Flow less than 1:
- The base opacity is decreased further. However:
- It allows build-up of opacity when you pass over an area several times, until the maximum defined by opacity (example right).
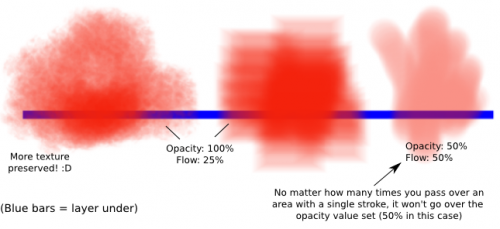
It may look as though spacing is increased, but that's just an illusion.

Adjusting flow allows you to preseve more of the texture, and obtain a wider range of opacity within a single stroke. Depending on the brush tip and spacing, the effect can look either like an airbrush (though Airbrush mode is something different) or a soft watercolor stroke.
Tip: With round brushes, vary spacing to increase or decrease the appearance of opacity further (fewer overlapping circles = looks less opaque).
Wash vs Build-up mode
Until now we've been using the default, "Wash" mode. Build-up mode allows you to add to a stroke each time you pass over it.
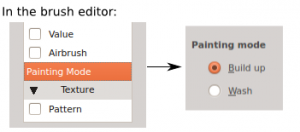
The example below should say most of it:

See any difference? Neither can I. Basically, in Normal blending mode, the following two work about the same:
- Wash mode with 100% brush opacity and low flow value
- Build-up mode with low brush opacity value and any flow value. In fact, Krita ignores the Flow value in this mode, and treats the Opacity value a bit like the flow value.
However, this is no longer the case with blend modes other than Normal. On the contrary, in build-up mode, a stroke's composite mode can affect itself.

There are too many possibilities and the results are quite unpredictable most of the time, so I'll leave you to play around with the settings.
Airbrush mode
In the brush editor:
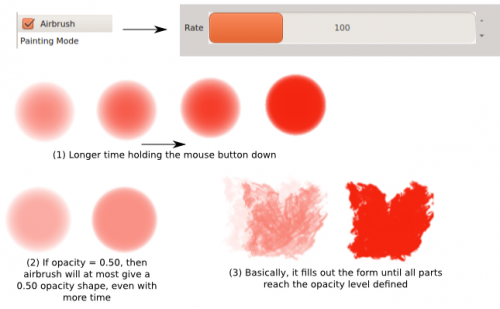
Airbrush is affected by the following parameters:
- Time: holding the mouse over the area will drop additional copies of the brush, basically increasing opacity (1)
- : the higher the flow, the faster the airbrush works.
- : the lower the rate, the faster the airbrush works, so don't reduce it and wonder why it's working too "fast"
- : no matter how long you hold down the airbrush, the maximum opacity value you can get is the opacity you've defined. (2)
- It will basically gradually bring all areas of the brush with lesser opacity to the maximum value. A "form-filler", in some ways. (3)
Wait a moment, that sounds kind of pointless! Not really, the form filling takes time. In the meantime:
- You can basically control the opacity of your brush simply by holding over an area longer.
- If you are using soft round brushes, you can produce the illusion of brushes of different sizes and hardness. This saves you the trouble of manually adjusting the opacity each time.

Well okay. Is that it? No, here are a few more things that affect it:
- When using animated brushes, the "airbrush" will "pile on" the different frames over the area.
- Using any dynamics with on will also drop dynamics-modified copies of that brush over the same area in succession.
Unfortunately the "Time" setting for dynamics doesn't update the brush instances. Krita will just pile on copies of the same instance rather than make new ones (which is a feature too).

Blending modes
There are waaaay too many blending modes for me to describe here. Most programs have similar sets of blending modes, so do a search for "blending modes."
You can modify blend modes either:
- From the top toolbar
- Or from the brush editor panel
(They're synchronized)

Now, with Krita, the default setting basically drops the same color with various levels of transparency. However, this is no longer the case with other blending modes on, especially in build-up mode.
The following examples were done by passing over the same areas several times in build-up mode:
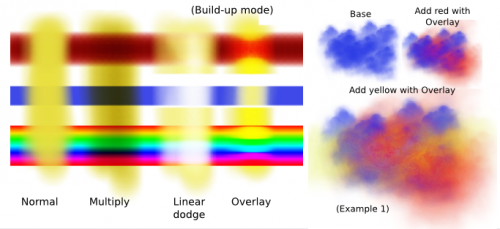
When used properly, blending modes can therefore save you a few trips to the color picker.
Some tricks include:
- Color effects with Overlay. Overlay is a combination of Multiply (a darkening mode) and Screen (a lighting mode), depending on the value underneath, so it will often produce new colors and increase contrast. (example 1)
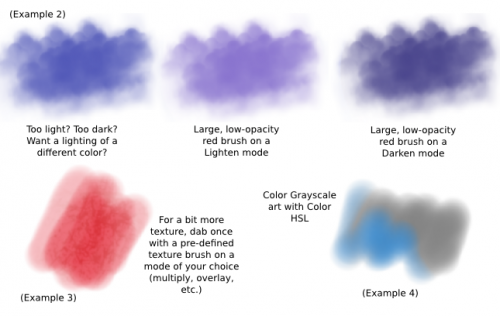
- Use a large, soft and low-opacity brush on Multiply mode to click once to darken a whole area, or on one of the Lighten modes to lightern the area. (example 2)
- Click once over an area with a texture brush on an area to add a bit of texture. (example 3)
- Color HSL to color grayscale (example 4)
etc.
Blending effects are often quite unpredictable. In fact, they are strictly speaking mathematical modes, not artistic ones. They just happen to produce nice effects from time to time, so play around to see what you can get.
The second part of this tutorial is here: Tutorial: Pixel Brushes II

