Kdenlive/Manual/Effects/uk: Difference between revisions
(Updating to match new version of source page) |
(Updating to match new version of source page) |
||
| Line 120: | Line 120: | ||
# [[Special:myLanguage/Kdenlive/Manual/Effects/Enhancement|Покращення]] | # [[Special:myLanguage/Kdenlive/Manual/Effects/Enhancement|Покращення]] | ||
# [[Special:myLanguage/Kdenlive/Manual/Effects/Fade|Зміна кольорів]] | # [[Special:myLanguage/Kdenlive/Manual/Effects/Fade|Зміна кольорів]] | ||
# [[Special:myLanguage/Kdenlive/Manual/Effects/Misc|Інше]] | # [[Special:myLanguage/Kdenlive/Manual/Effects/Misc|Інше]] | ||
# [[Special:myLanguage/Kdenlive/Manual/Effects/Motion|Рух]]<br /><br /> | # [[Special:myLanguage/Kdenlive/Manual/Effects/Motion|Рух]]<br /><br /> | ||
Revision as of 14:10, 16 August 2017
Ефекти
Ефектами у Kdenlive можна скористатися для внесення змін до властивостей звукових та відеоданих початкового матеріалу.
You add effects to clips by choosing them from the Effects Tab and dragging them onto a clip in the timeline. Or by selecting a clip in the timeline and choosing from the Timeline menu or from Clip in Timeline right click menu . For more detail see QuickStart - Effects
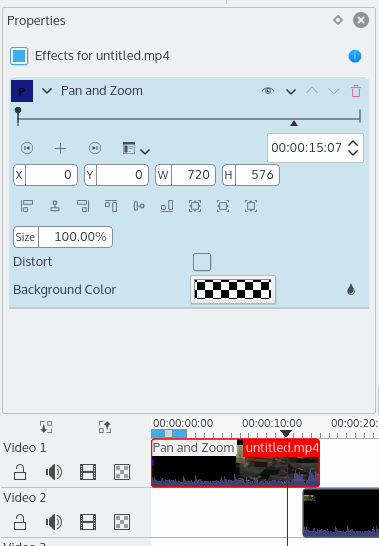
The effects that are in play on a given clip can be viewed and edited via the Properties Tab that displays when the clip in question is selected in the timeline.
You can also apply effects to an entire track. This is achieved by dragging an effect from the Effect Tab to the Track Header. Or you can click on the track header and chose from the Timeline menu . Tracks which have effects added in this fashion will have a gold star icon in the track header.

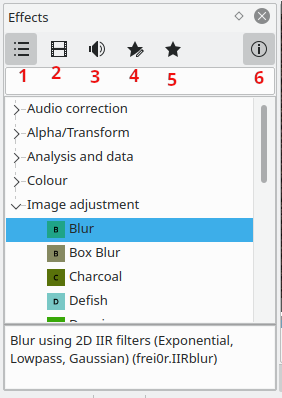
Effects Tab
Make the Effects Tab visible from the menu ()

To add an effect to a clip, simply drag it from the Effects Tab to the clip on the timeline.
The Properties Tab and its Menu
The Properties Tab
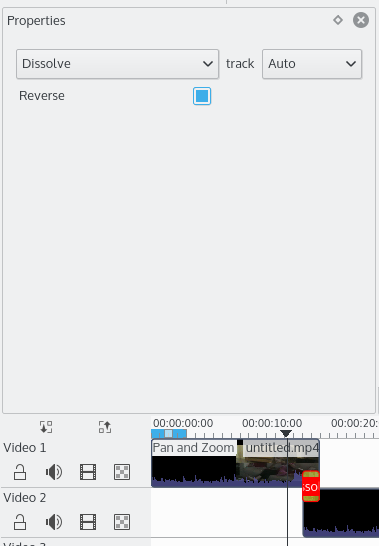
The Properties Tab displays the settings for the effects on the currently selected clip (Figure 3) or the settings for the currently selected transition (Figure 4) depending on whether it is a clip or a transition that is currently selected.
 |
 |
Click the eye icon shown at 2 to temporarily disable the effect and toggle the button to the state shown at 1. Click the empty eye icon shown at 1 to re-enable a disabled effect and toggle the button to the state shown at 2.
To remove an effect from a clip, click the trash can icon labelled 3 in the image below. The arrow labelled 1 minimizes the effect in the Properties Window. And the icon labelled 2 brings up the Properties Tab menu shown.
Скинути ефект
Цей пункт надає змогу скинути усі параметри ефекту до типових значень.
Save Effect
This allows you to save the current effect and all its settings. The saved effect will appear in the Effect List in the Custom category.
Create Group
This creates an Effect Group. An Effect Group is a place holder for multiple effects. You can then save the group of effects — they will the appear in the Effect List, in the Custom Section. You can then later apply the whole group of effects to other parts of the timeline.
To add effects to the group, first add the effect in question to a clip. Then drag that effect and drop it onto the Effect Group in the Properties Tab.
Create Region
New in ver >=0.9.3
The "Create Region" feature enables a user to apply an effect to a part of a clip only. It is a really powerful feature but currently the UI is not fully ready to get its full potential.
Basically, you add an effect to a clip — for example "Sepia" — then you go in the effect's menu and select "Create Region". This will now open a file dialog.
In that dialog, you need to point to an MLT clip with alpha transparency. This is where Kdenlive is not 100% ready because there are many ways we could create such clips, using for example a threshold filter or rotoscoping. But as a start, let's say you can open any image with alpha transparency, or a title clip created with Kdenlive. Then, the "sepia" effect will only be applied on the non-transparent areas of this "region" clip.
Використання у ефектах ключових кадрів
У багатьох ефектах використовується поняття «ключовий кадр». Ключові кадри — це визначені користувачем позиції у кліпі, де має розпочинатися, завершуватися чи змінюватися ефект. Ви можете встановити різні параметри ефекту на певних ключових кадрах, а Kdenlive поступово змінюватиме параметри між цими ключовими кадрами. По суті, програма виконуватиме певну інтерполяцію між такими ключовими кадрами.
Приклад використання ключових кадрів для коригування ефекту RGB можна знайти у розділі щодо ефектів підручника початкового рівня.
Позиціювання за активним кадром
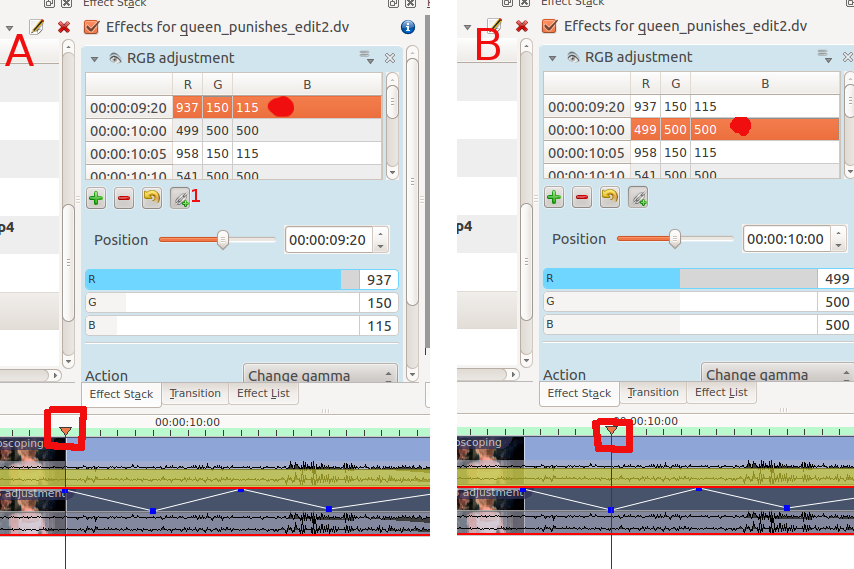
На деяких елементах керування ключовими кадрами є кнопка переходу до активного кадру ![]() (її позначено цифрою 1 на знімку вікна «A» нижче). Якщо кнопка переходу до активного кадру перебуває у натиснутому стані, і ви натиснете пункт кадру у списку ключових кадрів, Kdenlive прокрутить позицію перегляду у вікні попереднього перегляду до відповідного ключового кадру. У нашому прикладі ми позначили ключовий кадр 9:20 на «A», позначка позиції у кліпі (у червоній рамці) показує розташування ключового кадру. Після натискання ключового кадру у позиції 10:00 на знімку «B» показано пересування позиції у кліпі.
(її позначено цифрою 1 на знімку вікна «A» нижче). Якщо кнопка переходу до активного кадру перебуває у натиснутому стані, і ви натиснете пункт кадру у списку ключових кадрів, Kdenlive прокрутить позицію перегляду у вікні попереднього перегляду до відповідного ключового кадру. У нашому прикладі ми позначили ключовий кадр 9:20 на «A», позначка позиції у кліпі (у червоній рамці) показує розташування ключового кадру. Після натискання ключового кадру у позиції 10:00 на знімку «B» показано пересування позиції у кліпі.

Демонстрації ефектів
Знімки вікон з описом 33 відеоефектів можна знайти тут.
Нижче наведено три відео з YouTube з демонстрацією декількох відеоефектів, якими можна скористатися у Kdenlive (субтитри іспанською):
{{#ev:youtube|C6oeu2Yc64I}}
{{#ev:youtube|jrC4F_G64jA}}
{{#ev:youtube|XMoSgHHbA4k}}
Ще одне відео з YouTube (з субтитрами англійською):
{{#ev:youtube|capV7lUzbOw}}
Див. також список відтворення YouTube, створений Franz M.P.
Категорії ефектів
Див. також Ефекти і переходи. там наведено список ефектів і переходів за абеткою.
Знімки вікон з описом 33 відеоефектів можна знайти тут.
Ефекти поділено на такі категорії:
- Обробка прозорості
- Analysis and Data
- Artistic
- Звук
- Звукові канали
- Виправлення звуку
- Розмивання і приховування
- Колір
- Виправлення кольору
- Обрізання і перетворення
- Нетипові
- Викривлення
- Покращення
- Зміна кольорів
- Інше
- Рух
The available effects are defined by .xml files found in $KDEDIR/share/kde4/apps/kdenlive/effects (e.g. /usr/share/kde4/apps/kdenlive/effects).
Or at /usr/share/kdenlive/effects on version 15.n.
У цих файлах .xml містяться типові значення параметрів ефектів. Отже, якщо вам не подобаються типові значення параметрів у Kdenlive, ви можете змінити їх безпосереднім редагуванням цих файлів .xml.
FAQ:
П: Як здублювати ефект, щоб скористатися тими самими параметрами для іншого фрагмента відео?
A: Select your effect in the timeline. In the Properties Tab choose (from the Properties Tab Menu). You will now find this effect available in the Effect List section.
В: Інший варіант розв’язання: позначте фрагмент з ефектом на монтажному столі, виберіть пункт у контекстному меню, потім клацніть правою у позиції нового застосування цього ефекту і виберіть у контекстному меню пункт замість простого .
П: Як застосувати ефект одночасно до декількох (або всіх) кліпів?
В: Ви можете позначити декілька кліпів за допомогою Shift+перетягування (лівою кнопкою миші). Потім клацнути правою кнопкою миші на позначеному і згрупувати кліпи (або просто натиснути комбінацію клавіш Ctrl+G).

