Archive:Kdenlive/Manual/Transitions/fr: Difference between revisions
No edit summary |
Updating to match new version of source page |
||
| Line 56: | Line 56: | ||
{{#ev:youtube|h1k7GbEssqA}} | {{#ev:youtube|h1k7GbEssqA}} | ||
<span id="Automatic Transitions"></span> | |||
=== Transitions automatiques === | === Transitions automatiques === | ||
Revision as of 11:11, 1 August 2019
Transitions
Transitions gouvernent la façon dont Kdenlive coupe un clip vers le suivant. Vous pouvez ajouter de nombreusex effets de transitions différentes via le menu transitions de Kdenlive.
Comment ajouter une transition
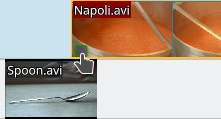
Pour ajouter une transition, ajustez les clips dans la chronologie de façon à ce que la fin d'un des clips chevauche le commencement d'un autre.
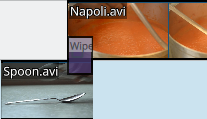
Faites alors un clic droit dans la chronologie au point de chevauchement, choisissez , puis ensuite choisissez en une depuis le menu déroulant.
Onglet Propriétés (version >= 15.12)
Dans Kdenlive 15.12, l'effet pile (stack) est fusionné avec l'onglet "Transitions" pour créer une fenêtre/onglet "Propriétés".
La fenêtre Propriétés montre les paramètres concernant les effets du clip actuellement choisi (Figure 1) ou les paramètres pour la transition actuellement choisie (Figure 2) selon si c'est un clip ou une transition qui est actuellement choisi.
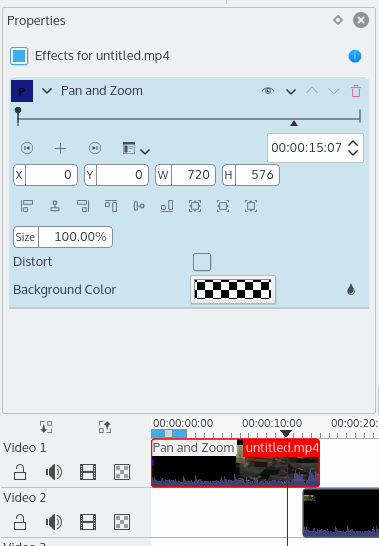 |
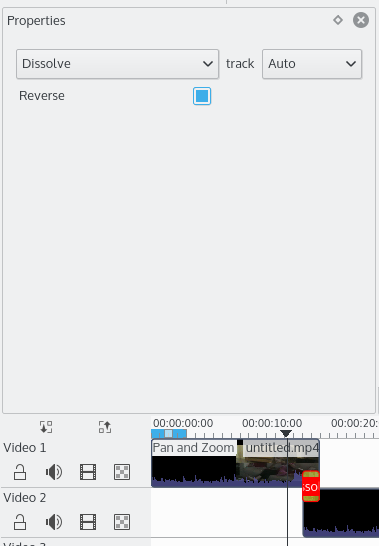 |
Si vous sélectionnez la transition dans la chronologie  , ses propriétés apparaîtront dans l'onglet Propriétés (Figure 2).
Vous devriez prévisualiser votre transition afin de vous assurer qu'elle fonctionne dans la direction à laquelle vous vous attendez. Par exemple, si c'est une transition "Dissolve" (dissolution) et qu'elle fonctionne dans la direction correcte, alors le première clip devrait se dissoudre dans le deuxième clip. Mais si c'est dans la mauvaise direction, le premier clip disparaîtra soudainement (remplacé par le deuxième clip). Il sera alors progressivement assombri puis sautera brusquement au deuxième clip. Si votre transition est dans la mauvaise direction, il suffit de cocher la case "Reverse" (inversion) dans l'onglet Propriétés.
Onglet Transition (pré version 15.12)
Si vous choisissez la transition dans la chronologie  ses propriétés apparaîtront dans l'onglet Transition.
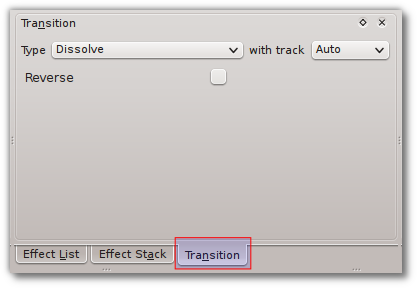
Si la fenêtre de dialogue Transition n'est pas visible, utilisez afin de l'ajouter.
You should preview your transition to make sure it is running in the direction you expect. For example, if it is a Dissolve transition and it is running in the correct direction, then the first clip should dissolve into the second clip. But if it is in the wrong direction, the first clip will suddenly disappear (replaced by the second track). It will then fade back in and abruptly jump to second clip. If your transition is in the wrong direction, just select the check box in the Transition tab.
Comment créer des transitions avec un simple clic
Il y a un raccourci pour créer des transitions entre deux pistes que se chevauchent.
In Version 17.04 you hover the mouse over the lower grey rectangle that appears at the end of the clips on the timeline and a tool tip will appear saying "Click to add Transition". If you click a dissolve transition will be automatically added.
{{#ev:youtube|e1f0Yc8Fh3c}}
Older Versions: If you hover the mouse over the overlapping region on the timeline, a green triangle will appear. Clicking this adds a dissolve transition between the tracks.
{{#ev:youtube|h1k7GbEssqA}}
Transitions automatiques
If a transition is set as an "Automatic Transition" and you adjust the overlap between the two clips involved in the transition, then the length of the transition will automatically adjust to cover the region where the clips overlap.
You can toggle off this feature on a transition by selecting the transition and choosing Automatic Transition from the menu.
Transitions will be created with the Automatic transition property set to true by default if the Automatic Transitions Button is active.
When Automatic Transition is off and you move a clip to change the overlapping region, then the length of the transition does not automatically adjust.
Mélanger des titres, images et vidéos avec des transitions
{{#ev:youtube|f6VHlOZutm8|500|left|Image and Title Layers Transparency Tutorial - qubodupl/Open Source Bug}}
Keyframe Animations Using Transitions
{{#ev:youtube|M8hC5FbIzdE|428|center|Keyframe Animation - Linuceum}}
Liste des transitions
Voir aussi Effets et transitions pour une liste alphabétique d'effets et de transitions.
Voir aussi transitions d'opération alpha pour une comparaison des diverses transitions de type opération alpha (addition, addition_alpha, alphaatop, alphain, alphaout, alphaover and alphaxor) .
- addition
- addition_alpha
- Affine
- alphaatop
- alphain
- alphaout
- alphaover
- alphaxor
- burn
- Cairo Affine Blend
- Cairo Blend
- color_only
- Composite
- Composite and transform
- darken
- difference
- Dissolve
- dodge
- grain_extract
- hardlight
- Hue
- lighten
- Matte
- multiply
- overlay
- Region
- Saturation
- screen
- Slide
- softlight
- subtract
- UV Map
- value
- Video Quality Measurement
- Wipe
FAQ
Q: How to add a cross fading effect?
R : Faites en sorte que les deux clips se chevauchent dans la chronologie, cliquez ensuite sur le triangle vert affiché dans le coin bas du clip du haut (voir Transition).
