Digikam/Watermark/uk: Difference between revisions
Created page with 'Категорія: Графіка/uk Категорія: Фотографія/uk Категорія: Підручники/uk' |
No edit summary |
||
| Line 15: | Line 15: | ||
Після визначення бажаних значень параметрів натисніть кнопку <menuchoice>Виконати</menuchoice>. Після завершення обробки фотографії з водяними знаками буде збережено у теці призначення. | Після визначення бажаних значень параметрів натисніть кнопку <menuchoice>Виконати</menuchoice>. Після завершення обробки фотографії з водяними знаками буде збережено у теці призначення. | ||
[[Категорія: Графіка/uk]] | <span class="mw-translate-fuzzy"> | ||
[[Категорія: Фотографія/uk]] | [[Категорія: Графіка/uk]]<br/> | ||
[[Категорія: Фотографія/uk]]<br/> | |||
[[Категорія: Підручники/uk]] | [[Категорія: Підручники/uk]] | ||
</span> | |||
Revision as of 18:08, 4 September 2010
Додавання водяних знаків за допомогою digiKam
Оригінал цієї статті можна знайти у блозі Scribbles and Snaps. Статтю відтворено з дозволу Дмітрія Попова.
Хоча існує багато способів захисту фотографій від несанкціонованого використання, позначення водяними знаками, як і раніше, залишається найпростішим і, ймовірно, найефективнішим методом, який може допомогти вам позначити ваше авторство і ускладнити використання вашої роботи без дозволу.
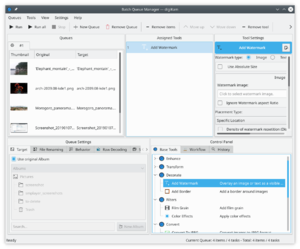
Although digiKam supports watermarking, this feature is hidden so well that you might not even realize that it’s there. This is because the watermarking function in digiKam is tucked under the tool which you can use to watermark multiple photos in one go. Here is how this works in practice. Choose -> (or press the B key) to open the tool. Drag the photos you want to watermark from a digiKam album onto the pane to add them to the current queue. Click on the tab in the pane and double-click on the tool to add it to the pane.

digiKam can use text or images as watermarks, and you can choose the desired watermark type in the pane. If you want to use the type, make sure that you already have a graphics file handy. Specify then the available settings such as , , and . Next, select the target folder in the section of the pane. In the section, you can specify what the system should do if it detects a file with the same name as the processed one in the target folder. You can either choose to overwrite the existing file or rename the processed file before saving it. You can also use the options available in the section to specify a renaming rule to automatically rename the processed files.
Після визначення бажаних значень параметрів натисніть кнопку . Після завершення обробки фотографії з водяними знаками буде збережено у теці призначення.
Категорія: Графіка/uk
Категорія: Фотографія/uk
Категорія: Підручники/uk
