Digikam/Watermark/ca
Marca d'aigua a les fotos amb digiKam
Aquest article va aparèixer originalment a Scribbles and Snaps i ha estat reproduït amb el permís d'en Dmitri Popov.
Si bé hi ha moltes maneres de protegir les vostres fotos de l'ús no autoritzat, la utilització de marques d'aigua segueix sent el més simple i probablement la tècnica més eficaç que pot ajudar a identificar-vos com el creador i dificultar que utilitzin les vostres obres sense permís.
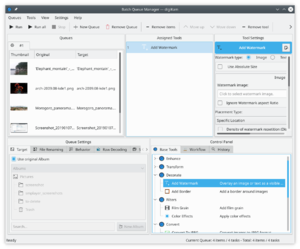
Tot i que digiKam suporta les marques d'aigua, aquesta característica s'amaga tan bé que ni tan sols us adonareu que hi és. Això es deu a que la característica marca d'aigua al digiKam està oculta sota l'eina que podeu utilitzar per a crear múltiples fotos amb marca d'aigua d'una sola vegada. Heus aquí com funciona. Escolliu Seleccioneu (o premeu la tecla B) per obrir l'eina . Arrossegueu les fotos per a les que voleu crear marques d'aigua des d'ún àlbum de digiKam cap al plafó per afegir-les a la cua actual. Feu clic a la pestanya en el plafó i feu doble clic sobre l'eina per afegir-la al plafó .

digiKam can use text or images as watermarks, and you can choose the desired watermark type in the pane. If you want to use the type, make sure that you already have a graphics file handy. Specify then the available settings such as , , and . Next, select the target folder in the section of the pane. In the section, you can specify what the system should do if it detects a file with the same name as the processed one in the target folder. You can either choose to overwrite the existing file or rename the processed file before saving it. You can also use the options available in the section to specify a renaming rule to automatically rename the processed files.
Once you are satisfied with the settings, hit the button, and once digiKam’s finished, you’ll find the watermarked photos in the target folder.
