Digikam/Brug digiKam med MySQL
Brug digiKam med MySQL
Fra Dmitri Popovs blog, 15. oktober 2010
Som standard bruger digiKam SQLite som database-motor til at gemme vigtige metadata og miniaturer; men fotohåndteringsprogrammet understøtter også den populær databasemaskine MySQL, og der medfølger et værktøj til overflytning af databaser, som kan hjælpe dig med at flytte dine data fra SQLite til MySQL. Selvfølgelig spekulerer du nok på, hvorfor du skulle ønske at skifte til MySQL, når SQLite allerede klarer håndteringen af dine data godt. Brugen af MySQL som digiKams databasemaskine lader dig gemme data på en ekstern server. På den måde kan du bruge flere forskelige installationer af digiKam (fx på din bærbare og din stationære maskine) til at tilgå og håndtere din fotosamling. Du kan også bruge MySQL-værktøjer til at lave backup og analysere digiKams data.
Obviously, to use digiKam with MySQL, you need a MySQL server. You also have to create two MySQL databases: one for storing photo metadata (e.g., digikam) and the other for storing thumbnails (e.g., thumbnails-digikam). And before you proceed, note the database connection information such as MySQL server address, user name, and password — you’ll need it when configuring MySQL settings in digiKam.
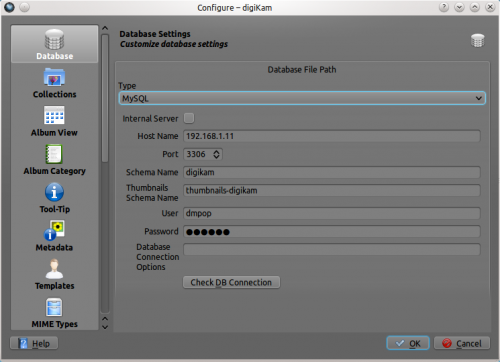
There are two ways to switch digiKam from SQLite to MySQL. If you’ve just installed digiKam, and you haven’t yet added any collection to it, choose , and switch to the section. Select the item from the drop-down list.

Enter the IP address of your MySQL server in the field and specify the correct port in the field (the default port is 3306). In the field, enter the name of the database for storing photo metadata, and specify the name of the database for storing thumbnails in the field. Enter your MySQL user name and password in the appropriate fields. To check whether the database connection works properly, press the button. If everything works as it’s supposed to, switch to the section, and add the directories containing your photos. Hit , and wait till digiKam populates the databases with data from photos. This can take a while if you have a lot of photos.

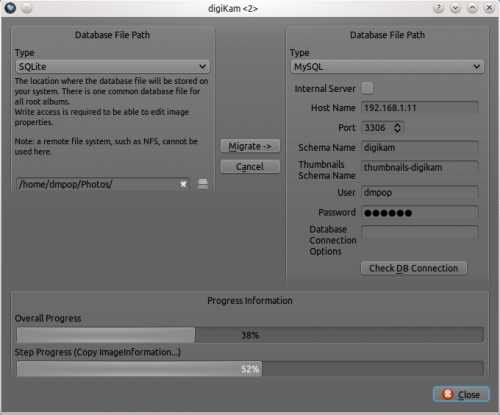
If you are already using digiKam with SQLite, you can use the database migration tool to move the existing data to MySQL databases. Choose , and select the item in the drop-down list in the right section. Fill out the required fields as previously described, and use the button to test the connection. Finally, press the button to copy the data from to .
